Asparagus (Asparagus officinalis)
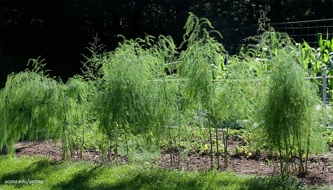
Asparagus (Asparagus officinalis) is an attractive, delicious, and nutritious perennial vegetable that can produce spears for 10-15 years once a bed is established. It is a hardy, cool- loving crop that sends spears out of the ground when soil temperatures are above 50 degrees F. The plant does best in full sun to part shade. Asparagus plants are dioecious which means that the male and female flowers are borne on different plants. The preferred male plants live longer, emerge earlier in the spring, and do not produce fruit that will compete with the roots and crown for nutrients. The female plant produces red berries in summer. The energy used for producing fruit reduces the amount and size of spears, which is why male plants are preferred. The asparagus plant will grow into a fern if the shoots/spears are not harvested. An established plant can produce 1/2 pound of spears per foot of row in spring and early summer with planned harvesting. Asparagus is a low calorie, high fiber food that contains Vitamins A, C, K and folate.
Growing Conditions
- Asparagus grows best in well-drained loamy soil. Asparagus roots that sit in water-logged soil may develop root/crown rot.
- Plants prefer a soil pH of 6.5-7.5 and will do poorly if the soil pH is less than 6.0. Prior to planting, send soil samples to the UConn Soil Nutrient Analysis Laboratory to determine nutrient levels and if limestone should be added prior to planting.
- Plants should be located in frost-free areas since young spears can be damaged by frost or light freezes.
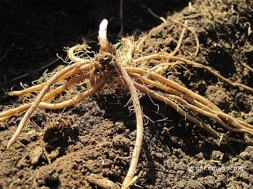
- Asparagus grows from an underground root system attached to an underground stem called a rhizome; small feeder roots absorb nutrients and water.
- Asparagus plants grown from seed are called crowns. When starting plants from seed, add one additional year before harvest as these seeds are slow to germinate and take 3- 4 months before they can be set outside.
- One, two, or three-year-old crowns with developed roots, can be purchased for a quicker harvest. However, one-year-old crowns are preferred since older crowns may have developed over-crowded roots that could be damaged when harvested. Examine purchased crowns for signs of developing buds and lack of disease or insects. The roots should be full- not shriveled - firm, and moist. If the crowns cannot be planted within a few days of purchase, keep them moist, away from freezing temperatures, and in a cool place. Alternatively, prevent them from drying out by heeling them into cool, moist soil in a shady location.
- Choose asparagus crown varieties that are Fusarium resistant.
- Asparagus can be planted in early April to late May as soon as the soil can be worked. When choosing a location, keep in mind that an established asparagus bed may last 10-15 years. It should be placed on the edges of the garden, preferably on the north or east side, in an area where the 6-8 foot ferns will not block sunlight from other plants. Planting at the edge of the garden also prevents the plants from being disturbed when working on other parts of the garden.
Planting Instructions
- Add compost to the area and any soil amendments to meet pH and mineral requirements. Apply 1.2 lb. of 10-10-10 fertilizer per 100 feet prior to planting. All lime and fertilizer materials should be thoroughly incorporated into the soil to a depth of 10 to 12 inches before planting. This will make phosphorous immediately available to the crowns and will encourage vigorous yields.
- Dig a furrow 6-8 inches deep and space rows 12-18 inches apart. Place the crowns 1 to 1- 1/2 feet apart on small mounds within the furrow to allow the roots to spread around the crown. After planting, back-fill the furrow with about 2 inches of soil, firm the soil around the crowns and water. As the spears appear, add 1-2 more inches of soil without completely burying them. The furrow will eventually be filled to its original level during the growing season.
- Placing the crowns at the right depth will ensure that the spears emerge when danger of frost has passed and provide strong growth.
Cultivation
Water
- Asparagus needs thorough watering during the first growing season. While the crowns are getting established, plants should be watered weekly until the soil is moistened to about 8- 10 inches. Once established, plants can tolerate some drought but need water during long, dry periods when they should get 1-2 inches of water per week.
- Do not overwater to prevent water-logged soil. If possible, use drip irrigation to prevent disease from getting established on wet foliage.
Weeding
- Weeds compete with the crop for water and nutrients. They also reduce the air flow around and between asparagus plants resulting in spears or foliage that stays wet for longer periods after rain or irrigation, promoting plant diseases.
- Weed the beds early in spring before spears emerge. Using a hoe can reach too deeply and risks damaging roots. Weeds should be hand-pulled in home garden asparagus beds. Place weed-free mulch such as straw around the plants to reduce weed seed germination and to conserve moisture.
- Developing ferns can need support from wind. Do not remove ferns but leave them to die naturally from frost.
- The red berries that develop on female asparagus plants have many seeds that can produce so many volunteer plants that they become weeds. Remove them during regular weeding.
Fertilizing
- It is good practice to re-test the soil every three years after the bed is established to monitor pH and fertilizer needs.
- Asparagus does not need additional fertilizer during the growing season but it will benefit from a light top dressing of 1/2 to 1-inch of compost or manure at the end of the summer or in the spring before spears emerge. However, using compost or manure to top dress the beds can affect the pH or nutrient balance of the soil.
- Experts at the UConn Soil Lab recommend using a 2 step process: add some compost, mix it in, wait a few weeks and then test the soil to see if any amendments are needed.
- Alternatively, use a loamy garden soil to top dress the bed. Then apply a balanced (10-10-10) fertilizer at the rate of 2.5 pounds per 100 square feet after ferns die back in the fall or in the spring before spears emerge instead of top dressing with compost or manure without a soil test.
- Work any amendments into the soil very lightly and no deeper than 1-2 inches to prevent damage to crowns or roots.
Harvesting
- Buds should appear in 10-12 days once the soil temperature is above 45-50 degrees. Do not harvest spears for the first or second year after planting. Allowing the spears to grow into ferns during these two years will help the plant store nutrients in the roots that are necessary for the following year's growth.
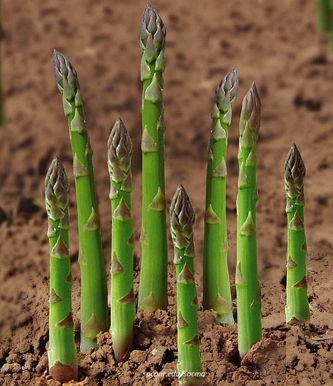
- Harvest spears when they are about 6-8 inches tall and about as thick as a little finger. Choose spears when heads are tight. Cut or snap off the spears at ground level. During the first harvest year, take spears for only 2 weeks then allow ferns to develop. After that first harvest, cut spears for about 6-8 weeks, until about mid-July at the latest.
- After harvest and in preparation for winter, ferns can be cut down to about 2 inches and covered with mulch, chopped leaves or straw. This will help deter early spring weeds and add some nutrients. See the fertilizer section for post-harvest recommendations.
Common Insect Pests
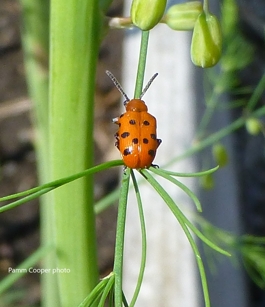
Asparagus Beetle: there are 2 types of asparagus beetle – the common (CAB) and the spotted (SAB). Both cause browning and scarring as they feed on the stalks. The common type is found more often and causes more damage to the plant since the larvae and adults also eat the ferns. If significantly defoliated, the plant will be weakened and will not provide enough nutrients for the growing spears during the next growing season. Damaged plants are also more susceptible to fungal infection.
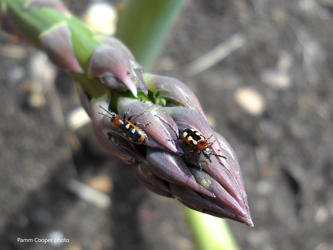
The Common Asparagus Beetle is about 1/4 - 3/8 inch long. The head, legs and body underside are smooth, shiny blue-black. The wings have 3 large, whitish spots on each wing cover, with a red outline.
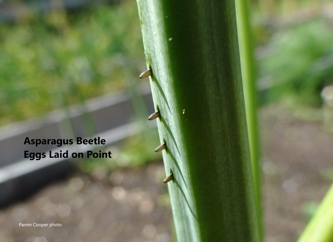
- Eggs are deposited in rows along the stalk in groups of 3-10 and are usually dark brown. Eggs hatch within a week of deposition and move to the stalks and ferns to start feeding.
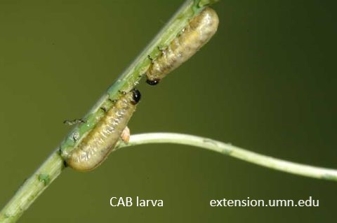
- Larvae are wrinkled, have a slightly humped back, with a grey, brown or black head and legs. They go through 4 stages of growth as they feed for about a week until maturity, fall to the ground and pupate in the soil.
- Adults emerge in about 7 days to start another generation. The adults feed on ferns until September when they look for loose tree bark or hollow stems of asparagus plants to overwinter. They emerge in the spring as new spears are appearing.
The Spotted Asparagus Beetles (SAB) adults differ in several ways from the common asparagus beetle. The spotted variety is about 3/8 inches long and is tan to orange with 6 black spots on each wing cover. SAB adults will feed only on the spears but will lay their eggs on the ferns and then the larvae will feed on the berries of the female plants. The adults emerge in May, later than the common asparagus beetle. Adults will chew on young spears, making them unsuitable for sale. They will have 2-3 generations per year. When present, monitor and manage them as for the common asparagus beetle.
Monitoring should begin as soon as the spears begin to emerge. Look for them in the afternoon when they are active. Remove any eggs by hand, dropping them, larvae and adults into a container of soapy water. Practice regular monitoring since new adults can fly into the garden. Harvest spears every day to prevent any eggs from hatching and to reduce feeding sites. To discourage both types of beetles in the asparagus garden, remove plant debris in the fall to reduce areas where adults can hide and survive.
Control beetles by encouraging beneficial insects such as the tiny green parasitic wasp and lady beetle larvae and other insects that can reduce the number of feeding beetles. Use of pesticides should be considered carefully since they can damage both helpful and harmful insects. Avoid using pesticides when plants are flowering since they may harm foraging bees. Also check the label when considering pesticide use to ensure the number of days between application and harvest is followed.
Cutworm-Cutworms arrive as night-flying adult black and tan moths that produce dark grey to black 2- inch caterpillars. The caterpillars hide in the soil near plants during the day and feed at night. Eggs are laid in grasses or weeds in May or June, hatch after a few days, then emerge to feed. The larvae are called cutworms because they curl around the plant stem and feed on it, which cuts off the stem at or below the soil surface. The plant may also appear wilted if the stem is only partially chewed through. Monitor the soil within 12 inches of the damaged plant by sifting through clumps of soil and/or checking nearby hiding places. When disturbed, the cutworms will curl into a “c” shape. Physically remove any larvae and drop them into soapy water. Make the garden environment unattractive for cutworms by removing weeds or plant debris that may harbor larvae, and encourage beneficial predators such as parasitic flies and wasps. Use aluminum or cardboard collars pushed several inches into the ground and extending above ground around new plantings to prevent larvae from crawling onto the plants.
Asparagus aphid- This insect overwinters on asparagus debris left in the field. The eggs are laid by small grey-green adults in the fall and the nymphs that emerge in the spring are capable of reproducing every 10-20 days. Signs of aphid presence include twisted and curled or yellowed leaves, deformed or dead shoots and abnormal plant growth on the lower portion of the fern. Accumulation of honeydew, a sticky secretion produced after aphid feeding, does not harm the plant but can attract other insects that feed on it. Sooty mold is a dark fungus that can grow on the honeydew. While unsightly, it is not harmful to the plant. Control asparagus aphid by removing dead material during fall cleanup and harvesting spears regularly in the spring to minimize their food source prior to fern growth. Spray plants with a strong jet of water to dislodge the aphids, introduce beneficial insects such as lacewings or ladybeetles, or use horticultural oil or insecticidal soap.
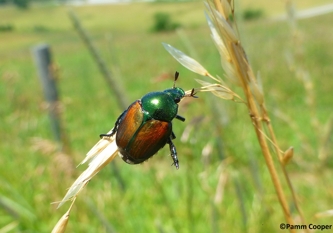
Japanese beetles-This green and bronze metallic-looking beetle overwinters in the soil as a grub, a creamy-colored, tiny, plump body with a brown head that feed on roots, and often on grasses. The grubs emerge as beetles in mid-summer. Scout for them beginning in midsummer through September. Handpicking as a control method is effective. This beetle has a habit of dropping off the plant when disturbed so hold a container of soapy water below it, tap the plant or the beetle so that it falls into the water.
Common Diseases
Fusarium root and crown rot (Fusarium spp.) - worldwide, this causes the most economic damage to asparagus crops. Caused by two species of fungi in the Fusarium genus, the symptoms include stunted growth, yellowing and wilted leaves and crown dry rot. Reddish-brown, oval lesions can appear on the asparagus stems and in the stem’s center and roots appear rotted. Once infected, the fungus will persist in the soil for a long time.
Control includes not planting for at least 5 years in fields where asparagus has previously been grown, treating seeds with hot water or disinfectant to ensure disease-free seedlings, and avoiding excessive cutting periods which can weaken the plant. Practicing good cultural habits and planting resistant varieties of asparagus also help Fusarium root and crown rot from becoming established in a growing area.
Asparagus rust (Puccinia asparagi) - this wind-borne fungal disease only infects asparagus, is found world-wide and causes damage to the bushy parts of the plant in successive stages. Initial symptoms include somewhat inconspicuous yellowish spots on stems in the spring. As spores of the fungus move into mature stages, other symptoms of infection include blister-like brown, powdery spots (pustules). As summer progresses into fall the brown spots turn black. Spores over-winter in the bushy plant residue and germinate in the spring. Wet or foggy, windy weather and high humidity promote the spread of the fungus. If asparagus rust persists in asparagus beds the crowns and roots will be affected, leading to smaller and fewer spears.
Control: remove and dispose of infected plants away from the garden (do not put into a compost bin) and remove any volunteer asparagus plants that may harbor additional spores. Treatment with a fungicide spray does not guarantee the bed will be disease free.
Purple spot lesions-Caused by the fungus Stemphylium vesicarium, this produces sunken, purple, oval-shaped lesions that appear on stems and ferns. It has a similar life cycle and generally affects asparagus ferns the same way as the asparagus rust fungus.
Purple spot lesion (Stemphylium vesicarium), this fungal disease produces sunken, purple, oval-shaped lesions that appear on stems and ferns. It has a similar life cycle and generally affects asparagus ferns the same way as the asparagus rust fungus.
Despite good cultural practices, pests and diseases at times may appear. Chemical control should be used only after all other methods have failed. For pesticide information or other questions please call toll free: 877-486-6271.
UConn Home and Garden Education Center, 2020.
Issued in furtherance of Cooperative Extension work, Acts of May 8 and June 30, 1914, in cooperation with the U.S. Department of Agriculture, the Dean of the College, Cooperative Extension System, University of Connecticut, Storrs. The Connecticut Cooperative Extension System is an equal opportunity employer and program provider. To file a complaint of discrimination, write USDA, Director, Office of Civil Rights, Room 326-W, Whitten Building, Stop Code 9410, 1400 Independence Avenue, SW, Washington, DC 20250-9410 or call (202) 720-5964