Seed Starting
Starting seeds indoors is a great way to get a jump on the growing season especially in areas such as Connecticut where the soil is warm enough for growth for only 4-5 months. Seedlings that have a 4-6 week headstart indoors can extend that period. Check packets for days to harvest to determine when seeds will need to be started indoors. Starting plants from seed also enables the home gardener to try new varieties and access a greater scope of plants than may be available in local garden center. Purchase seed packets that contain the amount of seeds that will be used in one season. Larger packets may be a bargain but will go to waste if the contents exceed the requirements. Consider splitting a packet of seeds with a friend if you would like to try some different varieties. Here is a link to our fact sheet of Seed Companies.
- Avoid using garden soil; it compacts easily and it can introduce disease-causing organisms.
- Use seed labeled for the current year when at all possible. To check older seed for viability place 10 seeds on a damp paper towel and keep moist until germination. Six to10 germinated seeds are a good sign. If the germination rate is lower, 2-3 seeds can be planted in each cell. Thin to just one seedling if necessary.
- Mix and moisten enough soilless seedling starter mix for all your containers. If possible, use containers that are similar in size. This will help standardize seeding, watering and transplanting. Fill the containers with the same amount of the soilless media.
- Follow the recommended planting depth on the seed packet when sowing seeds. This is generally 1-1/2 to 2 times the width of the seed, though some seeds must be "surface sown" meaning they should not be covered at all.
- For starting seeds in a tray, draw a light line in the potting soil with a pencil or stick and then space the seeds a thumb’s width along that line. Generally, onions and leeks can be started in a tray with little damage to their roots when they are transplanted.
- Most seeds are started in flats of individual cells. If trays from last year are being reused they should be cleaned with a 10% bleach solution and rinsed thoroughly.
- Fiber or paper pots that will decompose in the soil are good for raising seedlings that do not transplant well such as cucumbers and squash. Trim the pots to below the soil level when transplanting to prevent moisture from wicking away. Carefully tear or cut away the bottoms so that roots can easily spread out.
- Label containers clearly with masking tape or wooden plant labels using an indelible marker with the name and planting date.
- Maintain even moisture. Seeds must stay moist to germinate properly. Once a seed dries out, it will not germinate.
- Plastic domes, cling film or even clear plastic bags can cover the trays and hold in moisture until germination.
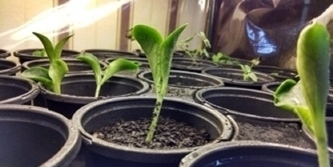
- Good light is essential. Once signs of germination are noticed, move the seed trays to a light-filled area. Seedlings need full sun from a south or west-facing window but should not be placed on a drafty windowsill wit fluctuations of temperatures over the course of a day. The most consistent choice is using fluorescent lights positioned 2 to 3” above the foliage. Use a timer to keep fluorescent lights on for 12 to 16 hours a day..
- Most seedlings like to be warm. Place the containers in a warm spot (70 to 75° F) or on top of a heat mat although a heat mat will dry the soil more quickly. Do not plug a heat mat into the same timer as lighting fixtures.
- Keep the soil moist, but never wet as this encourages damping off (see below). At first, lightly mist the media to keep the seedbed moist. Once seedlings emerge, water more deeply. Check daily and do not let the soilless mix dry out.
- Wait to fertilize until the seedling’s true leaves (the second set) appear. Then use a ¼ strength solution of a high-phosphorus fertilizer (e.g., 5-10-5), which will help the seedlings develop a strong root system. When the seedlings have one to three sets of true leaves, transplant them to a larger container if necessary.
- Seedlings will benefit from air movement either from a fan or by running your hand lightly over the tops of the seedlings. This will encourage the seedlings to develop stronger stems.
- Seedlings can be transplanted to larger containers if they outgrow their first cell packs or begin to get leggy. Never hold a seedling by its stem. Use a spoon to gently lift the root ball to its new container. Tomato seedling stems can actually be buried below the soil surface as this will encourage roots to grow in that area.
- Two weeks prior to transplanting seedlings will need to be hardened off. (see below)
- Keep a log for future reference.
- Seeds left over may be stored in an airtight container in a cool location.
Damping Off
Damping off can be a serious problem with seedlings. The fungi, Rhizoctonia spp. and Fusarium spp., along with the water mold Pythium spp. are the most common pathogens responsible for damping off. Using sterilized trays, tools, and potting medium can help prevent damping off. Damping off pathogens thrive in cool wet conditions. Low light, overwatering, high salts from over fertilizing and cool soil temperatures are all associated with increased damping off. A heating pad set to 70-75° F may protect seedlings. Clean tap water in the same temperature range should be used.
Hardening Off
Seedlings may be placed outside for a few hours in the shade during the warmth of the afternoon. Choose a spot protected from wind. Bring them back inside for the night before temperatures start to drop. Each day, leave the plants out a little longer, and expose them to a little more direct sunshine. By the end of about two weeks, unless freezing temperatures are forecast, the seedlings can stay outside in a sunny area until you are ready to transplant them into the garden.
Coldframes, temporary mini-greenhouses, may also be used for hardening off. The lids of coldframes are easily adjusted as needed, opening a bit more each day to accustom plants to the wind and cold and closed at night to protect from freezing.
Once hardened off, seedlings can be transplanted to the garden. Transplanting should be done on a cloudy day or late in the afternoon when the sun is past its peak. Hardened off plants may droop a bit but should recover. Row covers can provide protection from wind and temperatures until seedlings are acclimated.
UConn Home and Garden Education Center, 2017, revised 2022
Issued in furtherance of Cooperative Extension work, Acts of May 8 and June 30, 1914, in cooperation with the U.S. Department of Agriculture, the Dean of the College, Cooperative Extension System, University of Connecticut, Storrs. The Connecticut Cooperative Extension System is an equal opportunity employer and program provider. To file a complaint of discrimination, write USDA, Director, Office of Civil Rights, Room 326-W, Whitten Building, Stop Code 9410, 1400 Independence Avenue, SW, Washington, DC 20250-9410 or call (202) 720-5964