Newspaper Articles

Keep your Perennials & Annuals Looking Fabulous All Season Long!

By: Heather Zidack, UConn Home & Garden Education Center

Geraniums and other flowers in a mixed container
Geraniums benefit from regular deadheading. They’re great for beginners because it is easy to tell the difference between new and spent flowers. Photo by H. Zidack

Hanging baskets, planter boxes and perennial gardens that are bursting with color are seldom planted in spring and left untouched until autumn. Deadheading, pruning, trimming and pinching are all techniques that gardeners can use to get that perfect look all season long. While it may be intimidating, this simple task can result in a huge visual impact with only a little effort. Through a series of pruning techniques, we manipulate our perennials and annuals to give us the most beauty we can get out of them in such a short season. It is important to recognize that cutting healthy flowers or shoots can help plants in the long term – no matter how much it may pain us as gardeners to do so.

Deadheading is a widespread practice where gardeners remove flowers that have gone by. One of the first things to become aware of is the difference between a bud and a spent bloom on the plant you are working on. Many gardeners will snip petunia buds, mistaking them for spent flowers. It is important to be vigilant with these cuts. Remember that your plant's goal is to reproduce, and they use flowers to do so. By removing the flowers, you are stopping the plant from producing seed and encouraging it to restart the cycle – meaning more flowers for you!

Some gardeners will select “self-cleaning” varieties of annuals that will shed their flowers without the need to deadhead all summer long. In general, these may not produce seed; therefore can easily restart the process themselves.

The whole practice of deadheading, pinching and trimming herbaceous plants can be boiled down to redirecting the plants energy into different purposes. Where deadheading helps to clean spent flowers, pinching will remove new buds before they bloom. If you want to encourage beautiful single stem cut flowers, for example, you may decide to pinch lateral (side) flower buds to force the plant to put all its energy into a single bloom at the top. Alternatively, pinching the terminal (top) bud will give you many smaller flowers on one stem, creating a fuller appearance.

This same principle applies to pinching shoots of herbaceous plants to make them fill out more. Cutting further down a stem will again remove that terminal bud and cause the plant to focus its energy on new shoots that come from nodes further down the stem. Think of how full your basil plants flush out when you harvest fresh herbs.

Torenia hanging basket
Torenia is considered a self-cleaning annual that is great for shade and is loved by hummingbirds! Photo by H. Zidack

Often, gardeners will notice that in mid to late summer their hanging baskets will start to look “tired.” They may notice prolific flowering on the ends that hang down, but often see that the center of the basket is not as full or may even be dying out. The first thing to check for is to make sure that you are watering them regularly. Because hanging baskets are suspended in the air and uninsulated, they will dry out faster. When you are trimming herbaceous plants for growth you can take one third of the plant volume away at a time, safely. Think about it as playing hair stylist! Cut back one third of the longest growth at the ends, and watch new growth come from the roots. It may also help your hanging baskets to remove any branches that have been shaded or dried out in the interest of “lightening” the growth that is hanging down.  Again, you may lose flowers for a week or two – but the result down the road will be beautiful!

For perennial gardens, June is a wonderful time to do some pruning as well. Cutting back early flowering perennials can encourage a second flush of flowering in some species. This works exceptionally well for plants like Salvia, Nepeta, and Lavender. Deadheading throughout the season will help plants like roses and Echinacea continuously flower. And pinching can help perennial mums form their shape for the fall.

Summer is a stressful time for plants! Disease, pests, and extreme weather can all contribute to a stressful environment. Our New England summers can promote these pressures with high heat and humidity levels. During these times, pay careful attention to your watering habits and adjust, as necessary. In times of drought or excessive heat, plants will use water faster for hydration and cooling, just like we do. Being aware of this can help you know when to check for water and help you be more diligent with your watering practices. Using a balanced, water-soluble fertilizer can also promote plant health and reduce stress in perennials and annuals. This is why it is great to fertilize after pruning and deadheading. If you need more information on trimming, watering, fertilizing, or any other gardening questions, feel free to contact us, toll-free, at the UConn Home & Garden Education Center at (877) 486-6271, visit our website at www.homegarden.cahnr.uconn.edu

Luscious Lemony Herbs

By Dawn Pettinelli, UConn Home & Garden Education Center
With summer almost around the corner, many of us are setting in vegetables and herbs in hopes of preparing delectable culinary delights as these plants mature. Aromatic herbs bring amazing flavors and zing to all sorts of savory and sweet concoctions. A citrusy taste complements many dishes and some may not be aware of the wealth of lemon-flavored herbs that are widely available and also easy to grow.

Lemon balm plants up close.
Lemon Balm in the garden. Photo by dmp2024

Long-lived lemon balm has been a staple in my herb garden for years. The attractive heart-shaped, scalloped leaves have a delicate scent when rubbed. Lemon balm is a hardy perennial native to Europe and has long been grown for its culinary and medicinal purposes. Fresh or dried leaves can be made into a calming tea that reputedly reduces anxiety. They can also be used in savory chicken dishes, to make pesto and even in baked goods. The lemon balm I grow is the species and it produces flowers that, like many members of the mint family, are loved by bees. A dilemma ensues as to whether to leave the blossoms for the pollinators and deal with the copious seedlings that pop up the following year, or cut the plant back to encourage more leaf production. Also, once lemon balm flowers, the leaves take on an unpleasant ‘soapy’ taste. Cultivars such as ‘Compacta’ are sterile, so no seeds are produced.

As long as it is grown in a well-drained soil, lemon thyme is another long-lived herb. Growing just 4 to 6 inches tall, it’s an attractive plant in the herb garden, as an edging plant or even as a front border plant in perennial gardens. There are green, golden, and variegated leaved cultivars. Sprigs of lemon thyme can be dried but I like to use them fresh in chicken or rice dishes. The pinkish flowers usually open in July and are a big pollinator draw. Like many herbs, the best flavor is obtained collected before flowering. Plants respond well to regular trimmings.

Lemon basil is an annual in our climate but easily grown from seed. Like all basils, it does best in a sunny, fertile site with adequate moisture. Plants also do great in containers. Leaves have a fresh lemony scent and taste with some hints of mint and spices. If growing from seed, one might want to try ‘Sweet Dani’, which was a 1998 All America Selection winner. Named cultivars such as ‘Mrs. Burns’ lemon basil usually have larger leaves than the seed grown types. Pinch out flower stalks as they form for better flavor or for a longer and more abundant harvest, cut off the top third of your plants about once a month. This encourages greater branching and leaf production. Lemon basil rice is my favorite way to use fresh leaves.

Lemon grass in a garden bed.
Lemon grass in the garden. Photo by dmp2024

A tender perennial, lemon verbena, is mostly grown as a container plant and overwintered indoors. Plants have an exceptionally strong lemon scent and if happy, grow quite vigorously. They can easily get 3 or 4 feet tall and will grow into a small tree in warmer climates. Lemon verbena is native to South America, so it enjoys full sun and hot weather. Leaves can be used in potpourris, teas, and sweets.

Another tender perennial best grown in a pot is the lemon scented geranium. There are several named cultivars with some, like ‘Mabel Gray’ and ‘Rober’s Lemon Rose’, having a stronger scent. Either buy plants or start from a friend’s cutting. The lovely scented wavy leaves can be placed in the bottom of a cake or loaf pan and then filled with batter and baked, imparting a lovely pattern and slight lemony flavor. They can be used fresh or dried for a variety of culinary uses and are also good in potpourris.

Those enjoying Asian cooking are likely already familiar with the rich flavor of lemon grass. While it is native to India and only hardy to zone 10 to 12, it is a pretty vigorous grower that would do well in either a garden bed or container. Reportedly plants may reach 2 to 3 feet in height by midsummer if kept well-watered. The leaves as well as the bulbous base of

the stem are used in recipes. A few stalks can be removed as needed for cooking. Cut back potted plants to 6 inches before overwintering in a sunny window indoors.

For more information about growing lemon scented herbs or on other gardening topics, feel free to contact us, toll-free, at the UConn Home & Garden Education Center at (877) 486-6271, visit our website at www.homegarden.cahnr.uconn.edu or contact your local Cooperative Extension Center.

Tying Climbing Roses

By Marie Woodward, UConn Home & Garden Education Center

Climbing roses tied to a vinyl fence.
Photo by Marie Woodward

Climbing and rambling roses are a beautiful addition to any garden, adding height and depth to your outdoor space. These types of roses require proper training and tying to ensure that they grow in the desired direction, produce the most blooms and don’t become tangled or unruly.  Follow this guide on how to tie climbing and rambling roses to get the best results. 

Gloves, wire, hooks and pliers laid out on a table.
These tools are needed to train your climbing roses. Photo by Marie Woodward

For materials, one would need some twine or soft plant ties, a sharp pair of pruning shears, sturdy long-sleeved, thorn resistant garden gloves. Also, some wire and tools to secure to a trellis, fence or other structure may be necessary.

Climbing roses have two types of canes. Main canes are stems that originate from the base of the rose giving it its structure and support. They are also referred to as leaders. Lateral canes originate from the main cane. It is the lateral canes that produce the flowers and add volume to the shrub. In general, main canes are not pruned unless they are diseased or dead.

Before you start attaching the plant to a trellis, make sure that your rose is properly pruned. Removing any dead or diseased canes will encourage healthy growth. Cut back any wild or overly long shoots to create a manageable framework for tying. Starting with this step will allow for more control as you move through the process of tying.

Supportive wiring, better known as strain wires, helps to promote flowering. They hold the main canes at a 45–90-degree angle. These angles encourage lateral canes to flush and produce more abundant flowers.  

A rose cane tied to wire supports on a vinyl fence.
Attach your rose canes to strain wires with soft ties. Photo by Marie Woodward

If you're training your roses against a wall or fence, attach the horizontal strain wires to the structure, spacing them about 12-18 inches apart vertically and 5 feet apart horizontally.

 If you have a vinyl fence you can use vinyl safe hooks and secure the wire with a turnbuckle vertically, spacing them about two feet apart to avoid drilling holes in the vinyl material.

Using twine or soft plant ties, attach the rose canes to the support structure at regular intervals, starting about 1.5 feet from the ground. Tie them securely but not too tightly  You want to allow room for the canes to grow and expand. Avoid fishing lines or other rigid materials. Using the wrong ties or tying too tightly could lead to cane injury.

As the roses push new growth, continue to tie the new main canes to the support structure.  Continue to guide them in the desired direction, with those 45–90-degree angles as a guide.

Regularly check your roses and adjust the ties as needed.  Ensure that they remain secure but not too tight. Prune any wild or unruly shoots and remove any dead or diseased wood to keep your roses healthy and under control.

By following these steps and regularly maintaining your climbing rose, you’ll create a stunning vertical display that adds beauty and depth to your garden. While this guide provides good tips on for starting and maintaining younger climbing roses, older roses that have been neglected may need restorative measures. If you need more information on climbing roses or any other gardening questions, feel free to contact us, toll-free, at the UConn Home & Garden Education Center at (877) 486-6271, visit our website at www.homegarden.cahnr.uconn.edu

Tips on Selecting a Flowering Tree

By Dawn Pettinelli, UConn Home & Garden Education Center

If there’s a spot for a spring flowering tree in your landscape, now is the time to look at the trees showing off their floral splendor. Do you find one or two particularly appealing. Take note of the various flower colors, tree shapes and sizes. Once you’ve selected an alluring flowering tree or two, do a bit of homework.

Many of the spring flowering trees have several cultivars and they may vary in flower color, leaf variegation, mature height and width, fall color and so on. Pick the one that fits your location. Will the plant be in sun or shade? Is it going to be positioned as a specimen tree or incorporated into a foundation planting or a border? Will it add multi-season interest with attractive foliage, fruits or seed pods, or interesting bark? What insect or disease problems is it prone to?

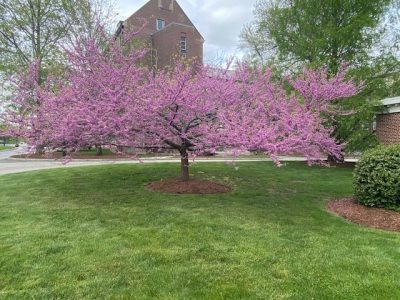
A redbud tree in flower on the UConn Campus
A redbud tree in flower on the UConn Campus. Photo by dmp2024

Redbuds (Cercis canadensis) are bursting with blossoms right now, at least on the Storrs campus. The extremely abundant, purple-pink peas shaped blossoms practically cover the tree. At maturity, trees reach about 20 to 30 feet tall with a slightly larger width, ending up in a roundish shape with a flatter top. After flowering, heart-shaped leaves develop while faded blossoms give birth to small, flattened legume seed pods that contrast nicely with the plant’s dark, scaly bark. Cultivars are available with white or more true pink flowers, variegated foliage, weeping forms and attractive fall foliage colors. Redbuds tolerate full to part sun and well-drained soil but avoid hot, dry locations for best establishment and flowering.

Dogwoods are a favorite of many. Their pink, white or red colored bracts dazzle especially in filtered sunlight. Dogwoods are native to the eastern and central United States where they are usually found as an understory tree. Most cultivars grow to about 30 feet in height with about the same width at maturity. The large 4-inch blossoms mature to form shiny red fruit much loved by birds. These exceptionally beautiful plants favor a cool, moist, acidic soil with adequate amounts of organic matter. Dogwoods struggle when faced with heat stress, drought, and pollutants so site carefully.

Another flowering tree that also does best in more natural settings, especially those with moist soils is our native shadbush or serviceberry (Amelancher canadensis). The name, shadbush, comes from the fact that this plant typically blooms when the shad return to fresh water to spawn, usually right about now. This plant can be grown as a single stemmed specimen or a multi-stemmed large shrub. Mature trees reach about 20 feet in height but there are shorter, more shrub-like cultivars. Shadbush sports white flowers in 2-to-3-inch racemes. Dark fruits are attractive to many animals plus both the gold autumn foliage and gray bark are very attractive.

Carolina silverbells in flower.
Carolina silverbells in flower. Photo by dmp2024

A standout for me this time of year is Carolina silverbells (Halesia carolina). A multitude of white, bell-shaped blooms adorn the branches of this 20-to-40-foot tree. Although it is native to southeast U.S., it is hardy to zone 5. Autumn color is not notable, but the tan 4-winged fruit persist well into the winter and stand out against the stark winter landscape and silvery grey bark. Be sure to check out ‘UConn Wedding Bells’, a very floriferous cultivar discovered by UConn Plant Science professor, Dr. Mark Brand. It has a smaller, rounder form with flowers larger than the species.

The star magnolia (M. stellata), as its Latin name implies, is definitely a stellar landscape plant. Gorgeous, lightly fragrant 3-to-4-inch blossoms grace the dense cluster of stems. Mature plants reach up to about 20 feet with a slightly narrower width. Plants do produce red fruits but most drop before they mature. I was delighted to find a seedling after I lost the parent tree in that late October snowstorm we had a number of years ago.

Other worthy spring flowering trees to consider include the flowering crabapples and cherries that have many exciting and lovely cultivars. A great place for information on woody plants is the UConn Plant Database (www.plantdatabase.uconn.edu). If you need more information on selecting a tree or any plant for your landscape or on other gardening topics, feel free to contact us, toll-free, at the UConn Home & Garden Education Center at (877) 486-6271, visit our website at www.homegarden.cahnr.uconn.edu or contact your local Cooperative Extension center.


Eastern Tent Caterpillars

By Pamm Cooper, UConn Home & Garden Education Center

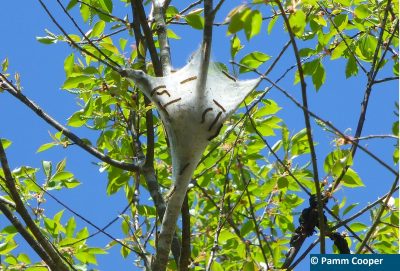
Eastern Tent Caterpillar Tents in a tree

Eastern tent caterpillars, Malacosoma Americanum, are native to North America and are noticed mainly because of the silken tents they build in the forks and crotches of trees in early spring. While most tents are found on black cherries, they can also be found on other trees such as apple and crabapple. They are readily visible since tents are constructed before leaves fully expand. There is only one generation per year.

These caterpillars are hairy and dark when small, and later instars have two yellow lines along the back. A white medial stripe goes along the sides of the body, and this is flanked by two yellow lines. There are blue blotches along its side as well. Bottom hairs on the body are rusty brown. Forest tent caterpillars are also hairy, but they do not make tents, and their bodies

are blue with white dots on the back. Handling should be done with gloves on as some people may have sensitivity to the hairs.

Egg masses are black, laid on small branches of host trees the previous year, and the egg mass rings around the branch. Sometimes they are mistaken for small black knot galls. 150-300 eggs may be in each egg mass. Caterpillars typically hatch as black cherry leaves begin to expand the next spring. Caterpillars feed on leaves and buds and rest communally by day in the nests they construct from silk.

While they can almost defoliate small trees, these caterpillars usually have completed their feeding stage in time for the trees to put out new leaves by early summer. The more tents there are on small trees, though, the greater number of caterpillars there are, so damage will increase.

While protected from many predators while inside the tents, there are birds that will tear the tents apart to feed on the caterpillars inside. Both the black-billed and the yellow-billed cuckoos are known for their ability to do this, and native vireos will also seek out and rip apart the tents.

Mature caterpillars leave the host plants in early summer in search of suitable sites to pupate within a silken cocoon they will spin. Moths emerge later that year. The moths have a fluffy light brown body, and the wings have three bands with the center being narrower than the outer bands and a lighter brown in color. The center band is bordered on both sides by thin, creamy bands.

Eastern Tent Caterpillar Tents in a tree

Occasionally, eastern tent caterpillars have outbreak years where large numbers of the tents can be seen on the same tree. Fresh buds may also be consumed if trees are severely defoliated. When found on residential properties, tents can be swept apart by rakes or brooms, exposing caterpillars to predators, or knocking them off the trees. If warranted, foliage can be sprayed with a biological product called Bacillis thuringiensis subspecies, Kurstaki, or BtK, which only harms caterpillars and not other insects. Caterpillars will ingest the product as they feed on the foliage.

Most healthy trees can tolerate severe defoliation from eastern tent caterpillars. If concerned, look for egg masses in the winter on trees that had been damaged the previous spring. Remove them, if possible, or crush them, or prune the branch off below where the egg mass is found. Or let them be if the trees appear to have recovered. Letting nature take its course with native insects on native trees can often benefit birds and other predators. Do not confuse them with the notorious gypsy moth caterpillars which do not make silken tents or nests of any kind.

If you have a question about tent caterpillars or other gardening topics, contact the UConn Home & Garden Education at (877) 486-6271 or www.homegarden.cahnr,uconn.edu or your local Cooperative Extension Center.


DIY – Grow Flowers for Cutting

By Dawn Pettinelli, UConn Home & Garden Education Center

Cut flower arrangment
Fresh cut flowers - Photo by dmp2024

Do you just love fresh flower arrangements for the table or even that single bloom in a vase by your bedside? Wouldn’t it feel great to just stroll out your back door, clip some blossoms, bring them inside and enjoy their beauty? There’s no reason that you can’t. Even a small yard or garden space can yield blossoms for cutting.

While many of us have flowering perennials and even woody plants that make for great arrangements, perhaps a dedicated cut flower planting would provide many more stems for cutting and not create any empty spaces in our garden designs. When planning your cut flower garden, first decide where it should go. The majority of blooming plants need at least 6 to 8 hours of sun each day, a well-drained, fertile soil and adequate water during dry spells. As with all garden plants, a soil test is a great way to find out what is needed to add to soils before planting but without a soil test, follow the directions on fertilizer packages.

There’s still time to prepare new beds for cut flower plantings but another alternative would be to turn over part of the vegetable garden to cut flower production. Probably your vegetable garden already has great soil and is located in a sunny area.

The hardest part of designing a cut flower garden is selecting what plants to grow. There are so many beautiful and exciting flowers to choose from. A good suggestion is to grow easy flowers at first and then progress on to more demanding ones. Another important factor to consider is which flowers need to be purchased as transplants (or started inside earlier under lights) and which can be easily grown by sowing seeds directly in the garden. While there are a number of flowering plants that can be started by direct seeding, you’ll get faster blooms if you purchase or grow your own transplants.

Zinnias planted in a row
Zinnias - Photo by dmp2024

Some that I typically grow each year from seed are zinnias, the tall African marigolds, cosmos, bachelor buttons, calendulas, nasturtiums, and some sunflowers. Cool weather calendulas and bachelor buttons can be sown now but wait until later in the month to plant the rest. A number of cutting annuals will self-seed if blossoms are allowed to mature and the beds are not heavily mulched. Some that spring up for me include ageratums, verbena, ammi, nigella, and wheat celosia. If you have some known self-seeders, wait a bit longer to prepare or till beds to see what sprouts.

Those best purchased as transplants include rudbeckia, snapdragons, cleome, stock, strawflowers, globe amaranth, tithonia, asters and amaranth. Some might have tiny seeds or be slower to germinate or just need a longer time until they produce flowers so starting with transplants may be a good option.

Two annual bulbs that are great for cutting are gladioli and dahlias. A few glad corms can be planted every other week until about mid-June to provide a summer full of spiky, colorful blooms. Dahlia tubers planted mid-May generally start producing blooms by late July but continue until a heavy frost.

There really are quite a few potential cut flower candidates to choose from. Feel free to select whatever colors and flower forms appeal to you most. From a designer’s viewpoint, consider what colors would be most compatible with where you want to place arrangements indoors. Also, whether making more formal arrangements or informal bouquets, flower shape plays a prominent role. Often the most attractive arrangements are filled with an assortment of shapes featuring a focal flower, spiky exclamation points, mounded shapes to hold the arrangement together, greenery for filling spaces and delicate airy springs to lighten the mood. I find mints, artemisia, and ferns make good fillers while grasses, kalimeris, boltonia, and white wood asters provide an airy touch.

The majority of annual flowers do fine at about a 9 by 9 inch spacing so you can pack them in pretty close. Do note that for copious blooms, a fertile soil and adequate water are essential. Maintenance also includes dead-heading, or removal of spent flowers to encourage the production of more blooms. Keep an eye out for plant pests as well.

Even beginning gardeners can set aside some space to grow beautiful flowers for enjoyment indoors. Try out a few this year, make notes on their performance and change up the plant rooster as they gain your approval or not.

For cultural information on growing various species of cut flowers or on other gardening topics, feel free to contact us, toll-free, at the UConn Home & Garden Education Center at (877) 486-6271, visit our website at www.homegarden.cahnr.uconn.edu or contact your local Cooperative Extension center.


Start Now For a Rosy Summer

By Dawn Pettinelli, UConn Home & Garden Education Center

A rose shrub in full bloom
Proper care of your roses will give you lots of blooms. Photo by dmp2024

The warmer days of spring will soon be upon us and it is time to think about spring rose care. Any winter protection such as mounded soil, mulch, leaves or rose cones that were placed around grafted bushes should be removed. Release any stems that were tied for winter protection. Fertilize your plants when new growth sprouts with a complete fertilizer such as 5-10-10 or and natural organic equivalent at the rate recommended by a soil test or follow the manufacturer’s instructions on the package. Generally, the fertilizer is sprinkled around the base of the plant and gently worked into the top of the soil.

Repeat blooming roses are heavy feeders and ideally should be fertilized monthly through July. Stop fertilizing at this time as later fertilizations may result in tender new growth late in the season that may not have time to harden off properly. Roses that bloom only once in June are usually only fertilized once in the spring. These include many ramblers and climbers, species roses and antique varieties. Rose books often recommend a dose of Epsom salts for each rose to supply magnesium. If you use a dolomitic limestone to modify the soil pH, however, the plants will most likely have enough magnesium available to them and additional magnesium will not improve growth or branching. Note that according to the American Rose Society, roses prefer slightly acidic soil so strive for a pH between 6.0 and 6.5..

climbing hybrid tea rose ‘Climbing Tangerine.’
This climbing hybrid tea rose is called ‘Climbing Tangerine.’ Photo by dmp2024

Most types of roses benefit from a spring pruning with the exception of climbing roses which are generally pruned immediately following flowering. Roses are pruned to improve their appearance, to remove diseased or dead wood and to increase the quantity and quality of flowers.

Polyanthas, floribundas and shrub roses do not require much pruning. Any canes that are damaged or broken should be removed as well as canes that are rubbing together. If just the tip of the stem is winter killed, cut back to sound wood just above a healthy bud. Rose bushes that are really overgrown can have about one-third of their canes removed from the base.

Hybrid teas and grandifloras usually require more severe pruning. After eliminating all dead and damaged wood, cut back to 18 to 24 inches. Make your pruning cuts at a slant slightly above a bud, preferably one oriented away from the center of the plant.

If your roses are grafted, it is also important to remove any suckers arising from the rootstock.

Spring is a great time to add a few more roses to your garden. Roses are soil either bare-root or as container plants. Those sold in containers can be planted either in partial leaf or full leaf. Mail ordered bare-root stock, however, should be planted when it is still dormant. It is best to plant bare-root roses as soon as you get them. If planting has to be delayed for a day or two, remoisten the packing material and store in a cool, shady location. When it is time to plant bare-root stock, unpack the plant and place the roots in warm water for an hour or two. Cut off any dead or injured parts and plant immediately after soaking.

Roses require a minimum of 6 hours of sun each day for maximum bloom. An area with good air circulation will cut down on disease problems. Soil type is not as important as drainage. Roses will not tolerate wet feet.

When planting grafted plants, set the bud union, which is the point where a rose cultivar is grafted to the root stock, about one inch below the soil level. Roses require about one inch of water per week. If at all possible do not get the leaves wet when watering as this promotes the spread of diseases such as black spot.

Roses benefit from the application of an organic mulch like shredded bark, pine needles or cocoa bean hulls. Mulches not only keep weeds down but help conserve moisture. If you have any questions on roses or other gardening topics, contact the UConn Home & Garden Education at (877) 486-6271 or www.homegarden.cahnr,uconn.edu or your local Cooperative Extension Center.

It’s Spring! Time to Feed the Plants!

By Dawn Pettinelli, UConn Home & Garden Education Center

Plants need nutrients to grow and develop just like we need vitamins and minerals. They get most of their nutrients dissolved in the water they take up with their roots. When we add fertilizer to the soil around our garden plants, we are adding vital plant nutrients.

Native Connecticut soils are typically low in pH and low in nutrients. Our native plants have adapted to our native soils but most of our garden plants are not from around here. Zinnias and tomatoes are from South America, bluegrass lawns and lilacs hail from Europe and rhododendrons from Asia. Our native soils may not supply the nutrients they need so it is up to us to do so.

Of course, the best way to know which nutrients and how much to add is with a soil test. April is a very busy month at the UConn Soil Nutrient Analysis Lab (www.soiltesting.cahnr.uconn.edu) but there is still time to get your soil tested before planting.

Without soil test recommendations, always follow the directions on the fertilizer package. Applying too much can injure your plants plus excessive nitrogen and phosphorus can wind up in our waterways. Before fertilizing, calculate out the square footage of your garden or lawn. You don’t need to measure exactly; you can measure a pace and then walk down the length and across the width of your gardens to get a rough estimate of area. For odd-shaped beds or lawns, break them down into more square, oval or rectangular areas and add them up.

All fertilizers come with 3 numbers on the package denoting the percent, on a dry weight basis, of nitrogen, phosphorus and potassium. Nitogen promotes green, leafy growth, phosphorus encourages fruits and roots, and potassium is for all round health and tolerance to stresses like drought, cold and disease. So, fertilizers with a higher nitrogen number would be most appropriate for turf grasses, trees and shrubs, while ones higher in phosphorus are generally used in vegetable and flower gardens.

Adding fertilizer to perennials with a watering can and a hand rake.
Fertilizer spread around a perennial. Photo by dmp2024

Whether you select a synthetic or natural organic fertilizer is a matter of personal choice. Both are beneficial to plants. For annual plantings, whether vegetable or flowers, it would be ideal to mix the fertilizer into the top 6 inches of soil. That’s where most of the roots will be so it makes sense that the nutrients they need are there too. Put down the fertilizer, as well as any limestone or other amendments shortly before planting. Long season annuals, like tomatoes, pumpkins and marigolds would appreciate a second application of fertilizer, referred to as side dressing, about 2 months after the first one.

As you are cleaning up your perennial beds and see the new shoots popping through the soil, add some fertilizer around plants and carefully scratch it in. Do the same for bulbs. It is harder to fertilize if the beds are heavily mulched. Not much fertilizer spread on top of mulch will make it to the plant roots. Rake or pull away the mulch, sprinkle some fertilizer directly to the soil around your plants and replace the mulch.

For trees and shrubs, fertilizer should be spread under the whole canopy as a healthy root system will grow at least as wide as the branches and perhaps even more so. Do your best to remove the mulch before fertilizing. Typically trees and shrubs are fertilized once a year in the spring. Once they have reached their mature size, often the fertilizer is cut down to half rate as woody plants can recycle many of the nutrients they need.

Lawns can be fertilized now but pay attention to the moisture level of the soil. With all the rain that we have been experiencing, the soil is pretty soggy in spots. Stay off wet soils as they will become compacted. Most lawns do well with just a spring and fall application of fertilizer. If the clippings are left down, they supply nutrients plus add organic matter to the soil. Be sure to set your spreader on the proper setting.

If you have questions about fertilizing or if you have any other gardening questions, contact the UConn Home & Garden Education at (877) 486-6271 or www.homegarden.cahnr,uconn.edu or your local Cooperative Extension Center.

Watch for Bulb Diseases

Dr. Nick Goltz, UConn Home & Garden Education Center; UConn Plant Diagnostic Lab

Gardens in New England come to life in spring thanks, in large part, to bulbs! Spring bulbs are reliable, perennial color-bringers and seem equally at home in landscapes and containers. Daffodils (Narcissus spp.), grape hyacinth (Muscari spp.), and tulips (Tulipa spp.), are just some of the bulb plants that grace our gardens this time of year, and they remind us that the blooms of summer alliums aren’t far behind. While these plants might seem effortless to grow, they are not without their fair share of disease issues!

Purple streaking and weak root systems associated with Fusarium rot.
Purple streaking and weak root systems are symptoms associated with Fusarium rot. Ed Kurtz, budwood.org

One common disease of bulbs we see here in Connecticut is Fusarium wilt and bulb rot.

Bulbs generally prefer average to loamy soil with good drainage. When planted in clay soils or following long periods of rain in early spring, however, they are susceptible to rot diseases caused by fungal pathogens such as those in the genus Fusarium. The various wilt and rot diseases caused by Fusarium species can be destructive and sometimes difficult to control. Symptoms include wilting, brown lesions at and below the soil line, vascular discoloration, bulbs that are soft or spongey, and, especially with garlic (Allium sativum) and relatives, a purple-red discoloration of bulb tissue. Plants affected by this soil-borne fungal disease do not recover, so it is wise to be proactive with management and prevention.

If your bulb plants do not emerge properly in the spring or emerge but wilt soon after, fail to flower, or display other symptoms associated with root rot diseases, pull them up and throw them away! Fusarium and similar fungal pathogens often survive the winter in the soil on diseased plant tissue from the year before, so it is important to keep your garden clean and to not compost diseased plant tissue, as most home compost bins do not reach temperatures necessary to kill pathogens. Fungi like Fusarium thrive in soggy soils, so do your best to prevent flooding and standing water where bulbs are planted. There are no fungicides that will completely control or eradicate Fusarium in a landscape, but some are helpful with preventing infection of healthy plants. Remember to always wear protective equipment and follow label rates and instructions if you choose to apply fungicides.

Symptoms of tulip fire, Botrytis tulipae, on tulip flower and leaves.
Symptoms of tulip fire, Botrytis tulipae, include leaf spots on leaves and flowers, often with dark boarders resembling burn injury, lending the common name. Sandra Jensen, Cornell University, Bugwood.org

Another common fungal disease of bulbs grown here in the Northeast is Botrytis gray mold or tulip fire. Fungi in the genus Botrytis cause disease symptoms on many different host plants. Though it is often called “gray mold” when associated with other plants, for tulips, the disease is usually called “tulip fire” due to the spots it causes on leaves and flowers, often with dark borders resembling a burn.

Botrytis fungi are very common and are capable saprophytes, meaning they feed on dead or decaying tissue and contribute to nutrient cycling in the environment, but can be problematic in managed landscapes. To cause disease, Botrytis fungi must first colonize and get nutrients from dead or declining plant tissue, such as fading flower petals, over-ripened fruit. Once the fungus is established in its host plant, it becomes more aggressive and invades healthy plant parts, causing brown lesions and decay.

To prevent Botrytis gray mold and tulip fire, try to encourage good airflow around your plants. Many people plant their bulbs closely together, like eggs in a carton, but this can make bulbs susceptible to tulip fire over time when treated as perennials. Dig up your tulips when they appear crowded, and each year when dealing with a potential disease issue. Inspect bulbs before you plant them again, and discard bulbs that are not firm, discolored, or otherwise do not appear healthy. Rotate to new locations and avoid planting consecutively in the same spot if there has been a history of disease there.

If you have questions about growing bulb plants, are dealing with a plant health issue, or regarding other gardening topics, feel free to contact us, toll-free, at the UConn Home & Garden Education Center by emailing ladybug@uconn.edu. You can also call us at (877) 486-6271, visit our website at www.homegarden.cahnr.uconn.edu, or contact your local Cooperative Extension center.

Grow Vegetables – Save Money

By Dawn Pettinelli, UConn Home & Garden Education Center

Lettuce planted in a container.
This lettuce was planted in a container. Photo by dmp2024

Anyone who grocery shops on a regular basis has likely noticed a higher tally at the checkout counter. The latest consumer pricing analysis from the USDA is predicting a 1.3 percent increase in food prices. While we can’t do much to lower the prices, one thing we can do is grow some of our own vegetables and herbs.

The investment in a small 100 square foot or so garden is not large, and one can be assured of healthy, high quality fresh produce. Vegetable gardeners can also control what, if any, types of pesticides are used on the plants. One source suggested that a $70 investment in plants and seeds could produce a harvest worth $600 or more over the growing season. Already having basic garden tools was probably taken for granted.

If yard space is limited or too shaded, consider renting a plot in a community garden, maybe teaming up with a friend trading garden chores for produce, or consider growing in window boxes and other containers. Even small areas provide opportunities to grow your own food. While a head of lettuce can cost $2-3 dollars at the grocery store, for that same amount one can often pick up a cell-pack of 6 lettuce plants and grow them out in a large container, or 6 square feet or so of garden bed.

Starting plants directly in the garden by direct seeding can also offer considerable savings. I picked up a package of mixed lettuce variety seeds for $3.25 that contains 500 seeds. This would enable one to grow multiple succession plantings for at least 2 or 3 years. If stored in a dark, cool, dry spot, many seeds last for at least 2 years if not longer.

Good candidates for direct sowing would be bush or pole beans, lettuce and other green leafy vegetables, radishes, peas, carrots, summer and winter squash, cucumbers, and corn. If they tickle your tastebuds, you can toss in turnips and parsnips.

Some vegetable varieties have greater cold tolerance than others so your peas, radishes, and many green leafy vegetables can usually be planted by the end of this month depending on the weather. In northern parts of Connecticut, it would be good if the soil warms and dries up a bit more.

Other types of vegetables are better to set in the garden as transplants, whether you grow them yourself or purchase them in cell-packs. The main reason for this is twofold. Certain plants, particularly in the brassica family, like cabbage, broccoli and cauliflower germinate fine in warm household temperatures but like to be grown cooler than many of us keep our houses and if left in those warm temperatures grow long and leggy instead of short and stocky. So, it’s just easier to purchase healthy, stocky plants grown in a greenhouse to set in the garden or container, although the leggy ones usually catch up.

The second reason why some plants are better purchased as transplants is because vegetables like tomatoes, peppers, eggplant and leeks have a long growing season – often 80 to 100 days from transplant until they produce harvestable crops. It makes more sense to plant 3- or 4-week-old transplants around Memorial Day so harvesting can start in late July or August. Contrarily, even though some winter squash and pumpkins might take 100 days or so to mature, I typically just direct seed them around Memorial Day because they seem to catch up with transplants, that usually experience a bit of transplant shock, pretty quickly so I don’t feel like I am gaining much by purchasing transplants and more importantly, the particular varieties I prefer are not always available as plants.

Fresh picked roma style tomatoes
This fabulous roma style tomato is an heirloom variety a friend brought from Italy. It makes a fantastic sauce! Photo by dmp2024

Regardless of whether you have a few containers to fill or a large garden, do some research before purchasing seeds or transplants. There are so many different cultivars available so look up variables like days to harvest, disease resistance, cold tolerance, productivity and more. Make notes on how they taste and any problems during the growing season.

When planning your edible plantings, also think about succession sowings, finding out what pest problems to be on the lookout for, last and first frost dates, mature size and space requirements, and days to harvest.

Feel free to contact the UConn Home & Garden Education Center with questions on growing vegetables, herbs and other plants or if you have any other gardening questions, contact the UConn Home & Garden Education at (877) 486-6271 or www.homegarden.cahnr,uconn.edu or your local Cooperative Extension Center.