Shrubs

Feeling blue? How Blue Pigments Create Vibrant Hues in Plants

By Natasha Raymond, UConn Plant Diagnostic Lab

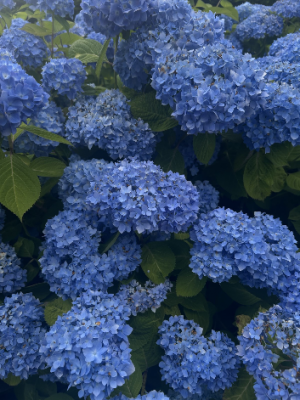
Clusters of vibrant blue hydrangea flowers densely packed among lush green leaves, filling the frame with layered blooms and foliage.
Bigleaf Hydrangea (Hydrangea macrophylla) is one of the few flowers that can have a natural blue hue. Photo by Emily Leahy, UConn Plant Diagnostic Laboratory

Blue is a color seldom seen in nature. Although the sky and bodies of water appear blue, very few animals and plants also exhibit this striking color. Anthocyanins, a type of pigment, are responsible for creating the red, purple, and blue hues found in plants. Anthocyanins are sensitive to environmental effects, such as acidity and the presence of metal ions. A primary example of this phenomenon is seen in the primary pigment Delphinidin, a type of anthocyanin.  Delphinidin changes color in the presence of aluminum ions, which become more soluble/available in acidic environments. Bigleaf hydrangeas contain this pigment, infamously lining the neighborhoods of Connecticut in a range of pastel blues to deep fuchsia hues dependent on soil pH levels.

Other plants, such as the blue oil fern, can appear iridescent blue due to structural color. Since they are accustomed to the dim understory of the rainforest, these plants must take advantage of as much light as they can get. Many plants reflect green light the most, creating their characteristic green hue. Blue oil ferns have specialized chloroplasts on the surface of their leaves called iridoplasts, allowing the plant to capture more green light rather than reflect it. These iridoplasts create a shiny blue appearance despite no blue pigments being present. The arrangement of photosynthetic membranes in iridoplasts creates an optical nanostructure known as photonic crystals that slow down and concentrate light, ultimately allowing the plant to use available light more efficiently.

Many companies have taken the rarity of blue plants as a challenge, working to engineer a blue flower themselves. Roses, orchids, and chrysanthemums have been genetically modified in recent years to achieve this goal, but the results thus far have only yielded shades of purple. One project, the Phalaenopsis Blue Gene Orchid engineered in Japan, was recently deregulated in the United States and thus approved for sale (though not yet widely available). A Delphinidin gene was inserted from an Asiatic dayflower into a pink “Wedding Promenade” orchid. A white orchid flower, an apparent blank canvas, could not be used as a starting point because Delphinidin needs co-pigments to bind and stabilize the color—White Phalaenopsis lacks these important support molecules. The Blue Gene Orchid flowers in a deep purple-indigo, likely due to its intracellular pH and naturally occurring co-pigments that bind and alter coloration.

The easiest method, however, to acquire blue flowers may be available in your kitchen: food coloring. If you place cut flowers into a cup of water with blue food coloring (20-30 drops), the water will be sucked up through water transport tubes (xylem), giving your flowers a pleasant blue coloring. While artificial, it allows for unique customization and can be a great experiment to do with kids. White carnations and roses worked best when I attempted this for my second-grade science fair. Grocery stores selling blue flowers often use this trick via stem injection or may also paint blue coloring on the outside of the flower. While a standalone blue pigment doesn’t exist in plants, nature has found a way to create a beautiful rainbow for us to enjoy!
The UConn Home Garden Education Office at the George Leigh Minor Plant and Soil Health Center supports UConn Extension’s mission by providing answers you can trust with research-based information and resources. For gardening questions, contact us toll-free at (877) 486-6271, visit our website athomegarden.cahnr.uconn.edu, or reach out to your local UConn Extension center atextension.uconn.edu/locations.

This article was published in the Hartford Courant September 12, 2026

Vascular Invaders – Verticillium and Botryosphaeria fungi

By Emily Leahy, UConn Plant Diagnostic Lab

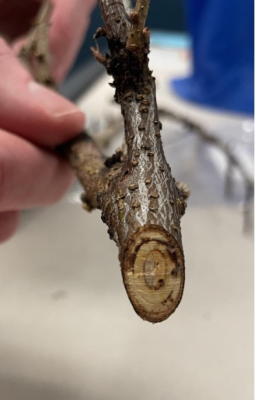
Close-up of a cut tree branch showing exposed wood rings and textured bark, held by a hand in an indoor setting.
Ring-shaped vascular discoloration associated with Verticillium wilt. Photo by UConn Plant Diagnostic Laboratory.

Vascular plant diseases present a complex series of challenges, both in diagnosis and management. Pathogens of this nature invade the roots and vascular system of their host, stifling the ability of water and essential nutrients to travel throughout the plant. Without proper vascular function, leaves become yellow and wilted. Abnormal discoloration and the pattern which it forms within stem or branch tissue is often the key indication that a vascular disease may be present.  

Two of the most prominent vascular pathogens are fungal species of Verticillium or Botryosphaeria. Both infect a wide array of hosts, overlapping to encompass many ornamental trees, shrubs, and vegetable crops. While there are many similarities between the diseases these pathogens cause, there are also defining characteristics which distinguish one from the other.  

Verticillium dahliae and verticillium albo-atrum have the potential to cause verticillium wilt. Hosts span from vegetables like tomatoes and potatoes to trees like maple and ash. The fungal structures of either species inhabit soil where infected plant debris has decomposed. There, they can survive for 10-15 years. During the pathogen’s dormant phase, survival structures called microsclerotia germinate. Hyphae (filamentous fungal growth structures) are emitted from these structures and can extend to potential hosts within limited distances. Verticillium inoculates hosts by entering root tips or other areas of root formation, breaking through exterior layers to reach the vascular tissue inside. Conidia (spores) are formed in this location, dispersing to other potential hosts, while Verticillium continues to spread throughout the plant.  

Although Verticillium wilt symptoms differ among hosts, abnormalities like leaf yellowing (chlorosis) or browning, wilting, and branch dieback raise suspicion of infection across the board. Symptoms may be isolated to one side of the plant or individual branches. Branch or stem discoloration is another key indicator of infection, accompanied by a streaking and a characteristic ring-shaped brown pattern on the interior of woody tissue. Damage is often concentrated in the lower areas of the plant, as Verticillium invades hosts from their base, working upwards. 

The persistence and longevity of Verticillium structures in soil makes crop rotation and the destruction of diseased tissue crucial to disease management. While it’s usually best to remove the diseased plant entirely, woody plants with minor infections can survive for several more years, provided affected branches are pruned away and tools used for pruning are disinfected after use. Rubbing alcohol is a good choice, but there are several other disinfectants on the market labeled for use with tools. Do not compost or use diseased tissue for wood chips, as remaining fungal structures will survive for several years and may infect new host plants.  

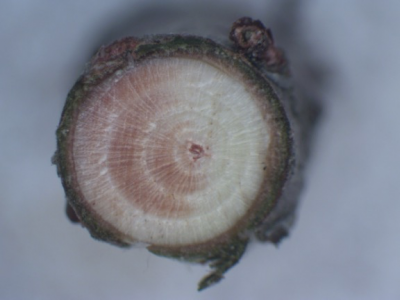
Close-up cross-section of a woody stem showing internal tissue discoloration and visible growth rings against a light background.
Wedge-shaped vascular discoloration associated with Botryosphaeria infection. Photo by UConn Plant Diagnostic Laboratory.

Botryosphaeria canker and dieback are attributed to several causal agents in the Botryosphaeriaceae family. Botryosphaeria is an opportunistic pathogen, choosing already stressed plants to infect and taking advantage of their weakened defense systems. Stress can stem from many sources—frequently environmental challenges, insect infestations, or prior instances of disease. While this group of pathogens has an extensive range of hosts, it is often observed on woody ornamentals—viburnum or rhododendron, for example—and trees like dogwood or maple. Fungal structures overwinter on previously infected tissue, or as endophytes which silently colonize plants without causing symptoms until they become weakened. Botryosphaeria uses many routes of entry when invading its hosts, including open wounds, cracks, or lenticels—porous openings on branch and stem tissue used for gas exchange.  

As a vascular pathogen, wilting and dieback are characteristic symptoms of disease, accompanied by necrotic patches on bark and branches. Branches become girdled, and sunken cankers are evident. Depending on the host, sap may ooze from these areas, and black fungal sporulation (pycnidia) may be visible. Unlike verticillium wilt, interior vascular discoloration due to Botryosphaeria infection appears in wedges, resembling a slice of pie.  

To manage Botryosphaeria canker and dieback, it is important to minimize sources of stress which can leave plants susceptible to infection. Appropriate pruning and sanitation practices, routine fertilization in accordance with the plant’s needs, and protection from environmental stressors (drought, heat, or cold) are all vital to maintaining vigor. Take care to prevent mechanical injury and wounds, minimizing the potential modes of entry for the pathogen.  

As is the case with all plant diseases, laboratory analysis is required for an accurate diagnosis. If you suspect your plant has been infected by a vascular disease, submit branch tissue to the UConn Plant Diagnostic Laboratory for evaluation. Remember to collect tissue that is just beginning to appear symptomatic, as the lab is unable to diagnose plants that are already dead.  

The UConn Home Garden Education Office at the George Leigh Minor Plant and Soil Health Center supports UConn Extension’s mission by providing answers you can trust with research-based information and resources. For gardening questions, contact us toll-free at (877) 486-6271, visit our website athomegarden.cahnr.uconn.edu, or reach out to your local UConn Extension center atextension.uconn.edu/locations.

This article was published in the Hartford Courant September 7, 2026

A Familiar Bloom in a Season of Change

By Emily Leahy, UConn Plant Diagnostic Lab

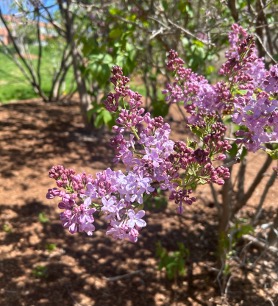
Light purple lilac blossoms on a shrub in a mulched garden bed.
Photo by Emily Leahy, UConn Plant Diagnostic Lab

Spring is the ultimate bringer of change. The restless souls contained within all forms of life begin to awaken, bringing fiery hues back to the formerly dreary expanse of winter landscapes. We meet this shift with a warm welcome, grateful for a chance to start anew. Innately, we crave change, constantly striving towards something greater that will fill a part of ourselves we feel is missing. Also, innately, we are walking juxtapositions. Above our desire for change floats an asterisk, denoting an extraneous condition—our deep fear of the very thing which we wish so desperately for. New experiences bring about uncertainty and inconsistency.  Thus, we cling to that which we find familiar and trustworthy to ground us while careening through the unknown.  

For me, ol’ reliable is the lilac shrub in my backyard. Season after season, I look out my window and am reassured by its presence, whether it is flush with vibrant blooms or displaying its tall barren branches. The leaf and flower buds of common lilac (Syringa vulgaris) are among the first whispers of spring I observe, appearing early in the season.  

Members of the olive family, Oleaceae, lilacs are well suited to life in cold climates—in fact, the chill of winter is essential to their bud development and maturation. Although new plantings take a few years to adjust and establish themselves, these perennial shrubs are equipped with substantial longevity. Common lilacs can live for up to a century, cementing their place as a companion to rely on during every phase of our lives.  

Common lilacs grow rapidly and immodestly, filling their landscape with a dominating sense of confidence. Success is dependent on being planted in sunny locations with moist, well-drained, and neutral to slightly alkaline pH soils.  

The lilac’s blooms are dichotomous, both quietly delicate and also boisterous with a showstopping flair. Flowers emerge between late April and early May. A strong, sweet fragrance diffuses from the quaint petals which cluster together in formations called panicles. Lilac blooms appear in a variety of hues, ranging from lavender to blush pink or even a creamy white.  

Even after the flowers of lilacs retire, matte heart-shaped leaves remain until the fall, painting the tall shrubs with dark green. During the dormancy of winter, gray stems and branches are visible, standing tall and proud even when cold weather casts its icy shadow over the once vibrant landscape.  

Lilacs are relatively self-sufficient yet require some care and attention to maintain their vigor. Susceptible to fungal diseases like powdery mildew and septoria/pseudocercospora leaf spot, it is important to ensure proper airflow throughout plantings to discourage sporulation. Powdery mildew is characterized by gray mycelial growth on leaf surfaces, while septoria/pseudocercospora leaf spot appears as brown spots that expand into broad patches. Insect pests, namely the lilac borer and oystershell scale, also impose their will on lilacs. Borers tunnel and weave through branches, leaving holes and open wounds as evidence of their travels. Oystershell scale refers to small insects, resembling their namesake in appearance, that take refuge on lilac bark. These pests and diseases can commonly be managed through removal and destruction of damaged tissue. In severe cases, additional integrated pest management strategies may be necessary. 

Consistent pruning practices are essential for lilacs to remain healthy throughout every season of change. Lilacs are beings of extreme preparation, developing next year’s buds as soon as the current flowering period is complete. By deadheading blooms promptly after they have run their course, lilacs are able to dedicate more energy to generating healthy flowers for future growing seasons. Renewal pruning is another beneficial technique—cutting back overgrown stems to remove barriers preventing light from reaching inner branches. This encourages new growth and results in lilacs which appear fuller, bursting with color from the inside out. Spring is the most appropriate time to employ these pruning tactics in accordance with lilac’s growing needs. Prune immediately after flowers start to fade for best results. 

Lilacs are a cornerstone of spring, providing a familiar and reassuring sight to ground us when our own lives become unrecognizable. Lilacs and the endless wonders of spring gently remove the asterisk from our desire for change, reminding us to take solace in the familiar while welcoming all that the unknown may bring.  

The UConn Home Garden Education Office supports UConn Extension’s mission by providing answers you can trust with research-based information and resources. For gardening questions, contact us toll-free at (877) 486-6271, visit our website at homegarden.cahnr.uconn.edu, or reach out to your local UConn Extension Center at extension.uconn.edu/locations.  

This article was published in the Hartford Courant May 3, 2026

Planting Bare Root Trees and Shrubs

By Dr. Lauren Kurtz, UConn Home Garden Education Office 

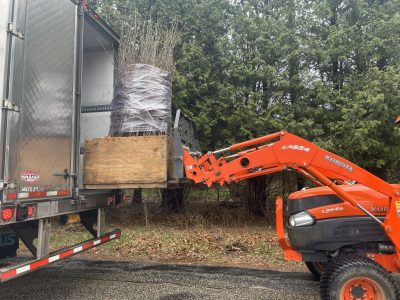
 A tractor with an orange front loader lifts a large wooden crate containing bundled bare-root trees from the back of a delivery truck near a wooded area.
A bundle of bare root apple trees. By Andrew Hoagland.

Bare root trees and shrubs, as the name suggests, are not sold in a pot or balled and burlapped. At the nursery bare root plants are grown in the ground, harvested as young plants, and sold without soil surrounding the roots. They are sold while the plant is dormant, usually in late winter or early spring and are best planted while they are still dormant or just before bud break. Historically, they have been used for agriculture or conservation plantings but they are also suitable for the home landscape. Bare root trees and shrubs are a great choice if you need a lot of plant material or are on a tight budget.  

Consider using bare root trees and shrubs to provide structure in your garden, to create wildlife habitat, for erosion control, or to start your home orchard or tree farm.  Additionally, bare root plants are perfect for planting a hedge because they are similar in size, establish quickly, and don’t require too much digging. They will take longer to fill in the hedge than containerized plants, but they will cost a lot less money. Many popular landscape trees and shrubs are available as bare root plants.  

Choose a reputable nursery or grower, preferably one that is growing regionally adapted plants. In New England, choose a grower in the Northeastern United States. When choosing species to purchase, have planting goals in mind. These goals can be those previously mentioned or other goals like revegetating an area with native plants after removing invasive plants. As with any planting project, consider the right plant for the right place. Choose species that are suited to the growing conditions of the planting area. Consider sun exposure, soil characteristics, hardiness zone, plant size at maturity, and location of underground utilities.  

Before purchasing bare root plants, have a plan with all the above considerations addressed. Unlike containerized plants, bare root plants have a very specific and narrow timeline for purchasing and planting. They are typically shipped in the early spring, around the time they should be planted.  

To keep plants dormant before planting, they can be placed in the fridge or in an unheated garage or basement. They can be stored dormant in the original shipping package for no more than two weeks before planting. Mist the roots every few days so they do not dry out during cold storage.  

Planting bare root plants is done in the early spring before buds open or late fall after the plant goes dormant but before the ground freezes. As with all trees and shrubs, they should not be planted too deep. The root flare, or transitional part of the plant between the roots and stem, should be level with the soil. Add a layer of mulch or compost but avoid piling mulch too high up the trunk. Water weekly, or more often under dry conditions, during the first year after planting. Protection from deer and rodents is important when planting young tender trees and shrubs. Use a tree tube or fencing to discourage browsing.  

The UConn Home Garden Education Office supports UConn Extension’s mission by providing answers you can trust with research-based information and resources. For gardening questions, contact us toll-free at (877) 486-6271, visit our website athomegarden.cahnr.uconn.edu, or reach out to your local UConn Extension Center atextension.uconn.edu/locations.  

This article was published in the Hartford Courant February 21, 2026

Highlighting Connecticut’s Winter Cheer: Common Witch Hazel

By Holly McNamara, UConn Plant Diagnostic Lab

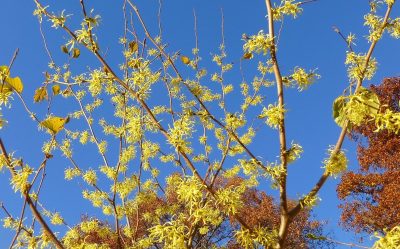
Branches of witch hazel with clusters of yellow, ribbon-like flowers against a clear blue sky and autumn foliage.
Photo by Pamm Cooper, UConn Home Garden Education Office

Connecticut’s native species of Witch Hazel, Hamamelis virginiana, is a remarkably unique woody ornamental that can be found as a large shrub or small tree. It comes to the rescue this time of year as the leaves continue to drop and our surroundings become starved of color. Its foliage in autumn is a showstopping yellow.  

Hamamelis virginiana can grow between 10 and 20 feet tall and is often nearly just as wide as it is tall. In ideal conditions, some can even grow as large as 30 feet tall. It has a loose and somewhat open, irregular rounded shape and is very attractive in landscaping when used as hedge rows, woodland edge planting, or along a pond or river. It’s the last plant to come into bloom each year in the Northeast, blooming from October to December. The bloom coincides with its flashy fall foliage, making it one of the most eye-catching specimens of the winter landscape.  

The blooms are bright yellow with spidery, ribbon-like petals and have a pleasant citrusy fragrance. They are clustered tightly around the branches, and the petals curl up protectively during cold spells. A few cut branches in a vase will be sure to perfume and brighten up your home during the dreary winter months. Its late flowers attract certain species of flies, bees, gnats, and cold-tolerant moths. These insects are a food source for native songbirds such as kinglets, chickadees, and titmice.  

The medicinal qualities of the Common Witch Hazel are world renowned and have been utilized for centuries. Its anti-inflammatory properties serve as a soothing remedy for bruises, itches, sunburns, acne, and small wounds. In fact, Common Witch Hazel extract is one of the only medicinal plants approved by the FDA as a nonprescription drug. Always consult with a medical professional before incorporating the use of medicinal plants. It's worth noting that there have been several Witch Hazel processing plants in Connecticut, starting in the 19th Century. To this day, most of the world’s Witch Hazel extracts are still produced in East Hampton, Connecticut. 

Consider planting a Common Witch Hazel or two in your yard, mixed with hollies, viburnums, and dogwoods for some late-season cheer. Common Witch Hazel will grow in a variety of conditions, from moist to dry, and shaded to sunny. Flowers are most abundant when planted in full sun. It prefers acidic, nutrient-rich, well-draining soil. It’s quite hardy, growing in zones 4 through 8, and has very little trouble with pests or diseases. After establishment, they are virtually care-free. The only maintenance of note is periodic pruning to remove suckers if a controlled shape is desired. 

Although it is a slow growing plant, it is worth the wait when it bursts into bloom. With so much going for it, this is a plant that deserves greater consideration for use in ornamental landscapes and yards. 

The UConn Home & Garden Education Center supports UConn Extension’s mission by providing answers you can trust with research-based information and resources. For gardening questions, contact us toll-free at (877) 486-6271, visit our website at homegarden.cahnr.uconn.edu, or reach out to your local UConn Extension center at extension.uconn.edu/locations.

This article was published in the Hartford Courant November 29, 2025

Road Salt and Your Soil

By Dr. Avishesh Neupane, UConn Soil Nutrient Analysis Lab

When I was a graduate student from Nepal living in New Haven from 2012 to 2014, I kept noticing the same winter aftereffect across town. Along busy streets, the first foot of lawn by the pavement turned yellow and matted, and the road-facing sides of yews and hollies burned while the yard sides looked fine. Coming from a place that does not spread salt each winter, it felt backward. We made the road safer, but the plants and soil paid the price. At UConn’s Soil Nutrient Analysis Lab, we hear versions of this every spring. People send soil from a strip along the road or from a bed near the driveway and say that spot never greens up like the rest.  

You have also likely noticed the symptoms. Fine particles form a crust on the soil surface where water evaporates. Turf browns right at the pavement edge. Buds on the roadside of a shrub fail to break. Evergreens brown on the street side when traffic spray carries salty water, while the interior needles stay green. Vegetable beds that sit too close to plow piles can exhibit poor emergence, tip burn, or slow growth, even when the rest of the garden appears fine.  

What road salt does to soil 

Sodium chloride (rock salt) is the most widely used deicer. Once it dissolves, it separates into sodium (Na) and chloride (Cl). Chloride is highly mobile. It moves with meltwater, so in a wet spring, it can leach through the soil and, where conditions allow, reach groundwater, affecting well water quality. 

Sodium changes how soil behaves. In healthy soil, calcium and magnesium sit on exchange sites; repeated sodium inputs displace them, sealing the surface, reducing infiltration, and making the soil feel tighter right where plants already struggle. Sodium also competes with potassium uptake, so salt-burned spots can look nutrient-deficient even when tests show adequate levels. 

Alternatives to sodium chloride are often less harsh but cost more. Magnesium chloride and calcium chloride melt at lower temperatures but still add chloride and can injure plants and corrode concrete and metal. Calcium magnesium acetate (CMA) is chloride-free and generally gentler, yet it’s pricier and harder to find. 

Lab testing and management options 

If you inform the lab that the sample is from a salt-affected area (such as a roadside, plow pile, or splash zone), they will interpret the numbers with that history in mind and, if necessary, use the appropriate salinity method for your sample. 

  1. Soil pH and texture (and organic matter). Sandy roadside fill flushes salts quickly but is more susceptible to damage due to its low buffering capacity. Heavier soils with more organic matter hold up better but can crust at the surface after repeated salting. For optimal plant health and reduced salt uptake, aim for a pH of approximately 6.5–7.0; your report will include a lime rate if your pH is below this range.
  2. Soluble salts / electrical conductivity (EC). EC shows how salty the root zone was when you sampled. It is most informative right after winter or snowmelt, when salts are near the surface. For mineral soils, labs typically measure EC from a simple soil–water extract. 

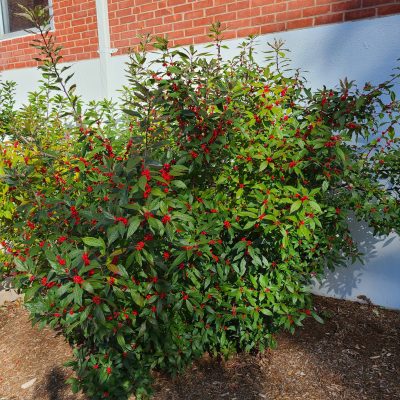
    Dense green shrub with numerous small, bright red berries growing along its branches, situated against a brick and white wall in a landscaped area.
    Plants like the Winterberry Holly (Ilex verticillata) may be able to stand up to some salt exposure in the landscape. Some varieties may be more resistant than others. (Photo by H. Zidack)

    Start with prevention. Before winter, top-dress the first 1–2 feet along the road with a thin layer of compost to improve structure and exchange capacity. Keep that strip covered, overseed thin turf, or use a salt-tolerant edge, and ask the plow operator to place piles where meltwater drains to the street or to vegetation that isn’t over your well line. Where meltwater goes matters as much as how much salt you use. 

    After winter, fix what the season left behind. If the roadside sample shows elevated EC, lightly loosen any compacted or crusted soil so that water can infiltrate. Then, leach the area with two or three deep soakings a few days apart to push salts below the main root zone. If a hedge or shrub burns on the roadside year after year, consider moving it back or replacing the front row with more salt-tolerant plants. 

    For chronic hotspots, shift from one-time flushing to long-term protection: use less deicer, keep piles away from beds and wells, maintain dense groundcover in the first foot along pavement, and in harsh exposures, consider stone mulch plus seasonal compost topdressing to help the soil rebound. 

    If your well water tastes salty, check the state’s road-salt guidance and contact your town. When the damage is limited to curb strips or driveway beds, soil testing and better winter practices usually solve it.  

    The UConn Home & Garden Education Center supports UConn Extension’s mission by providing answers you can trust with research-based information and resources. For gardening questions, contact us toll-free at (877) 486-6271, visit our website athomegarden.cahnr.uconn.edu, or reach out to your local UConn Extension center atextension.uconn.edu/locations. 

    This article was published in the Hartford Courant November 23, 2025

    Don’t Let Dry Soil Follow Your Plants Into Winter!

    By Holly McNamara, UConn Plant Diagnostic Lab

    This year, Connecticut’s notably dry summer conditions have continued into fall. According to the U.S. Drought Monitor, all counties are abnormally dry for this time of year, and some are even considered to be in a moderate drought. Thus, many trees, shrubs, and perennials are heading into winter low on moisture. These conditions combined with the dry air, low precipitation, and fluctuating temperatures characteristic of Connecticut winters can lead to plant damage if no supplemental water is provided. Many of your plants will benefit from a deep final soak before the ground freezes.

    Fall drought stress often doesn’t show up until spring, or even the following summer.Affected plants may appear perfectly normal and resume growth in the spring, using stored food energy. Plants may be weakened or die in late spring or summer when temperatures rise. Browning evergreens, delayed leaf-out, and sudden dieback are common signs of plants that went into winter too dry.

    Moist soil is so important in the fall and winter months because it provides insulation to the roots. It may seem counter-intuitive, but properly hydrated soil does a much better job at protecting roots from freezing temperatures than dry soil. Root damage occurs for this reason when plants do not receive enough late-season moisture.

    Woody plants with shallow root systems require the most supplemental water during extended dry periods in the fall and winter. Trees in this category include maples, birches, willows, and dogwoods. This category also includes perennials, and shrubs like hydrangeas, boxwoods, and azaleas. These plants benefit from mulch to further conserve soil moisture and buffer the roots from temperature swings. Apply mulch about 2 to 4 inches away from the trunk all the way to the outermost reach of its branches in a doughnut shape.

    Evergreen needles up close
    Evergreens need sufficient water in dry falls to help prevent winter injury. Photo by Heather Zidack

    Evergreens also benefit from fall and winter watering because they do not go dormant in the winter. Evergreens of any age are still actively respiring during the coldest months of the year and will continuously lose water through their needles. If they go into the winter with dry soil, they are more likely to have a difficult spring recovery. This is especially true for those in open or windy areas.

    Only water when daytime temperatures are above 40°F, ideally in the late morning or early afternoon so the water can soak in before possible freezing at night. Feel the soil at a depth of 4 to 6 inches to ensure that supplemental water is necessary. Soil should be consistently moist, but not oversaturated or muddy. Stop supplemental watering after the ground freezes because plants cannot absorb water through frozen soil. To water, use a soaker hose to provide a slow stream of water that can penetrate deeper into the soil with limited runoff. If your hose is already stored away for the winter, and your tree or shrub is small, consider drilling a 1/8-inch hole at the bottom of a 5-gallon bucket and filling that with water for a slow, steady stream. If dry weather continues into the winter and there’s little snow cover, additional watering once or twice a month may be needed until the soil hardens.

    A final round of watering now can prevent root injury that won’t be visible until much later. Evergreens, deciduous trees, and other landscape plantings will head into winter stronger with a little extra attention this month. Giving the soil one last watering before it freezes is one of the simplest ways to protect your landscape from winter stress.

    The UConn Home & Garden Education Center supports UConn Extension’s mission by providing answers you can trust with research-based information and resources. For gardening questions, contact us toll-free at (877) 486-6271, visit our website at homegarden.cahnr.uconn.edu, or reach out to your local UConn Extension center at extension.uconn.edu/locations.

    This article was published in the Hartford Courant October 25, 2025

    Why is My Lilac Blooming in the Fall?

    By Pamm Cooper, UConn Home & Garden Education Center

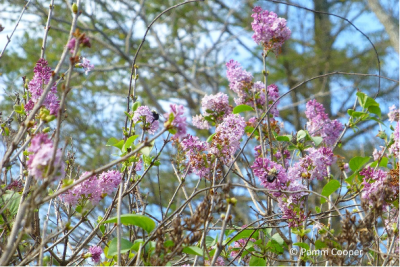
    Bumblebees on fall blooming lilacs
    Photo by Pamm Cooper, UConn Home & Garden Education Center

    Spring-blooming woody plants like lilacs (especially the old, grafted varieties), ornamental cherries, forsythia, crabapples, azaleas and some magnolias set their flower buds for the following year in early summer shortly after flowering.  Usually, flower buds are triggered to bloom by environmental conditions which normally occur after an extended fall and winter cold period, followed by longer days and warming temperatures in spring. It is not typical for these plants to have a second bloom in the fall, but environmental conditions sometimes trigger premature flowering in the fall. Some plants may have only a few flowers rebloom, while other plants may have more flowers open in the fall.  

    Some of the reasons for this out of season bloom are extended summer heat and drought conditions where supplemental water is lacking.  Severe early defoliation, especially from certain fungal pathogens, can also contribute to reblooming. The past two springs have been very wet and diseases such as anthracnose and Pseudocercospora spp. leaf spot may have caused leaves to brown, shrivel and drop early. This stresses the shrub and contributes to out of sync rebloom if other conditions are right. Good sanitation practices such as cleaning up infected leaves will be helpful in reducing fungal infections the following year. 

    If a plant is healthy and relatively unstressed, the normal seasonal move to cooler weather triggers dormancy. Plants that are deciduous will drop leaves as daylight length and temperature both decrease. Next year’s leaf and flower buds will also remain in a dormant state. Flowering and leafing out will be triggered by increasing daylight and air temperatures the next spring. 

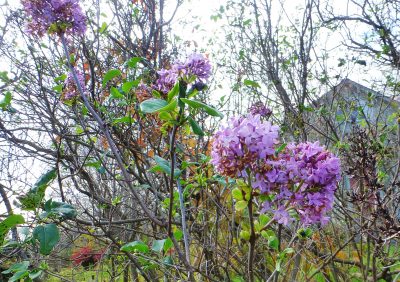
    Lilac flowers opening in October
    Photo by Pamm Cooper, UConn Home & Garden Education Center

    If certain woody plants have been stressed during the growing season, however, the change to cooler weather followed by some warmer weather can trigger some of the flower buds to open prematurely. This false dormancy especially affects flower buds near the tops of old-style lilacs where it is sunnier and warmer. Ornamental cherries may show sporadic flowering all over the tree where there is a southern exposure.  

    While fall reblooming of ornamental trees and shrubs can lead to a disappointing floral display the following spring, it is not harmful to the plant. After a less showy spring bloom period, flower buds will be produced normally. If stressful conditions caused by environmental conditions, insect pests or fungal pathogens are minimal, then a second bloom in autumn is unlikely to occur. Gardeners and landscapers can only do so much, and while the weather is out of our control, making sure plants are maintained properly to avoid stress during the summer will go a long way in helping them remain as healthy as possible.  

    The UConn Home & Garden Education Center supports UConn Extension’s mission by providing answers you can trust with research-based information and resources. For gardening questions, contact us toll-free at (877) 486-6271, visit our website at homegarden.cahnr.uconn.edu, or reach out to your local UConn Extension center at extension.uconn.edu/locations.

    This article was published in the Hartford Courant October 18, 2025

    Hyped for Hydrangeas

    Nick Goltz, DPM, UConn Home & Garden Education Center, UConn Plant Diagnostic Lab 

    When I moved to Connecticut in July of 2021, I remember driving through neighborhoods looking for somewhere I might eventually want to live and being struck by the beautifully-landscaped yards that each home seemed to showcase. I particularly remember being impressed by the tidy hedges of hydrangea, filled with lush globes of blue, pink and purple flowers. Can you think of a flower more emblematic of breezy, long summer days by New England coast than the hydrangea? I’ll wait. 

    Hydrangeas are a fascinating group of perennial plants with some unique quirks that make them a fun addition for the home garden. The genus is native to Asia and North America, but the species grown most commonly around the world, Hydrangea macrophylla, is native to Japan and has been bred extensively for hundreds of years, resulting in many cultivars. They are also bred with other species to help select for cold tolerance or inflorescence (flower cluster) shape.  

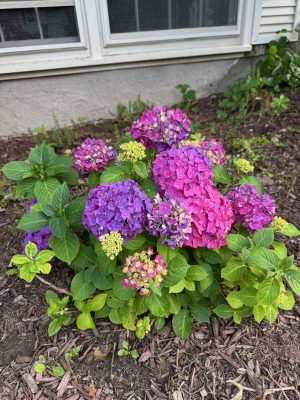
    Hydrangea macrophylla are commonly known as “bigleaf hydrangea”, but may also be called “lacecap” or “mophead” hydrangea, depending on the shape of the cultivar’s inflorescence. While many species of hydrangeas have white flowers, bigleaf hydrangeas are prized for their beautiful inflorescences that act as a natural pH indicator of the soil the plants grow in. The petals of flowers will change depending on how basic or acidic the soil is. Flowers will be blue, indigo, or deep purple in acidic soils with a pH of 5.5 or less. Plants gown in a slightly acidic soil with a pH between 5.5 and 6.5 will have a mix of purple hues. Hydrangeas grown in neutral to basic soils with a pH greater than 6.5 (especially 7 and up) will generally have fuchsia to pink-colored flowers. Many gardeners will amend the soil of their hydrangea beds from year to year to achieve the color that they hope for.  

    Many folks know of the color-changing capabilities of hydrangeas, but keep reading for a few tips on how to properly care for them beyond adjusting soil pH. Hydrangeas prefer moist, well-draining soil and a sheltered spot with partial shade. Some cultivars tolerate full sun well, but must be watered consistently to look their best. Hydrangeas do not grow exceptionally large and are considered “low fire risk”, so are a better choice for planting near the home. 

    A small hydrangea with both purple and pink blooms
    This ‘Summer Crush’ hydrangea near my house will have purple blooms in acidic soils and fuchsia blooms with basic soils. Because both colors are appearing, I’m guessing this soil must have a pH between 5.5 and 6.5!

    There’s a reason why coastal New England towns seem to be filled with hydrangeas while interior towns, particularly for our friends in Vermont, western Massachusetts, Maine, and New Hampshire, have fewer. Bigleaf hydrangeas can tolerate cold temperatures, but only to an extent. Depending on the cultivar, bigleaf hydrangeas grow best from zones 6 to 8. Most cultivars will survive zone 5 winters, but might not flower well without protection – harsh winter temperatures, especially when paired with low snow cover, can kill flower buds.  

    Flower buds form on old growth for most cultivars of bigleaf hydrangea. Because of this, many folks will accidentally prune away flower buds in winter, resulting in poor flower production come summer. For this reason, it’s important to never prune bigleaf hydrangea in fall, winter, or spring. Only prune away the bare stems from the previous year when you see that no new growth is being produced from them, or in summer when collecting flowers for the vase on your kitchen table!  

     If you find the twiggy winter appearance unsightly and can’t help but prune, if you struggle with deer feeding, or if you live in an area with common late spring frosts, consider planting a “reblooming” bigleaf hydrangea. There are a few cultivars, such as ‘Endless Summer’ and sports, that will produce flower buds on old growth and (usually) a second flush on new growth. Alternatively, you could plant other species of hydrangeas, such as smooth hydrangea (Hydrangea arborescens), or panicle hydrangea (Hydrangea paniculata), which tend to be a little more cold-hardy, or oakleaf hydrangea (Hydrangea quercifolia), if you’re looking for a hydrangea for an area with very hot summers.  

    If you have questions about growing hydrangeas, or any other gardening topic, call the UConn Home & Garden Education Center (toll-free) at (877) 486-6271. You can also email us at ladybug@uconn.edu, visit our website, www.homegarden.cahnr.uconn.edu, or visit your local UConn Cooperative Extension center.  


    This article was published in the Hartford Courant and The Westerly Sun July 5, 2025