Episode 166: Managing Invasive Plants
UConn 360– Lauren Kurtz discusses invasive plant management and the new Invasive Species Certificate Program.
Episode 166: Managing Invasive Plants
UConn 360– Lauren Kurtz discusses invasive plant management and the new Invasive Species Certificate Program.
By now the vegetables and flower beds should be pretty well planted and plants starting to establish themselves. Despite many of our best efforts, a new crop of weeds is also attempting to get established. These garden pests compete for light, water and nutrients. They also may harbor or attract insects that prey on our plants. If left to their own devices, they can crowd out our desirable specimens reducing the air flow and leading to conditions more conducive to disease.
Weeds are generally sorted into 4 categories: perennial, biennial, winter annuals and summer annuals. There’s a good chance that you removed any winter annuals as you prepared your planting areas. These plants typically germinate in the fall, overwinter, bloom in early spring and set seed. They include weeds such as annual bluegrass, chickweed and shepherd’s purse.
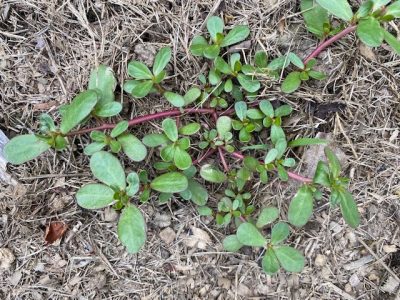
Perennial weeds include dandelions, burdock, thistle and plantains while Queen Anne’s lace and garlic mustard are some biennial ones. Usually, the summer annual weeds are most prevalent in recently planted vegetable and flower beds. Some examples are lambsquarters, galinsoga, purslane, crabgrass and ragweed.
You have probably heard the expression ‘A year’s worth of seeding is worth 7 years weeding’ or something along that line. Weed seeds can last a long time in the soil with purslane and dandelion seeds remaining viable up to 20 years and pigweed up to 40 years. So even letting a few weed plants go to seed will have you pulling up their progeny for quite some time.
What’s a gardener to do? The key to weed control is to stay ahead of them. Take them out when they are small and shallow rooted. For areas that are pretty much bare soil, like around vegetable plants, a small handheld hoe or cobra head weeder works great on patches of newly germinated weeds that are too tiny to pull by hand. For larger gardens, maybe a taller blade or stirrup hoe would be a good tool to have on hand.
I will admit to spending a lot of time on my hands and knees weeding. While this may be not practical for everyone, it gives you a chance to get up close and personal with both the weeds as well as your garden plants so you can see, for example, if any squash vine borers are attacking your squash or pumpkins or if your radishes are ready to be harvested or if that row of bean seeds has yet to germinate.
Mulch can be a gardener’s best friend. The key is to match the mulch to the garden. For vegetable gardens, straw mulches, shredded leaves or untreated grass clippings work well as they degrade over the season adding organic matter to the soil and feeding the bacterial microbes that are most active and essential in agricultural type soils. While many people use plastic, weed fabric or cardboard to keep weeds down, these have been shown to have negative effects on soil health. The benefits may outweigh the costs for commercial growers but for the home gardener, healthy soils mean healthy plants. Plus carboard, especially corrugated pieces often contains contaminants.
For perennial flower beds, I like the look of cocoa shell (if you don’t have dogs that would eat them) or buckwheat hull mulches. They set off your perennial foliage and flowering plants at a better scale than larger bark mulches, nugget mulches or woodchips do. The problem with these being they are not always easy to find or cheap. For trees and shrubs, coarser wood or bark mulches would be appropriate. The bottom line for mulches, is that regardless of which one you chose, it will help to keep weeds down.
In certain situations, the use of an organically certified (OMRI) herbicide might be helpful. There are a number of products on the market that contain essential oils, like clove or citrus, sodium or ammonium derivatives or even acetic acid (vinegar). I find them handy for high populations of just germinating weed seeds before planting or in pathways between rows. The tiny weeds are killed quickly especially on a sunny day.
Two things to consider when purchasing these products are that they typically do not kill the roots of larger established weeds. The top will generally die back but the roots are still alive and will resprout. The other thing is these organic weedkillers are non-selective meaning they can kill any plant they are sprayed on.
However, you choose to remove them, persistence and regular scouting will keep weeds to a minimum. Because the seeds can be in the soil, be transported when purchasing compost or plants, can blow in from the neighbor’s garden or even be moved by animals and people, weeds will always find a way into your gardens and it’s your job to keep them out.
Have a question about plants? The UConn Home Garden Education Office supports UConn Extension’s mission by providing answers you can trust with research-based information and resources. For gardening questions, contact us toll-free at (877) 486-6271, visit our website at homegarden.cahnr.uconn.edu, or reach out to your local UConn Extension Center at extension.uconn.edu/locations.
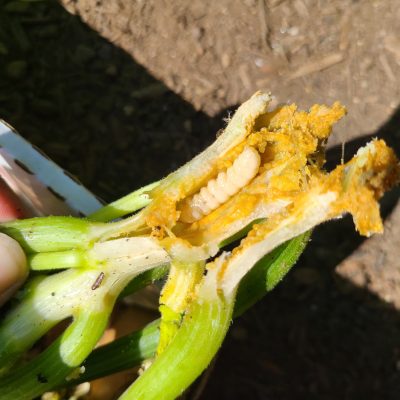
The Squash Vine Borer (SVB) is a red-orange and black winged insect. They emerge in early to mid-summer and lay their eggs at the base of squash stems. When those eggs hatch, larvae emerge and bore their way into the plant stem, continuing to eat your squash plants from the inside out until they are ready to pupate. Gardeners may not even notice their presence until they see squash plants wilting in the summer heat. Upon even closer inspection, a yellow, sawdust like appearance and entry hole at the base of the stem is often found. Once this is observed, it is often too late. While early June may feel too early to start scouting for these guys, it’s the perfect time to start planning defensive strategies to help protect your garden.
The first thing you can do, especially if you have a history with these insects, is select resistant cultivars. Knowing which types of squash are common targets can help you determine whether you will want to keep a closer eye on them this season, or maybe plant something different, altogether.
Cucurbita pepo is highly susceptible to Squash Vine Borer. This species includes Zucchini and summer squash. They have thin, hollow stems, which make it easy for these critters to get into. Pumpkins are also in this category. However, pumpkins are more likely to vine out and lay roots along the stems touching the soil surface. This helps the plant to withstand damage a bit better than its other counterparts.
Cucurbita maxima, which includes winter squash like giant pumpkins, Kabocha and Blue Hubbard varieties, is also susceptible to the SVB. While it is less preferred than C. pepo, it can still be targeted.
Cucurbita moschata is the most resistant plant species. C. moschata includes the butternut, honeynut and crookneck squashes. Their stems are thicker and more succulent, making them least favorable for the SVB to lay eggs on. Therefore, while not impossible, they stand a good chance against this garden pest. These insects are also rarely found in cucumbers and melons.
It is important to rotate your planting sites each year. These insects overwinter as pupae in the soil and emerge as adults in June-July. Planting in the same place each season is like placing a gift on their front doorstep. Moving your planting site and adding a protective row cover as soon as you plant can improve your odds at keeping the SVB away from your plants altogether. Leave the row cover until both male and female flowers begin to emerge. After that it is important to remove the row covers so pollinators can access the flowers.
For gardeners unable to rotate their gardens, preventative measures can still be taken. Do not use row covers as they can trap the pest in with your plants. Some recommend placing aluminum foil around the first couple inches of stem at the soil line to prevent insects from laying eggs and boring through stem tissue. Treating the base of the plants with a preventative pesticide may also be effective.
Chemical management is often tricky with these pests, and home gardeners may not feel it is worth the effort. Importantly, chemical management is no longer effective once the larvae have entered the stems, since they are then protected by the plants. In addition, these products can impact the pollinators visiting your cucurbits, so it’s important to carefully consider the full impact of chemical management. Always read the label in full and follow all instructions as prescribed.
Start scouting for the adults early. In mid to late June, check the base of stems for eggs and early boring damage. You may even see the adult insects flying around. Symptoms, like wilting, often begin in late June and become more common in July.
If you have a strong stomach and sense of adventure, you can carefully slice into the stem to try to find the larvae and extract it. Vining squash species may recover if the pest is removed and portions of vine are then buried in the soil, allowing new roots to take over and support the vine.
Alternatively, removing affected plants entirely and disposing of them in the trash may help to break the life cycle and remove pests from your garden for future seasons.
Since these insects typically only have one generation per year, your hard work does have a finish line. Paying extra attention and working to manage the SVB in early summer will allow your squash to grow healthy for the rest of the season. A second crop of summer squash can be planted in July, once adults are no longer out and laying eggs. This second crop should be unaffected by the SVB and produce healthy squash for your family to enjoy!
The UConn Home Garden Education Office supports UConn Extension’s mission by providing answers you can trust with research-based information and resources. For gardening questions, contact us toll-free at (877) 486-6271, visit our website at homegarden.cahnr.uconn.edu, or reach out to your local UConn Extension Center at extension.uconn.edu/locations.
Do Eggshells Actually Help Your Roses Grow? Here’s What a Gardener Says
The Spruce – Heather Zidack discusses how Egg Shells are best used in the garden, and things to consider before adding them!
Chaos gardening is a growing social media trend that encourages gardeners to relinquish control, scatter assorted seeds, step back, and see what happens. Instead of carefully spacing plants and planning layouts, chaos gardeners toss seeds and let nature decide what grows where. The results can vary widely, ranging from a surprising assortment of plants to a patch of disappointment.
Unlike traditional gardening, this approach emphasizes spontaneity over structure. For many, the appeal lies in its simplicity. Chaos gardening is easy to start, requires minimal knowledge, and often relies on leftover or inexpensive seed packets. The low-stakes, experimental nature makes it especially attractive to busy people or those new to gardening.
Still, the trend raises valid questions. Without site preparation or ongoing care, how well can seeds establish? And does “letting go” invite weeds into the garden under the guise of wildscaping?
In practice, chaos gardening often produces mixed results. While the concept is appealingly simple, success rates can be low, and plantings may struggle to persist long term. Still, gardeners interested in the trend can improve their chances of success by following a few simple suggestions.
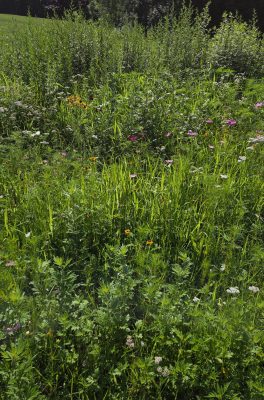
Avoid using this approach in large or prominent spaces. Start small, either in a container or a less visible area of the yard. To maintain a sense of experimentation, while increasing success, consider focusing on a single species at a time or scattering spring bulbs through an existing lawn. Tossing out a packet of “wildflower” seeds may sound charming, but it will not produce an instant, picture-perfect meadow. More often, it results in a steadfast patch of mugwort.
Even with a relaxed approach, a bit of planning goes a long way. Key factors such as sunlight and soil conditions still matter. The principle of “right plant, right place” applies regardless of gardening style. Identifying site conditions, selecting appropriate species, and preparing the planting bed can significantly improve outcomes.
Gardeners should also approach seed mixes labeled “wildflower,” “pollinator-friendly,” or “native” with some caution. While not inherently problematic, these mixes can contain species that are poorly suited to local conditions. A quick review of the species on the list can help inform decisions about whether the plants are suited to the region or growing conditions.
Learning how to recognize seedlings, including common weeds and invasive plants, is another important step. Early identification allows gardeners to remove undesirable species before they establish. Observing which plants succeed can also guide future efforts, gradually transforming a disorderly patch into a more reliable and productive space.
Patience is essential. Many perennials grown from seed take more than one season to flower. Including a mix of annuals and perennials can help maintain visual interest while longer-lived plants establish. As with any gardening method, some trial and error is expected.
Chaos gardening may never replace traditional approaches, but it offers an accessible entry point for beginners and a creative outlet for experienced growers. With a balance of spontaneity and informed decision-making, even an unstructured planting can become a living experiment.
The UConn Home Garden Education Office supports UConn Extension’s mission by providing answers you can trust with research-based information and resources. For gardening questions, contact us toll-free at (877) 486-6271, visit our website at homegarden.cahnr.uconn.edu, or reach out to your local UConn Extension Center at extension.uconn.edu/locations.
These are damaging plants to avoid in CT gardens. They can kill native plant species and take over.
The Hartford Courant – Dr. Lauren Kurtz discusses how native plants attract birds and pollinators, while invasive species harm ecosystems and what residents can do in their own gardens.
Solitary wasps are primarily hunting wasps which are either digger wasps or thread-waisted wasps. Most are seldom aggressive toward people because they are not defending a social colony. Instead, females are busy hunting other insects or arthropods to stock cells for a single larva to feed upon as they develop. Many solitary wasps dig nesting chambers in sandy soils, like the cicada killer and the great golden digger wasps. Others may use hollow pipes, tubes, window ledges or even sliding door tracks (a favorite site for the grass-carrying wasp).
Many of these wasps are also considered decent pollinators. They are active from June through late summer. The adult wasps die during the year and larvae generally pupate and emerge the following year. Females hunt specific prey such as caterpillars, katydids, cicadas and other insects which they paralyze and stock the nesting chamber with. An egg is laid on or near these future meals, and the larva will feed on them as it develops.
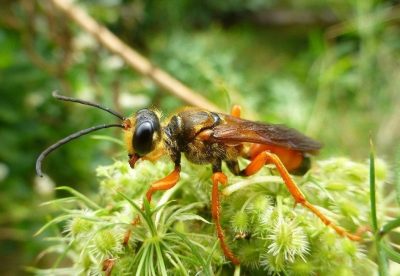
The great golden digger wasp, Sphex icheneumoneus, is a large wasp that sports golden hairs on the head and thorax and has a distinctive half orange half black abdomen. It is harmless to people and is often found on flowers in or near sandy soils where it digs nests for larvae in the ground. Main prey for larvae is katydids.
The Eastern Cicada killer, Sphecius speciosus, is one of the largest wasps in North America. It has amber wings and females are most evident in late July and early August as they burrow into sandy soils, leaving behind a squared off entrance and a sandy mound. Deep inside underground, the females have dragged paralyzed cicadas upon which they lay an egg. The larva will hatch and eat the paralyzed cicada. Next summer, after having pupated underground, the adults emerge. The females rarely sting but do alarm many homeowners due to their size and activity in lawns and along sidewalks.
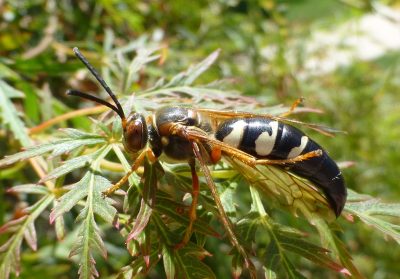
Grass carrying wasps Isodontia spp. create cells from grasses collected by the female. Each cell is stocked with paralyzed tree crickets, katydids and other orthoptera insects. Often packed together, these nesting cells can be found on windowsills, on bases of slider doors and on upper window ledges. Larvae overwinter in these cells and emerge as adults the following year or later that same year if there are two generations.
The oak apple gall wasp Amphibolips spp female lays an egg inside the tissue of an oak leaf inside which the larvae will hatch. The apple-like gall forms as a response to secretions from the larvae as it feeds on the leaf tissue safely inside. The gall turns brown after the adult wasp emerges. No damage is done to the oak. Cutting open the gall when green will reveal the wasp larva in the center.
Potter Wasp, Eumenes fraternus, females construct a small, rounded clay structure with a neck-like protuberance with a flattened top that makes it look like a tiny pot. After laying a single egg inside the female puts some paralyzed caterpillars and beetle larvae which the larva will eat. She seals the small opening with mud, which will be chewed open when the adult emerges next year. These tiny pots can be found on plants, rocks, pieces of wood and other places.
Solitary wasps pose little risk to us as they go about completing their life’s work. Defending nests is not a behavior such as is done by social wasps and hornets. Females will sting if handled or alarmed though, so avoid doing that. If digger wasps make you nervous, consider amending sandy soil with organic matter and keeping it moist when females are looking to excavate nesting chambers. Try to tolerate them for the short period of time they are active. Almost all can be found obtaining nectar from flowers in the wild and in cultivated landscapes.
The UConn Home Garden Education Office supports UConn Extension’s mission by providing answers you can trust with research-based information and resources. For gardening questions, contact us toll-free at (877) 486-6271, visit our website at homegarden.cahnr.uconn.edu, or reach out to your local UConn Extension Center at extension.uconn.edu/locations.
Spring is the ultimate bringer of change. The restless souls contained within all forms of life begin to awaken, bringing fiery hues back to the formerly dreary expanse of winter landscapes. We meet this shift with a warm welcome, grateful for a chance to start anew. Innately, we crave change, constantly striving towards something greater that will fill a part of ourselves we feel is missing. Also, innately, we are walking juxtapositions. Above our desire for change floats an asterisk, denoting an extraneous condition—our deep fear of the very thing which we wish so desperately for. New experiences bring about uncertainty and inconsistency. Thus, we cling to that which we find familiar and trustworthy to ground us while careening through the unknown.
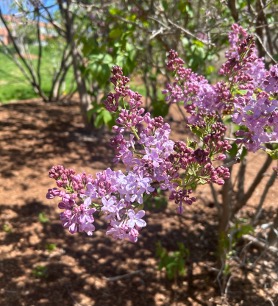
For me, ol’ reliable is the lilac shrub in my backyard. Season after season, I look out my window and am reassured by its presence, whether it is flush with vibrant blooms or displaying its tall barren branches. The leaf and flower buds of common lilac (Syringa vulgaris) are among the first whispers of spring I observe, appearing early in the season.
Members of the olive family, Oleaceae, lilacs are well suited to life in cold climates—in fact, the chill of winter is essential to their bud development and maturation. Although new plantings take a few years to adjust and establish themselves, these perennial shrubs are equipped with substantial longevity. Common lilacs can live for up to a century, cementing their place as a companion to rely on during every phase of our lives.
Common lilacs grow rapidly and immodestly, filling their landscape with a dominating sense of confidence. Success is dependent on being planted in sunny locations with moist, well-drained, and neutral to slightly alkaline pH soils.
The lilac’s blooms are dichotomous, both quietly delicate and also boisterous with a showstopping flair. Flowers emerge between late April and early May. A strong, sweet fragrance diffuses from the quaint petals which cluster together in formations called panicles. Lilac blooms appear in a variety of hues, ranging from lavender to blush pink or even a creamy white.
Even after the flowers of lilacs retire, matte heart-shaped leaves remain until the fall, painting the tall shrubs with dark green. During the dormancy of winter, gray stems and branches are visible, standing tall and proud even when cold weather casts its icy shadow over the once vibrant landscape.
Lilacs are relatively self-sufficient yet require some care and attention to maintain their vigor. Susceptible to fungal diseases like powdery mildew and septoria/pseudocercospora leaf spot, it is important to ensure proper airflow throughout plantings to discourage sporulation. Powdery mildew is characterized by gray mycelial growth on leaf surfaces, while septoria/pseudocercospora leaf spot appears as brown spots that expand into broad patches. Insect pests, namely the lilac borer and oystershell scale, also impose their will on lilacs. Borers tunnel and weave through branches, leaving holes and open wounds as evidence of their travels. Oystershell scale refers to small insects, resembling their namesake in appearance, that take refuge on lilac bark. These pests and diseases can commonly be managed through removal and destruction of damaged tissue. In severe cases, additional integrated pest management strategies may be necessary.
Consistent pruning practices are essential for lilacs to remain healthy throughout every season of change. Lilacs are beings of extreme preparation, developing next year’s buds as soon as the current flowering period is complete. By deadheading blooms promptly after they have run their course, lilacs are able to dedicate more energy to generating healthy flowers for future growing seasons. Renewal pruning is another beneficial technique—cutting back overgrown stems to remove barriers preventing light from reaching inner branches. This encourages new growth and results in lilacs which appear fuller, bursting with color from the inside out. Spring is the most appropriate time to employ these pruning tactics in accordance with lilac’s growing needs. Prune immediately after flowers start to fade for best results.
Lilacs are a cornerstone of spring, providing a familiar and reassuring sight to ground us when our own lives become unrecognizable. Lilacs and the endless wonders of spring gently remove the asterisk from our desire for change, reminding us to take solace in the familiar while welcoming all that the unknown may bring.
The UConn Home Garden Education Office supports UConn Extension’s mission by providing answers you can trust with research-based information and resources. For gardening questions, contact us toll-free at (877) 486-6271, visit our website at homegarden.cahnr.uconn.edu, or reach out to your local UConn Extension Center at extension.uconn.edu/locations.