Plant Stress

Managing Potassium for Cabbage Success

By Yiling Zheng, Graduate Student, Plant Science and Landscape Architecture, University of Connecticut 

Five harvested cabbage heads of increasing size are arranged on a white board in a grassy field, labeled with treatment rates of 0, 50, 100, 150, and 200 lb acre⁻¹. Surrounding cabbage leaves are visible on the ground, illustrating differences in cabbage growth across treatments.
Response of cabbage head size to potassium fertilizer application rates ranging from 0 to 200 lb/acre. Photo by Y. Zheng

Potassium (K) is an essential nutrient for growing healthy, productive cabbage. It plays an important role in root development, water management, enzymes activation, and overall plant health. Adequate potassium helps cabbage plants tolerate stresses such as drought, frost, insects, and diseases. One of potassium's most important functions is helping plants regulate water. During dry conditions, potassium improves the plant's ability to retain water and reduces the risk of wilting. Cabbage grown in K-deficient soils can experience changes in plant metabolism that can reduce growth and vigor. These changes include lower levels of amino acids needed for growth and nutrient uptake, reduced compounds that help plants cope with water stress, and disruptions in sugar movement within the plant. As a result, K-deficient cabbage may grow more slowly, produce lower yields, and become more susceptible to environmental stress. K also plays a critical role in cabbage nutrition and quality. For example, increasing K availability for cabbage can lead to increased starch sugar content in cabbage leaves.   

Sufficient K availability supports these important plant functions and promotes the development of a large, healthy leaf canopy before head formation, as well as the rapid growth of marketable cabbage heads. However, applying K beyond the crop's requirement does not typically increase yield or quality because cabbage plants can absorb more K than they need, a phenomenon known as luxury consumption. This unnecessary uptake increases fertilizer costs without providing additional benefits. In some cases, high K availability, such as from high-rate banded applications of potassium fertilizers, may increase the risk of cabbage head bursting and outbalance of essential nutrients. Therefore, proper K management is essential to maximize yield and quality while avoiding unnecessary fertilizer expenses and potential negative impacts on crops. 

A recent two-year field study conducted in Storrs, Connecticut, during 2024-2025 by graduate student Yiling Zheng in the Department of Plant Science and Landscape Architecture at the University of Connecticut demonstrated the benefits of potassium fertilization for cabbage production in soils low in K.  

In this study, soil test K was 138 lb acre⁻¹, below UConn's recommended optimum range of 250-349 lb acre⁻¹. K was applied as sulfate of potash (potassium sulfate) at rates ranging from low to high K supply levels. In both years, cabbage yield increased significantly with K fertilization up to 50 lb K₂O acre⁻¹, with no additional yield benefit observed at higher application rates. K fertilization increased marketable yield by 19% in 2024 and 58% in 2025 compared with the unfertilized control.  

Side-by-side cabbage plants grown under two fertilizer treatments, labeled 0 and 200 lb acre⁻¹, displayed on plastic mulch in a field. Plants at 200 lb acre⁻¹ are substantially larger, with fuller leaves and visible cabbage heads, while plants at 0 are much smaller and less developed.
Cabbage growth under contrasting potassium fertilizer rates: 0 lb/acre (left) and 200 lb/acre (right). Photo by Y. Zheng

Although K concentrations in marketable cabbage heads were not affected by fertilizer treatment, fertilization increased K concentrations in the unmarketable outer leaves. When K accumulation in both marketable heads and outer leaves was considered, total plant K uptake increased significantly with K fertilizer rate in both years. On average, K-fertilized cabbage took up approximately 150 and 200 lb K₂O acre⁻¹ in 2024 and 2025, respectively, compared with 110 and 90 lb K₂O acre⁻¹ in the unfertilized control. Across treatments, approximately 70% of total plant K was partitioned to the marketable head, with the remaining 30% retained in the outer leaves.   

This research also found that cabbage heads with higher K concentrations tended to have higher concentrations of N, P, Ca, Mg, S, Mn, Fe, and Cu, all of which contribute to the nutritional composition of harvested cabbage. These findings suggest that adequate K nutrition not only supports crop growth and yield but also enhances the uptake and accumulation of other essential nutrients. Maintaining sufficient K availability may therefore improve the overall nutritional quality of cabbage by promoting a more balanced mineral composition in the harvested heads. 

The UConn study demonstrated the importance of K fertilization for maximizing cabbage yield and quality. However, soil test potassium is the primary factor used to determine whether K fertilization is needed and how much should be applied. If soil test K levels are at or above the recommended critical level, additional K fertilizer is not necessary. Under these conditions, increasing K application is unlikely to improve cabbage yield or quality and may result in unnecessary fertilizer costs.  

Connecticut growers are encouraged to submit soil samples to the UConn Soil Nutrient Analysis Laboratory at the George Leigh Minor Plant and Soil Health Center before planting or transplanting cabbage. Soil testing provides the information needed to make sound fertilizer decisions and ensure that K and other nutrients are applied only when needed. By combining accurate soil testing with balanced fertility and careful nutrient management, growers can optimize cabbage yield and quality while protecting both farm profitability and the environment.

The UConn Home Garden Education Office at the George Leigh Minor Plant and Soil Health Center supports UConn Extension’s mission by providing answers you can trust with research-based information and resources. For gardening questions, contact us toll-free at (877) 486-6271, visit our website at homegarden.cahnr.uconn.edu, or reach out to your local UConn Extension center at extension.uconn.edu/locations. 

This article was published in the Hartford Courant October 11, 2026

Be on the Lookout for Apple Scab this Autumn

By Emily Leahy, UConn Plant Diagnostic Lab 

Close-up of a green leaf on a small branch, showing numerous dark brown to black irregular spots and browning along the edges. The leaf rests on a light-colored surface, highlighting signs of disease or leaf damage.
Example of apple scab symptoms on an apple leaf. Photo by UConn Plant Diagnostic Lab

Apples are synonymous with autumn, as their fragrance and flavor have become mainstays of the season which many call their favorite. Connecticut is no stranger to apple production—our state harvests over half a million bushels of apples annually. However, plant pathogens and pests do not harbor the same love for apples as many of us do. These agents wreak havoc year-round, impacting the health of apple trees even before fruit has begun production. One of these agents is Venturia inaequalis, the fungal pathogen responsible for apple scab.  

Apple scab is one of the most common and economically impactful diseases of apple crops worldwide. Members of the genus Malus—most notably including apples, crabapples, and their cultivated and wild varieties—can be susceptible to infection.  

Venturia inaequalis overwinters in the form of fungal fruiting bodies on apple leaf debris. The pathogen has two phases of its disease cycle. The primary phase begins when saprophytic growth, meaning fungal growth unrelated to disease, occurs for about a month after leaves fall. In the spring, rainfall prompts the release of ascospores (reproductive fungal structures) at the same time apple leaf buds begin to emerge and unfurl. Under the proper environmental conditions, these spores travel to new hosts with wet leaves which they can enter via leaf cuticles. The secondary phase of the disease cycle occurs as the pathogen obtains nutrients from the leaves, prompting its conidia (another form of fungal spore) to emerge and spread to other hosts. In what is known as secondary infection, conidia germinate on new apple leaves, allowing thread-like fungal structures called hyphae to inoculate the host. Numerous secondary infection cycles of Venturia inaequalis can occur during a single growing season depending on the amount of rainfall and humidity present in the environment. 

Symptoms of apple scab are distributed across multiple regions of the host plant, with leaves and fruits being the most visibly impacted. In the primary stage of infection, small, raised dark green or olive lesions appear on either surface of young leaves. These lesions increase in size, sometimes covering the entire leaf in what is known as sheet scab, and change color to yellow or black. In severe cases, leaves become scaly, shriveled, and eventually fall prematurely. Severity of infection is dependent on host age—younger hosts are more susceptible to the disease. Secondary lesions develop during the growing season, appearing as brown, irregular, raised leaf spots. Fruit tissue becomes gray or black in patches, which turn corky and crack as disease progression advances. Apples infected by Venturia inaequalis near the end of the growing season or in storage may develop pinpoint scab—small, dark spots on the tissue surface.  

The ability of apple scab to manifest at several points in the host’s life cycle and on a multitude of tissue surfaces makes the disease one of great economic impact for commercial growers. Cultural and chemical control methods are available, with proper sanitation and cleanup practices being essential to remove potential surfaces for the pathogen to overwinter on. Additionally, apple cultivars such as Liberty, Akane, and Chehalis have resistance to apple scab. Samples suspected of having apple scab may be submitted to the UConn Plant Diagnostic Lab for confirmation.  

The UConn Home Garden Education Office at the George Leigh Minor Plant and Soil Health Center supports UConn Extension’s mission by providing answers you can trust with research-based information and resources. For gardening questions, contact us toll-free at (877) 486-6271, visit our website at homegarden.cahnr.uconn.edu, or reach out to your local UConn Extension center at extension.uconn.edu/locations. 

This article was published in the Hartford Courant October 5, 2026

Something Rotten in Tomato Land?

By: Dawn Pettinelli, UConn Home Garden Education Office 

With the lazy, hazy days of summer in full swing, your vegetable garden is likely in full production mode. Tomatoes should be producing lots of blossoms by now with the earlier varieties offering ripening fruit. While it is true that tomatoes can be challenging to grow in New England, being susceptible to several diseases as well as some abiotic disorders, there are few summer pleasures greater than taking that bite of the first, ripe, sun-kissed tomato. That’s most likely the reason that 86% of food gardeners, according to the National Gardening Association, chose to grow them.  

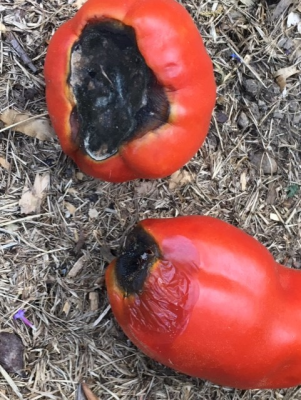
Ripe red tomatoes with sunken in black spots at the bottomBetween summer heat, sporadic rainfall, vacations and inconsistent watering, some of us are noticing black sunken patches on the blossom end (bottoms) of our ripening fruit. This is an abiotic or physiological disorder known as blossom end rot. It starts out with a small water-soaked area that enlarges and darkens as the tomato tries to ripen. The affected tissue has a dark, leathery appearance and may be colonized by a bacteria giving it a black color.  
The cause of this disorder is lack of calcium. Most of us know that people require calcium for strong bones and healthy teeth. Plants also have calcium requirements that must be met for good growth and establishment. It is needed for the proper growth and functioning of shoot and root tips and is an integral part of cell walls. As your tomatoes grow in size, more cells with more cell walls are needed. 

Plants take up the calcium they need through their roots. Nutrients like calcium, potassium and others are dissolved in the water that is in the soil. When a plant loses moisture on a hot day through the process of transpiration, the roots take up water to replace that loss and keep the plant turgid. The soil water contains nutrients the plants need. Anything that restricts the plant roots’ ability to take up water also reduces the amount of nutrients a plant receives.  

Blossom end rot is usually caused by one of two factors. Either there is not enough calcium in the soil or there is not enough water in the soil for the calcium to be able to move into the plant. Sometimes, because of the high humidity, factor number three comes into play. Plants are not transpiring that much because of the high humidity. Since little water is being lost through the leaves, little water (containing calcium and other nutrients as well) is being absorbed by the roots. So even if your soil is loaded with calcium, and your garden is irrigated, plants may not able to transport enough calcium from the soil water into their internal structures.  

If blossom end rot is noticed, first take a soil sample and send it to a soil testing laboratory (s.uconn.edu/soil-lab) to determine the soil pH and calcium levels. Often if calcium levels in the soil are too low, plants would also be exhibiting signs of deficiency including stunted growth, curling of leaves and perhaps spotting or scorching on leaves. Follow any recommendations for limestone additions if the pH or calcium levels are too low.  

Next, evaluate your watering techniques. Often this disorder occurs when succulent, vigorously growing plants are subjected to drought conditions. It is best to water deeply and less often than to water lightly on a daily basis. After watering, dig a small hole to check if the top 6 inches or so of soil are moistened. Adjust your watering schedule accordingly and if at all possible, just apply water to the base of the plant and avoid getting the foliage wet to discourage diseases. There isn’t much one can do to lower the humidity and increase plant transpiration rates except hope for a bout of dry weather.  

To thwart blossom end rot, some gardeners are purchasing blossom set sprays containing calcium to apply to their plants’ foliage. Others are fertilizing and spraying the plant’s foliage with calcium chloride, as directed on the package or making up a calcium solution by mixing gypsum or limestone with water and letting it sit overnight. After 24 hours or so, it can be used to drench the plants and soil. Gypsum can also be applied around the plants at a rate of about 5 pounds per 100 square feet and carefully scratched into the soil. Take care not to injure your tomato plant’s roots and water afterwards. Another option is to search out water soluble fertilizers that contain calcium and can also be used as a foliar spray and apply them to the plant’s leaves. 

The UConn Home Garden Education Office supports UConn Extension’s mission by providing answers you can trust with research-based information and resources. For gardening questions, contact us toll-free at (877) 486-6271, visit our website at homegarden.cahnr.uconn.edu, or reach out to your local UConn Extension office at extension.uconn.edu/locations.   


This article was published in the Hartford Courant July 19, 2026

Water your CT Garden with Confidence

By: Heather Zidack, UConn Home Garden Education Office

Watering is an essential skill for gardeners that is often overlooked. “How often should I water and how much?” is a frequent question with new gardens or when establishing new plants.  

There’s no magic formula for watering your plants. The soil texture, local climate, and even the metabolism of your plants can affect how often water needs to be replenished. So how do we know what to do? Over time, experienced gardeners form a sense of their soil and their plant’s needs, and perfect their watering practices.   

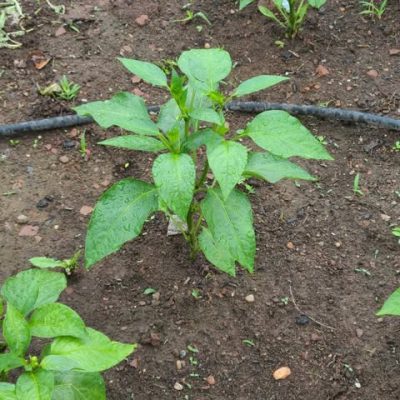
Pepper plant growing in a garden bed with a drip irrigation hose nearby.What plants really need 

Most established garden plants require about 1 inch of water per week from rainfall and irrigation combined. When mother nature doesn’t provide this through rainfall, we can supplement by adding about 0.62 gallons of water per square foot in a garden bed.  However, actual needs vary with soil type, weather conditions, plant species, and stage of growth.   

Knowing your soil texture can help you anticipate what your watering schedule might look like. Sandy soils are known for rapid drainage, which often means they require more frequent watering. Clay soils, on the other hand, hold water for longer periods and generally need less frequent irrigation. Plants also have preferences for different soil types, many of which are related to water availability and drainage. Choosing the right plant for the right site can help ensure it receives adequate moisture. 

A plant's water demand may vary depending on its stage of growth. For example, we tend to encourage additional support for plants that are fruiting/flowering, or plants that have just recently been transplanted. Keep a close eye on these plants and their water needs during stressful periods. Newly planted trees, shrubs and perennials need this additional monitoring and support through their first year of establishment in the landscape. You may find that you’re watering them more frequently during this time. This can be totally normal.  

Sometimes, soil can appear dark even when it hasn’t been watered, so don’t rely on appearances alone.  Your hands are one of the most reliable tools for checking soil moisture. Dig a few inches below the surface and feel the soil. If it feels cool and slightly moist, watering can likely wait. If it feels dry and crumbly, it's time to water. If the soil feels saturated or releases water when squeezed, allow it to dry somewhat before watering again. 

Water Deeply 

Giving your plants a good soak does more than just help them in the short term. Deep watering provides a slow, thorough soak that reaches the plant’s root zone rather than just the soil surface. This encourages deeper root growth and can improve drought tolerance, often allowing for less frequent watering. For most vegetables and perennials, water should reach at least 6–12 inches into the soil. Trees and shrubs may benefit from moisture penetrating even deeper into the root zone. 

Apply water slowly at the dripline so it soaks in without pooling or running off. Use a soaker hose, or a regular hose on a slow trickle over the root zone of your plants. Avoid high-flow sprinklers, since they may cause runoff. Keep in mind that water movement depends on soil type.  

Check the soil every so often to ensure that water is penetrating deep enough and set a timer for yourself. After a few watering cycles, you will become familiar with the timing and flow rate for your specific soil and plants. 

Stay Consistent 

Don’t automatically change your watering habits just because the temperature changes.  Hot weather can increase water demand, but it is essential to always check the soil first. During periods of heat and drought stress, plants can close their stomata and reduce water use as a survival mechanism. While this may slow water uptake, plants still need adequate soil moisture. Overwatering, however, may not be helpful. Instead, roots can sit in saturated soil and develop diseases like root rot. Always check the top few inches of soil to ensure water is needed. 

When weather starts to cool off in the fall, continue your watering practices. By watering until the ground freezes, you help your plants, survive the winter. The effects of winter burn can be reduced when evergreens enter the winter properly hydrated.  

Watering is an essential task in the garden year-round. It is important to know your plants, your soil, and the climate you are growing in to ensure you are giving your plants enough hydration. By watering only when needed, watering deeply, and continuing these practices well into the fall, you will be sure to have healthy plants year round! 

The UConn Home Garden Education Office supports UConn Extension’s mission by providing answers you can trust with research-based information and resources. For gardening questions, contact us toll-free at (877) 486-6271, visit our website at homegarden.cahnr.uconn.edu, or reach out to your local UConn Extension center at extension.uconn.edu/locations.   

This article was published in the Hartford Courant July 11, 2026

What’s Going Down with Your CT Basil This Summer?

By: N. Raymond and Emily Leahy, UConn Home Garden Education Office

What's Going Down with Your CT Basil This Summer?
By: N. Raymond and Emily Leahy, UConn Home Garden Education Office 

Basil growth is ramping up as we enter July. As these tasty plants begin to flourish, it’s important to keep an eye out for a pathogen known as downy mildew. Basil downy mildew (Peronospora belbahrii) severely impacts numerous varieties of basil (Ocimum spp.)  worldwide. The disease, caused by an oomycete pathogen, is especially prevalent in sweet basil (Ocimum basilicum). Oomycetes, also known as water molds, behave similarly to fungi yet are equipped with different structures and means of infecting plant material. Using water or water-based secretions, their reproductive cells (known as zoospores) adhere to the surfaces of plant tissue to inoculate their hosts.  

Leaves suffering from basil downy mildew exhibit yellow/pale discoloration (chlorosis) and browning on their upper surfaces. Chlorotic lesions expand and become necrotic, with leaves eventually falling prematurely. Small sac-like structures develop on the underside of leaves and are visible as purple-gray dots. These are called sporangia, which are specialized structures that can form, store, and release spores. Basil downy mildew prefers moist and humid conditions that encourage the growth and development of the pathogen.  

P. belbahrii must occupy a living host to survive and reproduce, making it an obligate parasite. The pathogen can only overwinter in warm environments where hosts will not freeze during cold temperatures. Sporangia germinate on hosts under high humidity and moderate temperatures. The germ tube of P. belbahrii enters basil leaves through microscopic openings called stomata where it can grow, expanding what is known as its hyphae network (filamentous growth structures of fungi and oomycetes) between plant cells. As the disease progresses, P. belbahrii will colonize the leaves, stems, and seeds of its host. Symptoms are often visible within 5-10 days of inoculation. However, infected hosts may also appear asymptomatic. Typically, sporulation of P. belbahrii occurs at night in conjunction with moist and humid conditions. Sporangiophores break through stomata on the underside of leaves, from which sporangia are released and travel to inoculate new leaves. Extended periods of leaf wetness, accompanied by moderate temperatures and high humidity, encourages prolific growth of P. belbahrii.  

Basil downy mildew can be controlled through cultural and chemical methods. Since P.  belbahrii thrives in moist conditions, it is crucial to maintain proper air circulation and space between plants. This can be achieved by planting at appropriate distances when you start your garden, or by thinning your plants later in the growing season. Planting seeds that are certified free of the pathogen minimizes the potential for disease as well. Utilizing drip irrigation or similar efficient watering systems can decrease standing moisture on and around basil plants. Avoid overhead watering or sprinkler systems. Fungicides are labeled for effective use against this pathogen, if chemical control is deemed necessary. Some cultivars with resistance to basil downy mildew are included in the table below.  

Type  Variety 


Sweet 

Amazel 

Everleaf 

Evi 

Eleonora 

Prospera 

Prospera Active 

Rutgers Devotion 

Rutgers Obsession 

Rutgers Passion 

Rutgers Thunderstruck 

Purple  Red Rubin 

Prospera Red 

Scented  Sweet Dani (lemon) 

Lime Basil 

Our colleagues at Cornell have performed quite a bit of basil downy mildew research, which can be accessed at https://www.vegetables.cornell.edu/pest-management/disease-factsheets/basil-downy-mildew/. Visit this link to learn more. 

Have a question about plants? The UConn Home Garden Education Office supports UConn Extension’s mission by providing answers you can trust with research-based information and resources. For gardening questions, contact us toll-free at (877) 486-6271, visit our website at homegarden.cahnr.uconn.edu, or reach out to your local UConn Extension Center at extension.uconn.edu/locations. 


This article was published in the Hartford Courant July 4, 2026

Start Scouting Now for this Common CT Garden Pest

By Heather Zidack, UConn Home Garden Education Office 

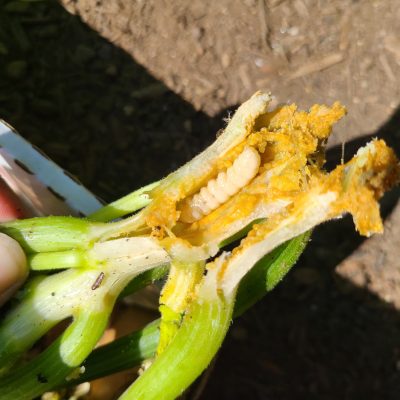
Close-up of a split green squash stem revealing orange plant tissue and a pale, grub-like larva inside, with soil visible in the background.Provide your feedback on BizChat
SVB larvae inside of a zucchini stem. Photo by H. Zidack

The Squash Vine Borer (SVB) is a red-orange and black winged insect. They emerge in early to mid-summer and lay their eggs at the base of squash stems. When those eggs hatch, larvae emerge and bore their way into the plant stem, continuing to eat your squash plants from the inside out until they are ready to pupate. Gardeners may not even notice their presence until they see squash plants wilting in the summer heat. Upon even closer inspection, a yellow, sawdust like appearance and entry hole at the base of the stem is often found. Once this is observed, it is often too late. While early June may feel too early to start scouting for these guys, it’s the perfect time to start planning defensive strategies to help protect your garden.  

The first thing you can do, especially if you have a history with these insects, is select resistant cultivars. Knowing which types of squash are common targets can help you determine whether you will want to keep a closer eye on them this season, or maybe plant something different, altogether.  

Cucurbita pepo is highly susceptible to Squash Vine Borer. This species includes Zucchini and summer squash. They have thin, hollow stems, which make it easy for these critters to get into. Pumpkins are also in this category. However, pumpkins are more likely to vine out and lay roots along the stems touching the soil surface. This helps the plant to withstand damage a bit better than its other counterparts.  

Cucurbita maxima, which includes winter squash like giant pumpkins, Kabocha and Blue Hubbard varieties, is also susceptible to the SVB. While it is less preferred than C. pepo, it can still be targeted. 

Cucurbita moschata is the most resistant plant species. C. moschata includes the butternut, honeynut and crookneck squashes. Their stems are thicker and more succulent, making them least favorable for the SVB to lay eggs on. Therefore, while not impossible, they stand a good chance against this garden pest.  These insects are also rarely found in cucumbers and melons.  

It is important to rotate your planting sites each year. These insects overwinter as pupae in the soil and emerge as adults in June-July. Planting in the same place each season is like placing a gift on their front doorstep. Moving your planting site and adding a protective row cover as soon as you plant can improve your odds at keeping the SVB away from your plants altogether. Leave the row cover until both male and female flowers begin to emerge. After that it is important to remove the row covers so pollinators can access the flowers.  

For gardeners unable to rotate their gardens, preventative measures can still be taken. Do not use row covers as they can trap the pest in with your plants. Some recommend placing aluminum foil around the first couple inches of stem at the soil line to prevent insects from laying eggs and boring through stem tissue. Treating the base of the plants with a preventative pesticide may also be effective.  

Chemical management is often tricky with these pests, and home gardeners may not feel it is worth the effort. Importantly, chemical management is no longer effective once the larvae have entered the stems, since they are then protected by the plants. In addition, these products can impact the pollinators visiting your cucurbits, so it’s important to carefully consider the full impact of chemical management. Always read the label in full and follow all instructions as prescribed.   

Start scouting for the adults early. In mid to late June, check the base of stems for eggs and early boring damage. You may even see the adult insects flying around. Symptoms, like wilting, often begin in late June and become more common in July. 

If you have a strong stomach and sense of adventure, you can carefully slice into the stem to try to find the larvae and extract it. Vining squash species may recover if the pest is removed and portions of vine are then buried in the soil, allowing new roots to take over and support the vine.   

Alternatively, removing affected plants entirely and disposing of them in the trash may help to break the life cycle and remove pests from your garden for future seasons.  

Since these insects typically only have one generation per year, your hard work does have a finish line. Paying extra attention and working to manage the SVB in early summer will allow your squash to grow healthy for the rest of the season. A second crop of summer squash can be planted in July, once adults are no longer out and laying eggs. This second crop should be unaffected by the SVB and produce healthy squash for your family to enjoy! 

The UConn Home Garden Education Office supports UConn Extension’s mission by providing answers you can trust with research-based information and resources. For gardening questions, contact us toll-free at (877) 486-6271, visit our website at homegarden.cahnr.uconn.edu, or reach out to your local UConn Extension Center at  extension.uconn.edu/locations.   

This article was published in the Hartford Courant June 7, 2026

Don’t Let Dry Soil Follow Your Plants Into Winter!

By Holly McNamara, UConn Plant Diagnostic Lab

This year, Connecticut’s notably dry summer conditions have continued into fall. According to the U.S. Drought Monitor, all counties are abnormally dry for this time of year, and some are even considered to be in a moderate drought. Thus, many trees, shrubs, and perennials are heading into winter low on moisture. These conditions combined with the dry air, low precipitation, and fluctuating temperatures characteristic of Connecticut winters can lead to plant damage if no supplemental water is provided. Many of your plants will benefit from a deep final soak before the ground freezes.

Fall drought stress often doesn’t show up until spring, or even the following summer.Affected plants may appear perfectly normal and resume growth in the spring, using stored food energy. Plants may be weakened or die in late spring or summer when temperatures rise. Browning evergreens, delayed leaf-out, and sudden dieback are common signs of plants that went into winter too dry.

Moist soil is so important in the fall and winter months because it provides insulation to the roots. It may seem counter-intuitive, but properly hydrated soil does a much better job at protecting roots from freezing temperatures than dry soil. Root damage occurs for this reason when plants do not receive enough late-season moisture.

Woody plants with shallow root systems require the most supplemental water during extended dry periods in the fall and winter. Trees in this category include maples, birches, willows, and dogwoods. This category also includes perennials, and shrubs like hydrangeas, boxwoods, and azaleas. These plants benefit from mulch to further conserve soil moisture and buffer the roots from temperature swings. Apply mulch about 2 to 4 inches away from the trunk all the way to the outermost reach of its branches in a doughnut shape.

Evergreen needles up close
Evergreens need sufficient water in dry falls to help prevent winter injury. Photo by Heather Zidack

Evergreens also benefit from fall and winter watering because they do not go dormant in the winter. Evergreens of any age are still actively respiring during the coldest months of the year and will continuously lose water through their needles. If they go into the winter with dry soil, they are more likely to have a difficult spring recovery. This is especially true for those in open or windy areas.

Only water when daytime temperatures are above 40°F, ideally in the late morning or early afternoon so the water can soak in before possible freezing at night. Feel the soil at a depth of 4 to 6 inches to ensure that supplemental water is necessary. Soil should be consistently moist, but not oversaturated or muddy. Stop supplemental watering after the ground freezes because plants cannot absorb water through frozen soil. To water, use a soaker hose to provide a slow stream of water that can penetrate deeper into the soil with limited runoff. If your hose is already stored away for the winter, and your tree or shrub is small, consider drilling a 1/8-inch hole at the bottom of a 5-gallon bucket and filling that with water for a slow, steady stream. If dry weather continues into the winter and there’s little snow cover, additional watering once or twice a month may be needed until the soil hardens.

A final round of watering now can prevent root injury that won’t be visible until much later. Evergreens, deciduous trees, and other landscape plantings will head into winter stronger with a little extra attention this month. Giving the soil one last watering before it freezes is one of the simplest ways to protect your landscape from winter stress.

The UConn Home & Garden Education Center supports UConn Extension’s mission by providing answers you can trust with research-based information and resources. For gardening questions, contact us toll-free at (877) 486-6271, visit our website at homegarden.cahnr.uconn.edu, or reach out to your local UConn Extension center at extension.uconn.edu/locations.

This article was published in the Hartford Courant October 25, 2025

Why is My Lilac Blooming in the Fall?

By Pamm Cooper, UConn Home & Garden Education Center

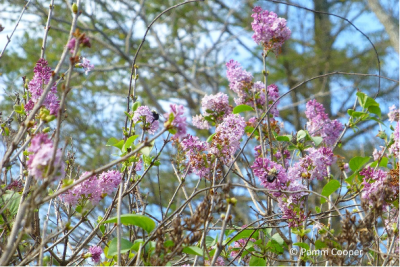
Bumblebees on fall blooming lilacs
Photo by Pamm Cooper, UConn Home & Garden Education Center

Spring-blooming woody plants like lilacs (especially the old, grafted varieties), ornamental cherries, forsythia, crabapples, azaleas and some magnolias set their flower buds for the following year in early summer shortly after flowering.  Usually, flower buds are triggered to bloom by environmental conditions which normally occur after an extended fall and winter cold period, followed by longer days and warming temperatures in spring. It is not typical for these plants to have a second bloom in the fall, but environmental conditions sometimes trigger premature flowering in the fall. Some plants may have only a few flowers rebloom, while other plants may have more flowers open in the fall.  

Some of the reasons for this out of season bloom are extended summer heat and drought conditions where supplemental water is lacking.  Severe early defoliation, especially from certain fungal pathogens, can also contribute to reblooming. The past two springs have been very wet and diseases such as anthracnose and Pseudocercospora spp. leaf spot may have caused leaves to brown, shrivel and drop early. This stresses the shrub and contributes to out of sync rebloom if other conditions are right. Good sanitation practices such as cleaning up infected leaves will be helpful in reducing fungal infections the following year. 

If a plant is healthy and relatively unstressed, the normal seasonal move to cooler weather triggers dormancy. Plants that are deciduous will drop leaves as daylight length and temperature both decrease. Next year’s leaf and flower buds will also remain in a dormant state. Flowering and leafing out will be triggered by increasing daylight and air temperatures the next spring. 

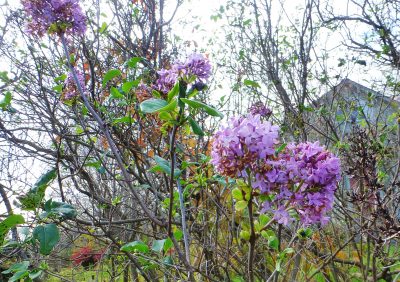
Lilac flowers opening in October
Photo by Pamm Cooper, UConn Home & Garden Education Center

If certain woody plants have been stressed during the growing season, however, the change to cooler weather followed by some warmer weather can trigger some of the flower buds to open prematurely. This false dormancy especially affects flower buds near the tops of old-style lilacs where it is sunnier and warmer. Ornamental cherries may show sporadic flowering all over the tree where there is a southern exposure.  

While fall reblooming of ornamental trees and shrubs can lead to a disappointing floral display the following spring, it is not harmful to the plant. After a less showy spring bloom period, flower buds will be produced normally. If stressful conditions caused by environmental conditions, insect pests or fungal pathogens are minimal, then a second bloom in autumn is unlikely to occur. Gardeners and landscapers can only do so much, and while the weather is out of our control, making sure plants are maintained properly to avoid stress during the summer will go a long way in helping them remain as healthy as possible.  

The UConn Home & Garden Education Center supports UConn Extension’s mission by providing answers you can trust with research-based information and resources. For gardening questions, contact us toll-free at (877) 486-6271, visit our website at homegarden.cahnr.uconn.edu, or reach out to your local UConn Extension center at extension.uconn.edu/locations.

This article was published in the Hartford Courant October 18, 2025

Dodder – A Common but Weird Parasitic Plant

By Pamm Cooper, UConn Home & Garden Education Center

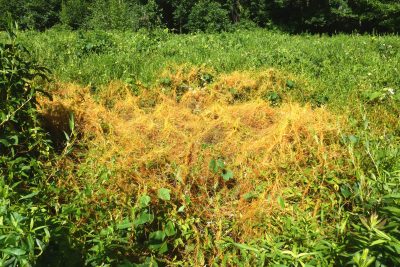
Dodder plant wrapped around a host and flowering
Photo by Pamm Cooper, UConn Home & Garden Education Center

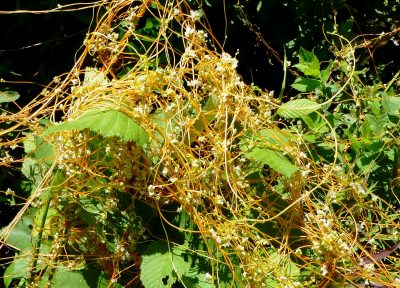
Dodder is an obligate parasite of certain plants. This unusual member of the morning glory family is also known as “Angel’s Hair” and “Strangle Weed.” Like Indian pipe, another parasitic plant, Dodder has no chlorophyll to manufacture its own food, so nutrients and water are obtained from its host plant.  Its yellow to orange twining stems can form stringy, dense orange mats that cover its host plants, and it will often climb over other nearby plants as well. This vine twines counterclockwise around stems and other parts of its host.  Look for it in mid- July through September in damp fields or on stream and pond banks. 

Dodder germinates from seeds produced in earlier years. The new plants have only a few days to find a suitable host plant, or they will die. After connecting with the host plant, dodder will degrade at the soil level where it originated and is then free of any soil contact. Dodder has no leaves or roots, but it does produce flowers and then seeds.  The only way new plants can be re-established is from seed produced at least the previous year or even earlier.  

Dodder feeds on its host by means of small tubes called haustoria that pierce into the hosts leaf or stem vascular system. One type will siphon water from the xylem, and another type will obtain food (minerals, sugars etc.) from the phloem of the host plant. In this way, dodder obtains essential nutrients and water for its own survival at the expense of its host plant. Five-angled dodder Cuscuta pentagona, a very common dodder species found here in Connecticut does not have specialized host plant preferences. 

Since not all plants are suitable hosts for dodder, and because it needs to find a host quickly, dodder has a unique ability to “sniff out” certain plant chemicals and will gravitate toward these plants soon after germination. Notable hosts are jewelweed in the wild and tomatoes in crop cultivation. Thus, if you are interested in finding dodder, in July and August check out places where jewelweed abounds. Look for mats of orange, stringy vines covering the tops of this plant and perhaps on nearby Joe-pye weed and goldenrods.  

Yellow strings of dodder encompassing plants in a field
Photo by Pamm Cooper, UConn Home & Garden Education Center

Dodder seeds can survive in soil for twenty years or more and will germinate as conditions are suitable. Because of the longevity of its seed viability, dodder may be found either yearly in the same area or appear there years later. Flooding can also relocate the seeds, so it may appear along various spots along the same stream or pond. Look for its small white flowers appearing in clusters along the vine in late July and August. 

Once dodder is firmly established on the host plant in the wild, research has shown that removal of the host plants and the dodder, especially before seeds are set on the dodder, will be more effective than other methods. This may need to be done yearly until any seed bank is exhausted. Try to scout early in July as dodder is getting established. Sometimes small dodder plants can be removed from the host. Some people with dodder persisting in extensive areas have burned these sites, and this will also severely impact any seeds on the ground. 

Dodder is an aggressive plant, but it is not considered invasive because it is a native plant. It has received the dubious honor of making the Federal List of Noxious Weeds, though.  Although its hosts may be severely weakened, dodder does not always kill its host. While that is not reasonable cause to let it run rampant in a garden, in the wild it is in more of a tournament for survival. May the best plant win… 

The UConn Home & Garden Education Center supports UConn Extension’s mission by providing answers you can trust with research-based information and resources. For gardening questions, contact us toll-free at (877) 486-6271, visit our website at homegarden.cahnr.uconn.edu, or reach out to your local UConn Extension center at cahnr.uconn.edu/extension/locations. 

This article was published in the Hartford Courant September 1, 2025

Extreme Sports for Plants: Temperature Tolerance

By Dr. Matthew Lisy, UConn Adjunct Faculty

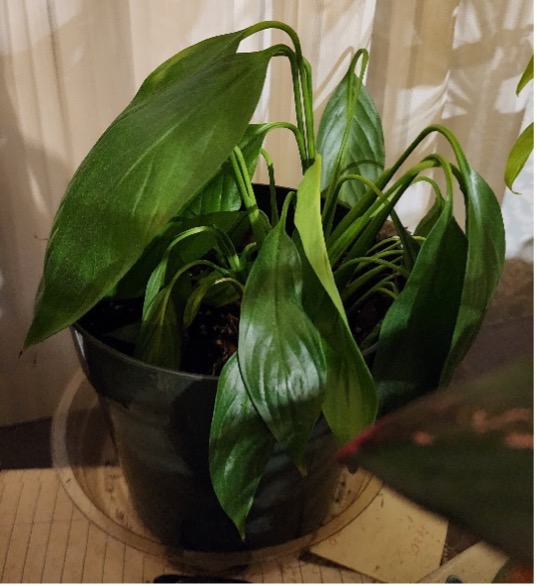
Spathiphyllum wallisii in a pot wilting indoors

This Spathiphyllum wallisii is forty years old. In the fall of 2024, it wilted due to an extreme negative temperature change. (photo by M. Lisy)

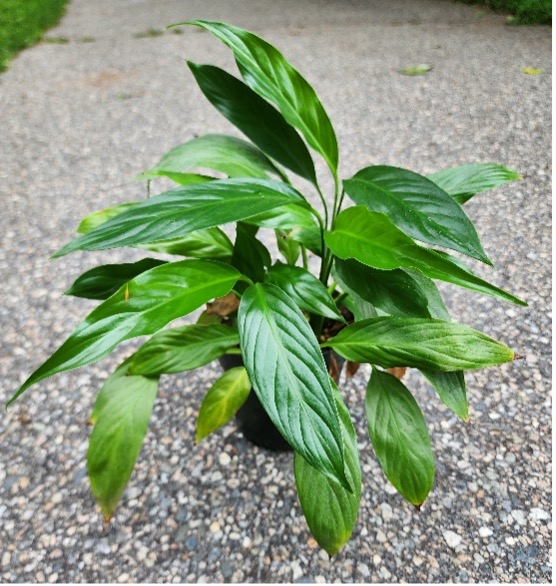
Spathiphyllum wallisii outside, lush and healthy

This is the same Spathiphyllum wallisii showing a lot of new growth during the warm, humid summer of 2025. (photo by M. Lisy)

Plants, like humans, have an ideal temperature preference.  In general, we like to have temperatures between 60 to 80 degrees Fahrenheit.  Temperatures outside this range cause us stress.  Our plants have very similar temperature requirements, only they have no ability to shiver or move!  This past winter, I had a 40-year-old houseplant near my bedroom window.  Our fall weather hit, and we dropped about 30 degrees in a day.  My plant wilted and looked like it was going to die.  After a long process of investigation and discussions with my fellow plant professionals, I can only conclude it was the rapid temperature change.  The good news is that it made a full recovery once it adapted to the cooler weather.

This past winter, I had some Sansevieria that were under my windowsill.  They get beautiful light in the later part of the day.  The house is heated to 55 degrees, which is above their lower temperature tolerance, but the plants were not looking good.  This spring, I found out that the storm window had fallen out of place.  This set up a cold draft that negatively affected the plants, causing some formerly unexplained rot over the winter.

Not all plants have the same susceptibility to temperature.  Cacti and succulents are usually from hot, arid climates.  These plants are used to seeing temperatures soaring in the day, and then getting comparatively cold at night.  As long as they are given proper light, most of these plants can tolerate life very easily in our homes.  Even cold, unheated basements or outdoor greenhouses are just fine as long as temperatures stay above freezing.

Many of our plants come from the tropical forest floor where they are used to similar temperatures during the day and the night, all year long.  While there is some adaptation to life in our homes, they have a preferred temperature and humidity range.  There are some really neat “new” Philodendron species being offered for sale.  Many of them have minimum temperatures of 60 or even 65.  This can be difficult to do in an era where our smart thermostats are programed to turn down while we are not home, and up when we return in the evening.  These temperature swings may be intolerable to our plants.

Be careful watering plants when the sun is shining.  Those little water droplets can end up capturing the sun’s rays just like a greenhouse would.  The droplets heat up and can actually burn a spot in the plant leaf.  Remember, each drop can do this, so many times, the whole plant can look like a spotted mess!

Temperature can many times mark the difference between success and failure to keep some of the more difficult species of houseplants.  Changes should be done slowly to avoid stress.  If houseplants are kept outside in the summer, waiting too long can see the loss of some plants with lower temperature tolerances.  Placing plants closer to the house or inside a simple greenhouse can help during the first cool nights of early fall.  Especially sensitive plants should be brought in before any threat of cool weather.  I learned this lesson the hard way with my prized Philodendron squamiferum.  Its ideal temperature range is 65-85 degrees Fahrenheit.  I had it in the basement and was planning on moving it to the first floor, but left it down there as the light was nice.  While this plant technically can tolerate temperatures in the 50s for a short duration, it got too cold for too long and it dropped all its leaves one night (it died).  As a general rule of thumb, if it is too cold for people, it will be too cold for our houseplants!

The UConn Home & Garden Education Center supports UConn Extension’s mission by providing answers you can trust with research-based information and resources. For gardening questions, contact us toll-free at (877) 486-6271, visit our website at homegarden.cahnr.uconn.edu, or reach out to your local UConn Extension center at cahnr.uconn.edu/extension/locations.

This article was published in the Hartford Courant August 2, 2025