We Asked Arborists When to Prune Dogwood Trees, and They All Said the Same Thing
The Spruce – Heather Zidack and other professionals give their insight on pruning Dogwood Trees
We Asked Arborists When to Prune Dogwood Trees, and They All Said the Same Thing
The Spruce – Heather Zidack and other professionals give their insight on pruning Dogwood Trees
By Nick Goltz, DPM, UConn Plant Diagnostic Lab/UConn Home & Garden Education Center
The forecast is looking good for a perfect 4th of July weekend. Most folks will take advantage of the weather ahead to plan that perfect grilling menu for when their friends and family visit. This is a much-needed respite from the severe weather that passed through over the past few weeks. Severe winds and torrential rains hammered Connecticut and most of the rest of the Northeast after a recent heat wave. With the weather for the week ahead of us is looking much better than the weather of the week behind us, now is the perfect time to assess our trees and determine if any action needs to be taken before the next storm comes!

I’ll start and end this column with the advice that a professional arborist should be called-in if you are ever unsure of your tree’s health, or if you need support regarding safe management and potential removal. In Connecticut, one of the best resources for finding a licensed, local arborist as well as additional resources regarding tree care and maintenance can be found on the Connecticut Tree Protective Association website, ctpa.org. That said, tree triage can start with you at home. There are many things one can be on the lookout for to determine if a tree need professional attention, and potentially in what order the work should be done.
I’m sure you’ve heard this phrase used to describe real estate, but with trees too, location is everything. The first thing to consider when performing your tree triage is the location of the tree. Regardless of tree age, size, species, or health, the trees that should always merit our immediate attention are those in locations where they could pose a danger to life or property if a limb were to fall off or if the tree were to topple altogether. Trees within striking distance of homes, power lines, and important structures like chicken coops and pet houses should always be the first inspected before the storm comes and after it passes. If a tree knocks down a power line or hits a home, call for help. Never attempt to work around a live cable (one that still carries electricity) without the proper training and equipment.
The second thing to consider as you perform your tree triage is health of the tree. Trees weakened by disease or age are more likely to succumb to strong winds or topple after standing water weakens or kills roots. Inspect your trees for symptoms of stress and disease such as branches that no longer produce leaves. Depending on the species of tree, a few may not be much cause for concern, but if there are several branches on a tree that no longer produce new leaves or needles, the tree is likely not in great health. Another symptom of stress or disease is a visible canker, or large wound, on the trunk of the tree. Trees in good health will typically grow new tissue over an injury sustained by pruning, animal feeding, or a previous storm. Cankers that appear to be getting larger over a few years, rather than smaller, are often a cause for concern.
There are even some obvious signs of disease such as conk or shelf mushrooms that grow directly from the wood of the tree. While these organisms are important for nutrient cycling in natural ecosystems, they often indicate that a tree is approaching the end of its life. The shelf mushroom is only the sexual structure of the fungus, there to produce spores and reach new trees. While removing the mushroom may slow the spread of the fungus to other trees nearby, the majority of the “body” of the fungus will still exist within the tree, weakening it by breaking down woody tissue over time.
Trees, like other living things, do not live indefinitely and become more vulnerable to illness and stress as they age. Just like people need to take care of themselves to ensure they live a long, healthy life, so too must trees be cared for over the course of their lives to ensure they have the best possible outcome. Regular fertilization and pruning are essential to not only ensure that a tree grows robustly, but also that it does not become lopsided or heavy on one side as it ages. Even healthy trees can fall if they are never pruned and have a poor center of gravity! Pruning should be performed frequently to promote new growth, discourage lopsidedness, and allow increased airflow through the canopy. This will have the double benefit of decreasing disease pressure that often accompanies high canopy humidity and prolonged leaf wetness. Though it depends on the species of tree, most here in New England perform best when pruned while they are dormant in winter. Remember to not remove more than 1/3 of the tree’s branches when pruning, if possible!
There are other factors to consider when determining if a tree should come down that we don’t have space to discuss at length here, such as the species of tree, whether the tree is used for other purposes (such as part of a living fence), whether the tree has historic or personal significance, or what removal of the tree may mean for other plants nearby that depend on its shade. And, of course, nobody should consider tree removal without considering cost and time. If cost is a concern, remember to do your triage and prioritize the management of trees that could potentially damage your home, property, or power lines if they were to fall. These considerations and others are worth discussing with an arborist as they survey your property!
For questions about planting and pruning trees or other gardening topics, feel free to contact us, toll-free, at the UConn Home & Garden Education Center at (877) 486-6271, visit our website at www.homegarden.cahnr.uconn.edu or contact your local Cooperative Extension Center.
By Dawn Pettinelli, UConn Home & Garden Education Center
About now the gardens should be planted, and it is time to turn our attention to the trees and shrubs on the property. New growth is almost fully expanded and pruning of spring flowering shrubs can commence. When out there with your pruners, keep an eye peeled for suckers and water sprouts, both on the plants you’re pruning and other woody plants in the yard.
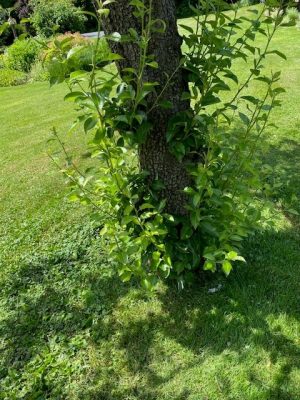
Many trees and shrubs produce vigorous, upright stems that can reach several feet high over the growing season if left unchecked. Those arising from the root system are known as suckers while those growths arising from the crown portion of a tree or large shrub are referred to as water sprouts. At the very least, they are unattractive and take away from the architectural framework of a plant. More importantly they use water, nutrients and energy that could be put to better use if not taken from the rest of the plant. If not removed, they can crowd out the main plant resulting in reduced vigor.
Some woody plants naturally tend to produce suckers and sometimes these young vigorous shoots are needed to rejuvenate older plants as aging stems are removed. An example would be shrubs like red-twigged dogwoods or lilacs. Suckers arising from trees such as apples, crabapples, honey locust, lindens and others, however, should be removed.
In the case of grafted plants, like hybrid tea roses or apples, the desired variety is grafted on to a rootstock that might be more cold hardy, have dwarfing genes or other desired features. Occasionally the rootstock revolts, so to speak, and sends up its own shoots. In the case of roses, one might notice a stem with red flowers when the plant was purchased as a named cultivar with different colored flowers.
Suckers and water sprouts often occur because plants are in some way stressed or due to damage to their root system. Plants can be under stress for a number of reasons. Some common reasons would be insect or disease problems, drought, too high of a water table, compacted soil and/or difficult growing conditions.
Planting too deep will also stress a plant and could cause suckers to develop. Whenever planting woody plants sink them so that the level of soil in the pot they are grown in is level with the soil they are planted in.
Another reason for suckers or water sprouts is that plants are pruned incorrectly or too drastically. Seldom is it advisable to remove more than one-third of the plant at one time. Also, avoid topping ornamental or woodland trees.
Ideally suckers and water sprouts should be removed as soon as they are produced. Often, they can just be rubbed or twisted off in spring as their stem is just starting to expand. Once they reach pencil-size in thickness, cut with clean, sharp pruners. Do your best to remove them flush to a limb or as close to the tree’s trunk or root system as you can. Don’t leave stubs as these will likely have buds at their base and just regrow.
Speaking of suckers, there are often questions when growing tomatoes about what to do with the sprouts popping up where the leaf attaches to the main stem. Typically suckers just form on indeterminate tomato varieties, which are those that continue to grow, bloom and set fruit as long as growing conditions allow. If all suckers are left on the plant, it becomes quite unruly and hard to stake. Also, fruit will be plentiful but usually smaller.
Usually, the suckers below the first fruiting cluster are removed so the development of those tomatoes won’t be slowed. Then it is up to individual gardeners to decide whether to leave suckers or not and how many to leave. Often a few are left to increase and extend the harvest. Tomatoes in our area are prone to many leaf diseases, especially during humid and wet seasons. As the bottom leaves yellow and die, it is beneficial to let some of the suckers on top grow so plants can produce more foliage to yield food for the plant and to shade the developing fruit. Some experimentation might be necessary keeping in mind that it is better to remove too little than too much.
For questions about pruning suckers and water sprouts or on other gardening topics, feel free to contact us, toll-free, at the UConn Home & Garden Education Center at (877) 486-6271, visit our website at www.homegarden.cahnr.uconn.edu or contact your local Cooperative Extension Center.
By Pamm Cooper, UConn Home & Garden Education Center
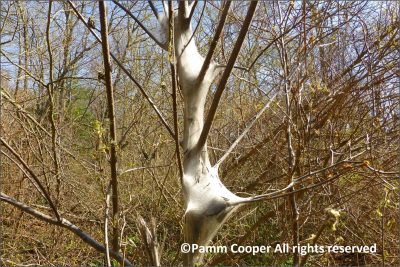
Eastern tent caterpillars, Malacosoma Americanum, are native to North America and are noticed mainly because of the silken tents they build in the forks and crotches of trees in early spring. While most tents are found on black cherries, they can also be found on other trees such as apple and crabapple. They are readily visible since tents are constructed before leaves fully expand. There is only one generation per year.
These caterpillars are hairy and dark when small, and later instars have two yellow lines along the back. A white medial stripe goes along the sides of the body, and this is flanked by two yellow lines. There are blue blotches along its side as well. Bottom hairs on the body are rusty brown. Forest tent caterpillars are also hairy, but they do not make tents, and their bodies
are blue with white dots on the back. Handling should be done with gloves on as some people may have sensitivity to the hairs.
Egg masses are black, laid on small branches of host trees the previous year, and the egg mass rings around the branch. Sometimes they are mistaken for small black knot galls. 150-300 eggs may be in each egg mass. Caterpillars typically hatch as black cherry leaves begin to expand the next spring. Caterpillars feed on leaves and buds and rest communally by day in the nests they construct from silk.
While they can almost defoliate small trees, these caterpillars usually have completed their feeding stage in time for the trees to put out new leaves by early summer. The more tents there are on small trees, though, the greater number of caterpillars there are, so damage will increase.
While protected from many predators while inside the tents, there are birds that will tear the tents apart to feed on the caterpillars inside. Both the black-billed and the yellow-billed cuckoos are known for their ability to do this, and native vireos will also seek out and rip apart the tents.
Mature caterpillars leave the host plants in early summer in search of suitable sites to pupate within a silken cocoon they will spin. Moths emerge later that year. The moths have a fluffy light brown body, and the wings have three bands with the center being narrower than the outer bands and a lighter brown in color. The center band is bordered on both sides by thin, creamy bands.
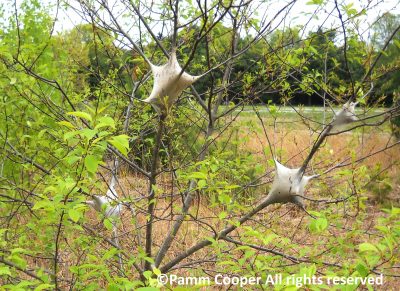
Occasionally, eastern tent caterpillars have outbreak years where large numbers of the tents can be seen on the same tree. Fresh buds may also be consumed if trees are severely defoliated. When found on residential properties, tents can be swept apart by rakes or brooms, exposing caterpillars to predators, or knocking them off the trees. If warranted, foliage can be sprayed with a biological product called Bacillis thuringiensis subspecies, Kurstaki, or BtK, which only harms caterpillars and not other insects. Caterpillars will ingest the product as they feed on the foliage.
Most healthy trees can tolerate severe defoliation from eastern tent caterpillars. If concerned, look for egg masses in the winter on trees that had been damaged the previous spring. Remove them, if possible, or crush them, or prune the branch off below where the egg mass is found. Or let them be if the trees appear to have recovered. Letting nature take its course with native insects on native trees can often benefit birds and other predators. Do not confuse them with the notorious gypsy moth caterpillars which do not make silken tents or nests of any kind.
If you have a question about tent caterpillars or other gardening topics, contact the UConn Home & Garden Education at (877) 486-6271 or www.homegarden.cahnr,uconn.edu or your local Cooperative Extension Center.
By Heather Zidack, UConn Home & Garden Education Center
There’s a well-known scene in the movie “Braveheart” where Mel Gibson’s character, commands his men to “Hold!” as the enemy is rushing upon them. It’s a scene that I often reference as an analogy for this part of the year. Daylight savings time has changed our clocks, the sunshine is warm, temperatures are reaching the “light jacket” level of comfortable, and we all feel spring rushing towards us with the promise of seedlings, flower buds, and fresh green leaves. With this, there are certainly plenty of chores that we can do right now to prepare, but there are others that we really should be waiting for a few weeks longer.
Houseplants may enjoy a short afternoon in the outdoor sunlight on these warmer days but resist the urge to put them outside full time until night temperatures consistently reach 50 degrees Fahrenheit. The occasional day trip is an effective way to help them transition from the protection of your indoor environment to full sun outdoors. More importantly, consider giving your houseplants a good spring cleaning. Repot or divide root bound plants, remove the winter dust from leaves with a damp rag, and trim out any dead or unsightly growth. Now they’re ready for their spring debut!
Fertilizing is another task that many gardeners feel may be a chore to check off their lists early. This is a project that should wait a little bit longer. Often, fertilizer will push new growth in your plants. Pushing them too early can leave tender leaves and buds at risk of exposure to frost and freezing temperatures, actively slowing or stunting growth that you intended to give a boost to. In the same vein, grub control, pre-emergent, and many other synthetic materials used in the landscape require specific soil temperatures to be effective and it’s still just too cold. Always read the label of any garden product to learn the best timing of any application. At this point in the year, consider doing a soil test. If you haven’t done so before, it's great to have a baseline for planting and caring for your garden. If you’ve done it a few years ago – check it again! Things change and you may be surprised by what nutrients you need (or don’t) since you last checked in.
It may still be a little early for mulch as well. Adding fresh mulch too early in the season can trap moisture and slow the soil from warming up to optimum growing temperature. Take this time to pull out grass and weeds that may have taken root in mulched beds and put this time into your hardscape. Look for tripping hazards to address like cracked, sinking, or heaved pavers. Check structures like pergolas, sheds, and even raised beds for rotting boards, warping, or structural damage. Repair as needed. Building new garden spaces is always an option! Create your punch list of projects that will need fresh paint or sealant. If the weather is going to be warm and sunny – consider power washing hardscapes and structures now.
Late winter/early spring is a fantastic time for pruning trees and shrubs in the landscape. It’s ideal because there is great visibility, and the cooler temperatures prevent disease and insects from taking advantage of fresh wounds. You want to make sure you’re pruning correctly, for the species and purpose of the trees and shrubs in your landscape – so do your homework! As a rule of thumb, roses, hydrangeas, and some hardy perennials tend to appreciate a later pruning and can vary between types within the species, so stay aware of what you have on your property to ensure success!
“But when do I get to play in the dirt?” That's next! For our outside plants, think about dividing perennials. Divisions at this point in the year make the plants much easier to handle for the gardener. Moving your plants now gives them a chance to “wake up in place” this spring. You will reduce concerns with transplant shock when you move plants ahead of their spring flush and our summer heat.
Indoors, stepping your seedlings up into larger containers gives them a little more breathing room as we wait for the season to start. Only transplant seeds when they’ve started to show 2-3 sets of true leaves and keep in mind that different species can have different needs. If you excitedly started your tomatoes too early, and now notice leggy stems, try transplanting them in plastic cups and burying them all the way up to their first couple sets of true leaves. They will put out even more roots along that covered stem and be even better prepared when you put them in the garden this season!

There are still plenty of projects that can be done while we wait for spring to come! If you have questions on spring garden projects or any other gardening topic, feel free to contact us, toll-free at the UConn Home & Garden Education Center at (877) 486-6247, visit our website at www.homegarden.cahnr.uconn.edu or contact your local Cooperative Extension Center.
Prune Now for Beautiful Summer Trees
By Marie Woodward, UConn Home & Garden Education Center
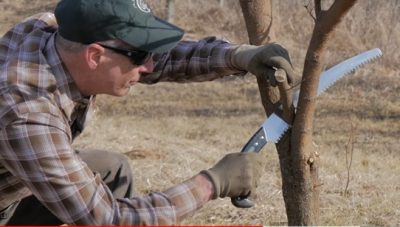
Winter is a great time for gardeners to plan for their next growing season. Many think that planning can only be done inside. Not so. Now is an ideal time to prune deciduous landscape trees. The absence of leaves gives a clear view of the canopy above and allows for a clear assessment of a tree’s structure and any problems that may be present. In addition, there are no pests present in winter, and disease spread will be slowed by the cold weather. But before heading outside with those loppers and pruning saws, there are a few important things to know and consider.
It's important to understand the tree’s anatomy. A typical deciduous landscape tree will consist of three main parts: the leader, the scaffolding branches and the lateral branches. The leader is the dominant vertical branch of the tree. This is easily spotted as the straight, most upward growth from the trunk. The leader is the tree’s most important branch, crucial for the tree’ structure, photosynthesis, and even distribution of nutrients. Scaffolding branches emerge from the trunk and the leader to make up the canopy of the tree. Secondary branches that grow from the scaffold branches are called lateral branches. Once you understand the basic structure of the tree, it’s much easier to successfully prune it.
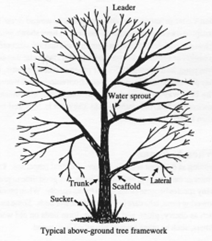
Photo from Virginia Cooperative ExtensionFirst, assess the tree. What species of tree is it? That will reveal its natural structure, something your pruning should ideally strive to support. Note though, that proximity to buildings or human activity nearby is likely to influence your pruning strategy (keeping scaffolding branches clear of buildings, for example, or making sure people can walk under the lowest branch?)
Locate the leader of the tree and look for problem branches. Dead, diseased, damaged, or crossing branches should be pruned first. When pruning dead or diseased branches, make cuts into healthy wood, well below the affected area. It’s also a good idea to disinfect tools between cuts to help prevent the spread of disease. (A 10% solution of bleach to water works well.)
After the tree’s diseased, damaged, or crossing branches are pruned, look for lateral branches that are trying to compete vertically with the leader. They can draw energy away from the leader and sap the tree’s vigor. Usually, there is no need to remove all of a competing branch. Just pruning the vertical portion back to the scaffold branch should be sufficient. This will slow the competitor branch’s rate of growth, allowing the leader to dominate.
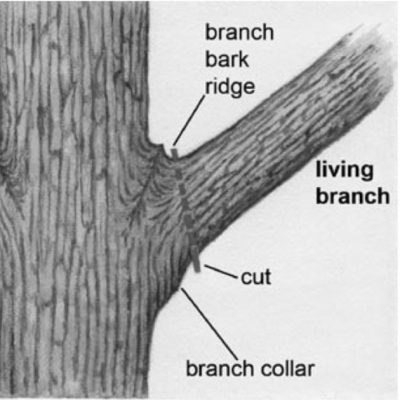
When pruning a scaffold branch, it is important to cut outside the branch collar. That is the swollen area at the base of the branch, where it joins the trunk. Make the cut outside the branch collar at a 45-to-60-degree angle to the trunk and leave it alone to heal naturally. There is no need to coat or cover cuts. Doing so could prevent the wound from healing and might seal in pathogens adversely affecting the health of the tree.
According to Pete Smith, forester and arborist from the Arbor Day Foundation, there are five main factors to consider when pruning trees:
Of course, when pruning a long-neglected tree, it may take a few seasons to be able to apply all five rules, but ultimately, your trees will be healthier and more beautiful if you follow these guidelines.
For questions about pruning or if you have any other gardening questions, contact the UConn Home & Garden Education at (877) 486-6271 or http://www.homegarden.cahnr.uconn.edu/ or your local Cooperative Extension Center.