Vegetable Gardening

High-tech Tomatoes

By Dr. Matthew Lisy, UConn Adjunct Faculty
UConn Home & Garden Education Center

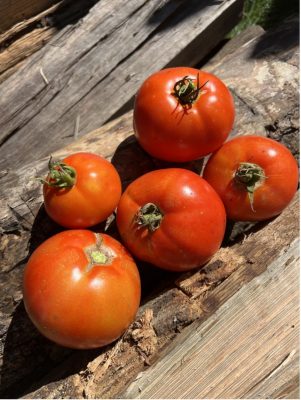
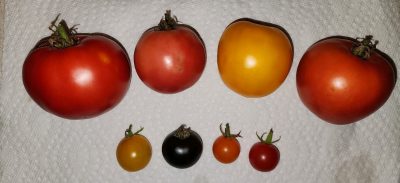
Assorted slicing and cherry tomatoes
An assortment of tomato varieties of both the slicing and cherry types.  The colors include red, orange, pink, yellow, and now purple (photo by M. Lisy).

Tomatoes are one of the most popular food plants in the world, and as such, have undergone massive amounts of selective breeding. Native to western South America, the tomato can now be found all over the world. Originally grown for ornamental purposes due to fear of toxicity, modern gardeners grow many different colors including red, yellow, pink, orange, and white.

Tomatoes are prone to certain diseases which led to dependence on chemicals to control either the disease or the pest that transmits it. Disease resistant varieties of tomatoes were made by crossing certain parental tomatoes that had beneficial traits. For example, if a certain tomato tasted great but was prone to some type of wilt disease, it was crossed with a tomato that was resistant to wilt. Of course, this was VERY time consuming, and many times the final product is not perfect, but as close to ideal as possible. This does make people dependent on the seed producers, but at least you get the tomatoes you desire.

People were sad that they could never get the old heirloom varieties with superior taste to grow in the presence of modern-day diseases, so science came up with another solution – grafted tomatoes. Using young plants, the grower would take and graft the top of the desired tomato onto the roots of the undesirable but disease resistant rootstock. Certainly, these types of tomatoes have an important role in agriculture, but they are not feasible/economical in many situations.

One modern scientific solution is genetic engineering. This process takes a gene, or piece of DNA that codes for a specific trait, out of one species, and places it into another. The public generally does not like this type of technology partially due to a lack of understanding of the process, but also a fear of what could happen because of it. While science continues to make new GMOs, many companies will not use them due to consumer preference. In 1994, the “Flavr Savr” tomato became the first genetically engineered food to be granted a license for human consumption by the FDA. Although flavorful throughout its long shelf life, this tomato failed to meet commercial standards due to being easily damaged during harvest and shipping. Even though this tomato failed to become the success the company had hoped for, Calgene (now owned by Monsanto) made history.

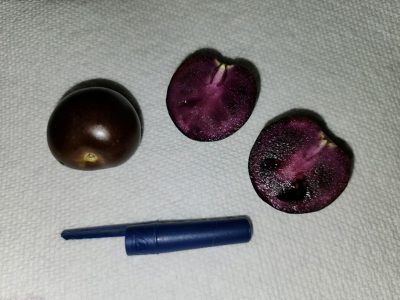
Purple tomatoes with a blue pen cap to display size.
“The Purple Tomato,” the first GMO tomato available to home gardeners. Note the completely deep purple skin and flesh (photo by M. Lisy).

Thirty years later, the year 2024 saw another milestone in the world of GMO tomatoes. Norfolk Plant Sciences, and its seed-selling subsidiary, Norfolk Healthy Produce, produced the first tomato with completely purple skin and flesh. This is also the first time a GMO food crop has been approved for home gardeners. The color comes from the anthocyanin pigment, which is said to have heart-healthy and antioxidant benefits when consumed in the quantity found in this tomato. In addition, this pigment may increase the shelf life of the tomato. The gene for this pigment came from edible snapdragon flowers.

Many times, people fear GMOs saying that it is unnatural to have an extra “foreign” gene in an organism, and the potential risk of a “new combination of genes” created by this engineering process. The Food and Drug Administration deems this tomato as safe for human consumption as any other. In the end, each person should do their own research and make an informed decision for themselves and their family. For me, it is an exciting time to be alive as we are living through history. I felt really excited to grow the first-ever GMO tomato for home gardeners. One day, many of the tomatoes will be like this, but for right now, I will marvel at the original.

For your gardening questions, feel free to contact us, toll-free, at the UConn Home & Garden Education Center at (877) 486-6271, visit our website at www.homegarden.cahnr.uconn.edu or contact your local Cooperative Extension center.

What’s Eating My Brassicas?

By Dawn Pettinelli, UConn Home & Garden Education Center

Broccoli, cabbage, kale and other members of the brassica family are tasty and so good for you but its not just us who find them delectable. Brassicas have a number of insect pests but probably several caterpillar species do the most damage.

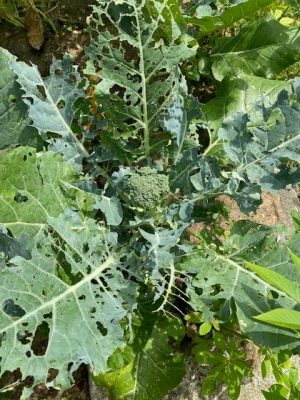
A close up of caterpillar damage on broccoli leaves.
Caterpillar damage on broccoli. Photo by dmp2024

When checking plants, look for holes in the leaves. A few irregular holes may soon become a skeletonized leaf with only the midrib left if control measures are not taken. These caterpillars can quickly devour plants.

Two of the most common pests are the imported cabbageworm and the cross striped cabbage worm. According to Dr. Shuresh Ghimire, UConn Vegetable Extension Specialist, imported cabbageworm is the offspring of the cabbage butterfly, a butterfly with white wings with 1-2 round black spots on the forewing. Eggs, laid singly on leaves, are light green or yellow and slightly elongated. Three to 5 days later, the eggs hatch. The lime green velvety caterpillars feed for 2 to 3 weeks.

Dr. Ghimire noted that imported cabbage worm feeding and resting mostly occur on the underside of leaves. Be sure to check both the tops and bottoms of leaves. Damage includes round or ragged feeding holes and deposits of wet, green or brownish frass. There can be 4 to 5 generations each year. This pest overwinters as a pupae close to host plants.

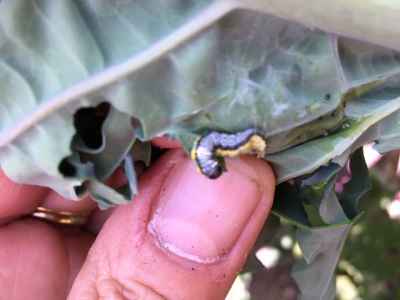
Cross stripped cabbage worm
Cross striped caterpillar. Photo by dmp2024

The cross-striped cabbageworm used to be a southern pest but no longer. The adult moths fly at night so are seldom seen. Cross-striped cabbageworms are most abundant on late-season plantings says Dr. Ghimire. Unlike the other major caterpillar pests, such as cabbageworm and diamondback moth, the cross-striped cabbageworm lays its eggs in batches (3-25) rather than singly, so caterpillars emerge in clusters. Egg batches are yellow, flattened, overlapping like fish scales, and attached to the lower leaf surfaces.

The distinctive-looking caterpillars are bluish gray on top with green on their undersides, a yellow stripe on each side with a row of numerous black bands across the back. Clusters of these caterpillars are voracious feeders and plants infested with cross-striped cabbageworm larvae are often completely skeletonized, while adjacent plants may be left undamaged. There are 2 or 3 generations per year.

Two other caterpillar pests of brassicas are the diamondback moth and the cabbage looper. Eggs of these two pests are laid singly and most years they do not cause considerable damage to home vegetable gardens.

There are several strategies to control these caterpillars on broccoli plants. If you have just a few plants, check them every few days looking at both sides of the leaves and either squish any caterpillars you find or drop them into a can of soapy water.

A close-up of a leaf with chewing damage
Caterpillar damage on brassica leaves. Photo by dmp2024

Rotating your plantings and interplanting with flowers may confuse pests. Dr. Ghimire suggests planting flowers to attract natural enemies, like Braconid wasps, which lay eggs on soft-bodied caterpillars such as cabbage worms. The larvae feed inside the live caterpillars, weakening or killing them. Some plants known to attract pest predators include dill, parsley, hyssop and mints.

Since brassicas do not need to be pollinated, they can be covered with netting or row covers to exclude insect pests. The holes in the netting should be one-quarter inch. Hoops can be used to hold up the barrier or one can make wooden or PVC cages for a custom fit. Be sure to tuck or pin the edges to the soil so pests can’t crawl under.

Finally, if the caterpillar infestation becomes too extensive, Dr. Ghimire recommends Bacillus thuringiensis (Bt), which is a biological control for Lepidoptera species of moths and butterflies. Bt is a bacterium that when sprayed on your plants and consumed by the caterpillar enters the insect’s gut and causes it to die. While it is effective for controlling these pests, it is harmless to humans and other animal species. Limit its use to brassicas to prevent it from affecting desirable caterpillars.

As with all garden pests, the key to healthy plants is regular monitoring and putting control measures into practice when pests are first noticed. For questions on brassica pests or any other gardening questions, feel free to contact us, toll-free, at the UConn Home & Garden Education Center at (877) 486-6271, visit our website at www.homegarden.cahnr.uconn.edu

Grow Vegetables – Save Money

By Dawn Pettinelli, UConn Home & Garden Education Center

Lettuce planted in a container.
This lettuce was planted in a container. Photo by dmp2024

Anyone who grocery shops on a regular basis has likely noticed a higher tally at the checkout counter. The latest consumer pricing analysis from the USDA is predicting a 1.3 percent increase in food prices. While we can’t do much to lower the prices, one thing we can do is grow some of our own vegetables and herbs.

The investment in a small 100 square foot or so garden is not large, and one can be assured of healthy, high quality fresh produce. Vegetable gardeners can also control what, if any, types of pesticides are used on the plants. One source suggested that a $70 investment in plants and seeds could produce a harvest worth $600 or more over the growing season. Already having basic garden tools was probably taken for granted.

If yard space is limited or too shaded, consider renting a plot in a community garden, maybe teaming up with a friend trading garden chores for produce, or consider growing in window boxes and other containers. Even small areas provide opportunities to grow your own food. While a head of lettuce can cost $2-3 dollars at the grocery store, for that same amount one can often pick up a cell-pack of 6 lettuce plants and grow them out in a large container, or 6 square feet or so of garden bed.

Starting plants directly in the garden by direct seeding can also offer considerable savings. I picked up a package of mixed lettuce variety seeds for $3.25 that contains 500 seeds. This would enable one to grow multiple succession plantings for at least 2 or 3 years. If stored in a dark, cool, dry spot, many seeds last for at least 2 years if not longer.

Good candidates for direct sowing would be bush or pole beans, lettuce and other green leafy vegetables, radishes, peas, carrots, summer and winter squash, cucumbers, and corn. If they tickle your tastebuds, you can toss in turnips and parsnips.

Some vegetable varieties have greater cold tolerance than others so your peas, radishes, and many green leafy vegetables can usually be planted by the end of this month depending on the weather. In northern parts of Connecticut, it would be good if the soil warms and dries up a bit more.

Other types of vegetables are better to set in the garden as transplants, whether you grow them yourself or purchase them in cell-packs. The main reason for this is twofold. Certain plants, particularly in the brassica family, like cabbage, broccoli and cauliflower germinate fine in warm household temperatures but like to be grown cooler than many of us keep our houses and if left in those warm temperatures grow long and leggy instead of short and stocky. So, it’s just easier to purchase healthy, stocky plants grown in a greenhouse to set in the garden or container, although the leggy ones usually catch up.

The second reason why some plants are better purchased as transplants is because vegetables like tomatoes, peppers, eggplant and leeks have a long growing season – often 80 to 100 days from transplant until they produce harvestable crops. It makes more sense to plant 3- or 4-week-old transplants around Memorial Day so harvesting can start in late July or August. Contrarily, even though some winter squash and pumpkins might take 100 days or so to mature, I typically just direct seed them around Memorial Day because they seem to catch up with transplants, that usually experience a bit of transplant shock, pretty quickly so I don’t feel like I am gaining much by purchasing transplants and more importantly, the particular varieties I prefer are not always available as plants.

Fresh picked roma style tomatoes
This fabulous roma style tomato is an heirloom variety a friend brought from Italy. It makes a fantastic sauce! Photo by dmp2024

Regardless of whether you have a few containers to fill or a large garden, do some research before purchasing seeds or transplants. There are so many different cultivars available so look up variables like days to harvest, disease resistance, cold tolerance, productivity and more. Make notes on how they taste and any problems during the growing season.

When planning your edible plantings, also think about succession sowings, finding out what pest problems to be on the lookout for, last and first frost dates, mature size and space requirements, and days to harvest.

Feel free to contact the UConn Home & Garden Education Center with questions on growing vegetables, herbs and other plants or if you have any other gardening questions, contact the UConn Home & Garden Education at (877) 486-6271 or www.homegarden.cahnr,uconn.edu or your local Cooperative Extension Center.

The Do’s and Don’ts of Early Spring Gardening

By Heather Zidack, UConn Home & Garden Education Center 

There’s a well-known scene in the movie “Braveheart” where Mel Gibson’s character, commands his men to “Hold!” as the enemy is rushing upon them. It’s a scene that I often reference as an analogy for this part of the year. Daylight savings time has changed our clocks, the sunshine is warm, temperatures are reaching the “light jacket” level of comfortable, and we all feel spring rushing towards us with the promise of seedlings, flower buds, and fresh green leaves. With this, there are certainly plenty of chores that we can do right now to prepare, but there are others that we really should be waiting for a few weeks longer.  

Houseplants may enjoy a short afternoon in the outdoor sunlight on these warmer days but resist the urge to put them outside full time until night temperatures consistently reach 50 degrees Fahrenheit. The occasional day trip is an effective way to help them transition from the protection of your indoor environment to full sun outdoors. More importantly, consider giving your houseplants a good spring cleaning. Repot or divide root bound plants, remove the winter dust from leaves with a damp rag, and trim out any dead or unsightly growth. Now they’re ready for their spring debut! 

Fertilizing is another task that many gardeners feel may be a chore to check off their lists early. This is a project that should wait a little bit longer. Often, fertilizer will push new growth in your plants. Pushing them too early can leave tender leaves and buds at risk of exposure to frost and freezing temperatures, actively slowing or stunting growth that you intended to give a boost to. In the same vein, grub control, pre-emergent, and many other synthetic materials used in the landscape require specific soil temperatures to be effective and it’s still just too cold. Always read the label of any garden product to learn the best timing of any application. At this point in the year, consider doing a soil test. If you haven’t done so before, it's great to have a baseline for planting and caring for your garden. If you’ve done it a few years ago – check it again! Things change and you may be surprised by what nutrients you need (or don’t) since you last checked in. 

It may still be a little early for mulch as well. Adding fresh mulch too early in the season can trap moisture and slow the soil from warming up to optimum growing temperature. Take this time to pull out grass and weeds that may have taken root in mulched beds and put this time into your hardscape. Look for tripping hazards to address like cracked, sinking, or heaved pavers. Check structures like pergolas, sheds, and even raised beds for rotting boards, warping, or structural damage. Repair as needed. Building new garden spaces is always an option! Create your punch list of projects that will need fresh paint or sealant. If the weather is going to be warm and sunny – consider power washing hardscapes and structures now. 

Newly constructed raised beds
Newly constructed raised beds ready for spring! Photo by HZidack

Late winter/early spring is a fantastic time for pruning trees and shrubs in the landscape. It’s ideal because there is great visibility, and the cooler temperatures prevent disease and insects from taking advantage of fresh wounds. You want to make sure you’re pruning correctly, for the species and purpose of the trees and shrubs in your landscape – so do your homework! As a rule of thumb, roses, hydrangeas, and some hardy perennials tend to appreciate a later pruning and can vary between types within the species, so stay aware of what you have on your property to ensure success!  

“But when do I get to play in the dirt?” That's next! For our outside plants, think about dividing perennials. Divisions at this point in the year make the plants much easier to handle for the gardener. Moving your plants now gives them a chance to “wake up in place” this spring. You will reduce concerns with transplant shock when you move plants ahead of their spring flush and our summer heat. 

Indoors, stepping your seedlings up into larger containers gives them a little more breathing room as we wait for the season to start. Only transplant seeds when they’ve started to show 2-3 sets of true leaves and keep in mind that different species can have different needs. If you excitedly started your tomatoes too early, and now notice leggy stems, try transplanting them in plastic cups and burying them all the way up to their first couple sets of true leaves. They will put out even more roots along that covered stem and be even better prepared when you put them in the garden this season!  

Seedlings transplanted into plastic cups.
Seedlings that are leggy can be moved into plastic cups with holes in them and buried. Photo by H.Zidack 

There are still plenty of projects that can be done while we wait for spring to come! If you have questions on spring garden projects or any other gardening topic, feel free to contact us, toll-free at the UConn Home & Garden Education Center at (877) 486-6247, visit our website at www.homegarden.cahnr.uconn.edu or contact your local Cooperative Extension Center. 

Celebrate the Year of the Squash – 2024

Celebrate the Year of the Squash – 2024
By Dawn Pettinelli, UConn Home & Garden Education Center

Tomatoes and peppers certainly have a wide and varied selection of species, cultivars and varieties but I think squash beats them both out when it comes to sizes, shapes, colors and uses. Perhaps that’s one reason why the National Gardening Bureau decided to make 2024 the year of the squash.

Squash is an ancient crop possibly grown as long as 10,000 years ago in Central and South America. The name ‘squash’ was derived from a Narragansett word, ‘askutasquash’ meaning eaten uncooked or raw. All squash – summer squash, winter squash, pumpkins and gourds – belong to the Cucurbitaceae family. Vining types were included as one of the three sisters (corn, beans & squash) in indigenous plantings as each provides a benefit for the other two plants.

Not only are squash easy to grow but many types are a great source of vitamins, minerals and carotenes. Three main groups of squash are commonly found in home gardens. Cucurbita pepo includes zucchini, summer squash and spaghetti squash varieties all with a soft, edible shell and seeds. These do not store well and are typically consumed within a few days of picking.

'Butta' yellow zucchini squash.
'Butta' yellow zucchini squash. Photo by dmp2024

C. maxima is a large group with pumpkins and easily recognized winter squashes like buttercup, Hubbard, and turban varieties. Mature fruits have tough skins that would be peeled, their seeds are hard but could be enjoyed roasted, and they can store for months.

C. moschata includes butternut, a favorite of many, as well as futsu and a tetsukabuto hybrid. A great feature of this species is that they are resistant to squash vine borer, a pesky moth that lays eggs at the base of plants. Larvae that hatch from the eggs burrow into stems usually to the demise of the plant. I’ve been excited about growing ‘Autumn Frost’ as it has that classic butternut taste, but fruits are only 5 to 6 inches wide and high making it perfect for small families or stuffing.

While you can purchase transplants of both summer and winter squash at many places selling seedlings come spring, there are so many fine, exciting varieties to choose from, I suggest starting with seeds. All varieties of squashes are warm season plants so wait until the soil temperature warms up to at least 65 F. Usually this is around Memorial Day but some years, it might be a week or so earlier. Seeds are planted one-half to 1 inch deep.

Like most vegetables, squash prefer a sunny site, well-drained soil fortified with organic matter, a soil pH in the mid 6s and adequate amounts of water during the growing season.

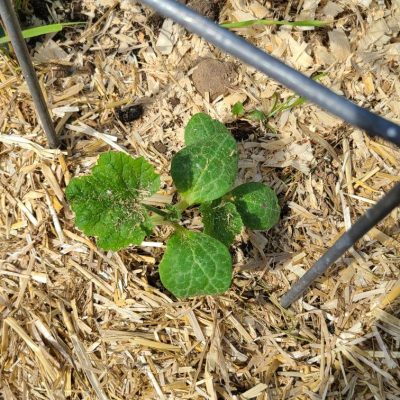
Depending on how large your garden is you may want to plant squash in rows or in hills. A hill is just a planting of 3 to 5 seeds. It does not need to be mounded. Many gardeners prefer the hill approach as some squash plants can get quite large and this saves some room. Personally, I like to plant one seed each of a green, a yellow, and a white cultivar of zucchini in a single hill for good looks and good eats. Another reason for planting in a hill is that the squash varieties that are susceptible to the squash vine borer could be kept under row cover until the borer season is over, usually around July 4th.

A hill of squash with a row cover over it.
A hill of squash with a row cover over it. Photo by dmp2024

Usually, your zucchini and other summer squash start maturing about 50 days after they have germinated. Winter squash and pumpkins will take 80 to 105 days to mature. How quickly the summer squash grow is one of the wonders of nature. Be sure to check plants every 2 or 3 days and pick fruit when small and less seedy.

Most squash are monoecious which means male and female flowers are produced on the same plant. The male flowers are produced first and held on long stems to attract pollinators. Female flowers are closer to the crown and have mini-fruits at their base. It takes several visits from bees for pollination to occur. Fruits that are incompletely pollinated will shrivel and die. One golden zucchini, ‘Easy Pick Gold II’ is parthenocarpic, which means fruits can develop without fertilization.

Powdery mildew is a very common disease of cucurbits. Look for varieties labeled as resistant or plan on using low toxic control sprays such as neem oil, potassium bicarbonate or Serenade™.

As you’re planning this year’s vegetable garden and purchasing seeds, give a few different squash a try. If you have questions on growing squash or on other gardening topics, feel free to contact us, toll-free, at the UConn Home & Garden Education Center at (877) 486-6271, visit our website at www.homegarden.cahnr.uconn.edu or contact your local Cooperative Extension center.