There are many styles of raised beds to choose from, depending on your needs. Raised beds exist on a spectrum, ranging from framed boxes above ground to unframed, elevated planting mounds. When planning new raised beds, both types have specific considerations to keep in mind.
Mounded Raised Beds
Mounded raised beds are created by mounding existing soil or adding additional material so the planting area sits above ground level. This method works well on compacted sites, in poorly drained areas, or on top of heavy clay soils.
Most mounded raised beds do not have a barrier between the ground and the mound. However, if you are wish to start a raised bed over lawn, cardboard can be placed underneath the mounded soil to smother the grass. If you use cardboard, it is best to allow it to decompose for a few months before planting. This will allow plant roots to grow freely into the soil below rather than being blocked by the cardboard layer.
The bed can be built using soil already on site, by mounding soil from the paths or edges into the bed. Alternatively, you can bring in topsoil and compost to create the beds. Any imported soil or compost should be free of pathogens, contaminants, and invasive weeds. Mounded raised beds are not tilled, and walking on the mound will compact the soil, so foot traffic should be avoided. These beds may need to be reshaped or re-mounded annually. Soil tests can be taken every two to three years, then apply amendments added as needed.
Framed Raised Beds
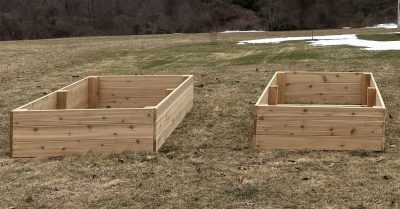
Framed raised beds offer many of the same benefits as mounded beds, along with additional structure and accessibility. A framed raised bed is more contained than an in-ground bed and can be made of wood, metal, or pavers. These beds are well suited for compacted or poorly drained sites, locations with contaminated soil, or in gardens designed to improve accessibility for people with limited mobility.
Raised bed depth can vary depending on the intended use. Some beds are only a few inches deep, while others may be up to 2 feet. Gardeners who use wheelchairs or who have difficulty bending may want to consider an elevated or deeper bed. Most annual vegetables require 12 to 18 inches of soil depth, root vegetables will require greater depth. Length and width can also vary based on site conditions, but a width of about an arm’s length is generally recommended for easy planting, harvesting, and weeding.
Prefabricated wood or metal beds can be purchased, or you can build your own using lumber. Cedar is often preferred over pine because it lasts longer, although it is more expensive. Use caution when considering repurposed or pressure-treated wood. Before 2004, pressure-treated lumber was treated with copper, chromium, and arsenic, which could leach into the soil. If pressure-treated wood is used, make sure it is labeled for ground contact. Whenever possible, choose untreated or naturally rot-resistant materials.
A good soil mix for framed raised beds is about one-half to two-thirds topsoil and one-third to one-half aged compost. This can require a large amount of material and may be costly depending on the size of the bed. Buying bulk topsoil by the cubic yard is usually less expensive than purchasing bags of raised bed mix. For smaller beds, bagged raised bed mix may be more practical. Avoid using free fill or topsoil from unfamiliar sources, as these may contain contaminants, invasive weeds, or invasive jumping worms.
To save money on filling a raised bed, some gardeners use hügelkultur, a method that fills the lower portion of the bed with logs, sticks, leaves, grass clippings, or kitchen scraps before adding topsoil and compost on top. Larger materials are placed in the bottom then followed by smaller organic materials overtop. Over time, the bulky material breaks down and enriches the soil. Because the material settles as it decomposes, additional topsoil and compost may need to be added annually.
Plant Choice
Annual plants are generally better suited to raised beds than perennials or shrubs. Extreme temperature fluctuations in raised beds are not ideal for overwintering perennials, and the need to periodically add more soil makes raised beds better suited to annual crops.
Care and Maintenance of Raised Beds
Both mounded and framed raised beds dry out faster than in-ground gardens, so supplemental irrigation is usually needed throughout the growing season. Weed pressure may be minimal, but regular weeding will still be necessary. Raised beds should be mulched to help retain moisture and reduce weeds.
The paths between raised beds can be planted in turf, covered with wood chips, topped with crushed gravel, or left as bare ground. Keep in mind that paths between mounded beds may need to be mowed or weeded regularly. They will also likely become compacted over time due to foot traffic.
The UConn Home Garden Education Office supports UConn Extension’s mission by providing answers you can trust with research-based information and resources. For gardening questions, contact us toll-free at (877) 486-6271, visit our website at homegarden.cahnr.uconn.edu, or reach out to your local UConn Extension Center at extension.uconn.edu/locations.