Do Eggshells Actually Help Your Roses Grow? Here’s What a Gardener Says
The Spruce – Heather Zidack discusses how Egg Shells are best used in the garden, and things to consider before adding them!
Do Eggshells Actually Help Your Roses Grow? Here’s What a Gardener Says
The Spruce – Heather Zidack discusses how Egg Shells are best used in the garden, and things to consider before adding them!
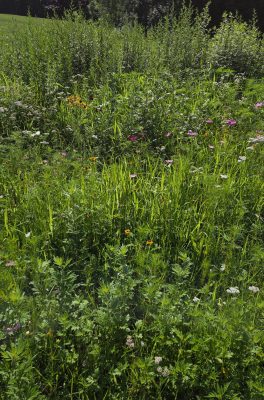
Chaos gardening is a growing social media trend that encourages gardeners to relinquish control, scatter assorted seeds, step back, and see what happens. Instead of carefully spacing plants and planning layouts, chaos gardeners toss seeds and let nature decide what grows where. The results can vary widely, ranging from a surprising assortment of plants to a patch of disappointment.
Unlike traditional gardening, this approach emphasizes spontaneity over structure. For many, the appeal lies in its simplicity. Chaos gardening is easy to start, requires minimal knowledge, and often relies on leftover or inexpensive seed packets. The low-stakes, experimental nature makes it especially attractive to busy people or those new to gardening.
Still, the trend raises valid questions. Without site preparation or ongoing care, how well can seeds establish? And does “letting go” invite weeds into the garden under the guise of wildscaping?
In practice, chaos gardening often produces mixed results. While the concept is appealingly simple, success rates can be low, and plantings may struggle to persist long term. Still, gardeners interested in the trend can improve their chances of success by following a few simple suggestions.
Avoid using this approach in large or prominent spaces. Start small, either in a container or a less visible area of the yard. To maintain a sense of experimentation, while increasing success, consider focusing on a single species at a time or scattering spring bulbs through an existing lawn. Tossing out a packet of “wildflower” seeds may sound charming, but it will not produce an instant, picture-perfect meadow. More often, it results in a steadfast patch of mugwort.
Even with a relaxed approach, a bit of planning goes a long way. Key factors such as sunlight and soil conditions still matter. The principle of “right plant, right place” applies regardless of gardening style. Identifying site conditions, selecting appropriate species, and preparing the planting bed can significantly improve outcomes.
Gardeners should also approach seed mixes labeled “wildflower,” “pollinator-friendly,” or “native” with some caution. While not inherently problematic, these mixes can contain species that are poorly suited to local conditions. A quick review of the species on the list can help inform decisions about whether the plants are suited to the region or growing conditions.
Learning how to recognize seedlings, including common weeds and invasive plants, is another important step. Early identification allows gardeners to remove undesirable species before they establish. Observing which plants succeed can also guide future efforts, gradually transforming a disorderly patch into a more reliable and productive space.
Patience is essential. Many perennials grown from seed take more than one season to flower. Including a mix of annuals and perennials can help maintain visual interest while longer-lived plants establish. As with any gardening method, some trial and error is expected.
Chaos gardening may never replace traditional approaches, but it offers an accessible entry point for beginners and a creative outlet for experienced growers. With a balance of spontaneity and informed decision-making, even an unstructured planting can become a living experiment.
The UConn Home Garden Education Office supports UConn Extension’s mission by providing answers you can trust with research-based information and resources. For gardening questions, contact us toll-free at (877) 486-6271, visit our website at homegarden.cahnr.uconn.edu, or reach out to your local UConn Extension Center at extension.uconn.edu/locations.
These are damaging plants to avoid in CT gardens. They can kill native plant species and take over.
The Hartford Courant – Dr. Lauren Kurtz discusses how native plants attract birds and pollinators, while invasive species harm ecosystems and what residents can do in their own gardens.
Solitary wasps are primarily hunting wasps which are either digger wasps or thread-waisted wasps. Most are seldom aggressive toward people because they are not defending a social colony. Instead, females are busy hunting other insects or arthropods to stock cells for a single larva to feed upon as they develop. Many solitary wasps dig nesting chambers in sandy soils, like the cicada killer and the great golden digger wasps. Others may use hollow pipes, tubes, window ledges or even sliding door tracks (a favorite site for the grass-carrying wasp).
Many of these wasps are also considered decent pollinators. They are active from June through late summer. The adult wasps die during the year and larvae generally pupate and emerge the following year. Females hunt specific prey such as caterpillars, katydids, cicadas and other insects which they paralyze and stock the nesting chamber with. An egg is laid on or near these future meals, and the larva will feed on them as it develops.
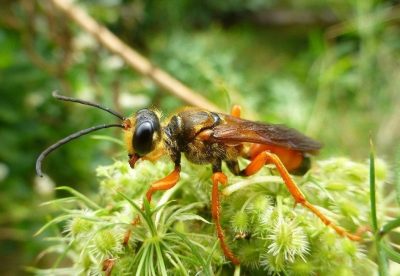
The great golden digger wasp, Sphex icheneumoneus, is a large wasp that sports golden hairs on the head and thorax and has a distinctive half orange half black abdomen. It is harmless to people and is often found on flowers in or near sandy soils where it digs nests for larvae in the ground. Main prey for larvae is katydids.
The Eastern Cicada killer, Sphecius speciosus, is one of the largest wasps in North America. It has amber wings and females are most evident in late July and early August as they burrow into sandy soils, leaving behind a squared off entrance and a sandy mound. Deep inside underground, the females have dragged paralyzed cicadas upon which they lay an egg. The larva will hatch and eat the paralyzed cicada. Next summer, after having pupated underground, the adults emerge. The females rarely sting but do alarm many homeowners due to their size and activity in lawns and along sidewalks.
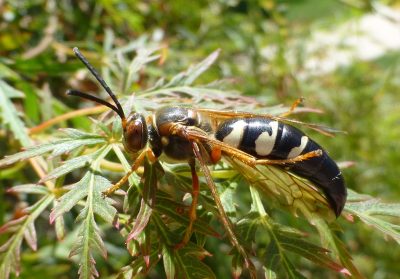
Grass carrying wasps Isodontia spp. create cells from grasses collected by the female. Each cell is stocked with paralyzed tree crickets, katydids and other orthoptera insects. Often packed together, these nesting cells can be found on windowsills, on bases of slider doors and on upper window ledges. Larvae overwinter in these cells and emerge as adults the following year or later that same year if there are two generations.
The oak apple gall wasp Amphibolips spp female lays an egg inside the tissue of an oak leaf inside which the larvae will hatch. The apple-like gall forms as a response to secretions from the larvae as it feeds on the leaf tissue safely inside. The gall turns brown after the adult wasp emerges. No damage is done to the oak. Cutting open the gall when green will reveal the wasp larva in the center.
Potter Wasp, Eumenes fraternus, females construct a small, rounded clay structure with a neck-like protuberance with a flattened top that makes it look like a tiny pot. After laying a single egg inside the female puts some paralyzed caterpillars and beetle larvae which the larva will eat. She seals the small opening with mud, which will be chewed open when the adult emerges next year. These tiny pots can be found on plants, rocks, pieces of wood and other places.
Solitary wasps pose little risk to us as they go about completing their life’s work. Defending nests is not a behavior such as is done by social wasps and hornets. Females will sting if handled or alarmed though, so avoid doing that. If digger wasps make you nervous, consider amending sandy soil with organic matter and keeping it moist when females are looking to excavate nesting chambers. Try to tolerate them for the short period of time they are active. Almost all can be found obtaining nectar from flowers in the wild and in cultivated landscapes.
The UConn Home Garden Education Office supports UConn Extension’s mission by providing answers you can trust with research-based information and resources. For gardening questions, contact us toll-free at (877) 486-6271, visit our website at homegarden.cahnr.uconn.edu, or reach out to your local UConn Extension Center at extension.uconn.edu/locations.
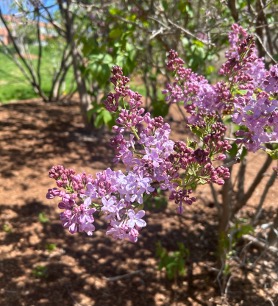
Spring is the ultimate bringer of change. The restless souls contained within all forms of life begin to awaken, bringing fiery hues back to the formerly dreary expanse of winter landscapes. We meet this shift with a warm welcome, grateful for a chance to start anew. Innately, we crave change, constantly striving towards something greater that will fill a part of ourselves we feel is missing. Also, innately, we are walking juxtapositions. Above our desire for change floats an asterisk, denoting an extraneous condition—our deep fear of the very thing which we wish so desperately for. New experiences bring about uncertainty and inconsistency. Thus, we cling to that which we find familiar and trustworthy to ground us while careening through the unknown.
For me, ol’ reliable is the lilac shrub in my backyard. Season after season, I look out my window and am reassured by its presence, whether it is flush with vibrant blooms or displaying its tall barren branches. The leaf and flower buds of common lilac (Syringa vulgaris) are among the first whispers of spring I observe, appearing early in the season.
Members of the olive family, Oleaceae, lilacs are well suited to life in cold climates—in fact, the chill of winter is essential to their bud development and maturation. Although new plantings take a few years to adjust and establish themselves, these perennial shrubs are equipped with substantial longevity. Common lilacs can live for up to a century, cementing their place as a companion to rely on during every phase of our lives.
Common lilacs grow rapidly and immodestly, filling their landscape with a dominating sense of confidence. Success is dependent on being planted in sunny locations with moist, well-drained, and neutral to slightly alkaline pH soils.
The lilac’s blooms are dichotomous, both quietly delicate and also boisterous with a showstopping flair. Flowers emerge between late April and early May. A strong, sweet fragrance diffuses from the quaint petals which cluster together in formations called panicles. Lilac blooms appear in a variety of hues, ranging from lavender to blush pink or even a creamy white.
Even after the flowers of lilacs retire, matte heart-shaped leaves remain until the fall, painting the tall shrubs with dark green. During the dormancy of winter, gray stems and branches are visible, standing tall and proud even when cold weather casts its icy shadow over the once vibrant landscape.
Lilacs are relatively self-sufficient yet require some care and attention to maintain their vigor. Susceptible to fungal diseases like powdery mildew and septoria/pseudocercospora leaf spot, it is important to ensure proper airflow throughout plantings to discourage sporulation. Powdery mildew is characterized by gray mycelial growth on leaf surfaces, while septoria/pseudocercospora leaf spot appears as brown spots that expand into broad patches. Insect pests, namely the lilac borer and oystershell scale, also impose their will on lilacs. Borers tunnel and weave through branches, leaving holes and open wounds as evidence of their travels. Oystershell scale refers to small insects, resembling their namesake in appearance, that take refuge on lilac bark. These pests and diseases can commonly be managed through removal and destruction of damaged tissue. In severe cases, additional integrated pest management strategies may be necessary.
Consistent pruning practices are essential for lilacs to remain healthy throughout every season of change. Lilacs are beings of extreme preparation, developing next year’s buds as soon as the current flowering period is complete. By deadheading blooms promptly after they have run their course, lilacs are able to dedicate more energy to generating healthy flowers for future growing seasons. Renewal pruning is another beneficial technique—cutting back overgrown stems to remove barriers preventing light from reaching inner branches. This encourages new growth and results in lilacs which appear fuller, bursting with color from the inside out. Spring is the most appropriate time to employ these pruning tactics in accordance with lilac’s growing needs. Prune immediately after flowers start to fade for best results.
Lilacs are a cornerstone of spring, providing a familiar and reassuring sight to ground us when our own lives become unrecognizable. Lilacs and the endless wonders of spring gently remove the asterisk from our desire for change, reminding us to take solace in the familiar while welcoming all that the unknown may bring.
The UConn Home Garden Education Office supports UConn Extension’s mission by providing answers you can trust with research-based information and resources. For gardening questions, contact us toll-free at (877) 486-6271, visit our website at homegarden.cahnr.uconn.edu, or reach out to your local UConn Extension Center at extension.uconn.edu/locations.
So, you started your seeds, have been watching them attentively, and spring is knocking at the door. It’s still a little too early to put some things outside, but overzealous gardeners may find themselves swimming in seedlings that need management. Consider taking these steps to help you and your seedlings find a comfortable compromise as they wait to go outdoors.
If you haven’t done so already, thinning your seedlings is an important step in ensuring that the plants you put in the ground will be robust and strong. As a fellow gardener, I’m familiar with the pain of disposing of “perfectly good seedlings.” However, this isn’t an entirely true belief. Seedlings that are not thriving in optimum conditions, may be indicating to you that they aren’t strong for planting in the garden.
Thinning prevents crowding and allows for more air flow between seedlings. When crowded, seedlings compete for water, nutrition, light, and space. By thinning, we ensure that plants have enough resources to grow healthy. Thinning also helps to encourage airflow, which can reduce the risk of fungal development. Fungal pathogens can lead to issues like “damping off,” and other plant diseases that put your seedlings at risk.
You may decide to thin your plants by snipping out weaker seedlings at the base. If you have the heart, the patience and the amount of valuable bench space to dedicate to extra seedling trays or containers, you may decide to carefully tease apart seedlings and replant them for one last chance.
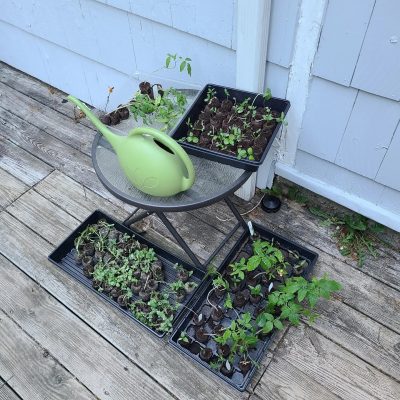
Your strongest seedlings should be potted up into a larger container to encourage them to continue to grow. Putting seedlings into 3- or 4-inch pots (or recycled plastic cups with holes in the bottom) gives them a little bit extra wiggle room while we wait out these temperature fluctuations of a New England spring. Extra space for the root zone will allow the plants to continue to expand. More roots mean more water and nutrient uptake, leading to healthy growth. This practice may also help reduce watering needs on your part, since there is more media to hold moisture in the root zone.
Are your tomato seedlings getting leggy? You can bury the stems of the tomato seedlings to help promote adventitious root development. Remove the cotyledons and any small leaves that you intend to bury below the soil line. Make sure to leave at least one third of the plant’s total height above the soil line to continue healthy growth.
To this point, our seedlings have grown in optimum conditions, or as close to optimum as we’ve been able to provide. Not only have these conditions been ideal, they’ve also been consistent. When your plants get out to the garden, the new environment may be shocking. Hardening off is a process of transitioning them from their ideal growing conditions, into a more realistic environment. Any plant, whether it is a new seedling, a beloved houseplant, or a sheltered patio tropical, needs this transition when moving from inside to outside.
Take your plants on “field trips” during warm spring days by placing them outside in a location with bright, indirect light. Full sun may be too strong for seedlings that have been acclimating with grow lights or through sunny windows so introduce direct light incrementally.
Using cold frames can help to transition your plants from indoors to outdoors. These small, unheated enclosures use the sun’s energy to store heat like a greenhouse. This helps to reduce the drastic temperature swing of nightfall and insulate plants from frosts during the temperamental spring season. Crack them open during warm days for ventilation and to help start reducing humidity.
When conditions are right for hardening off and planting your seedlings, continue to monitor weather conditions. Late spring in New England has been known to throw us a cold snap or two. If frost/freeze warnings occur, bring in potted plants and use a frost cover or breathable fabric to cover in-ground plants as frost protection. Garden stakes will help keep fabric from directly touching your plants and help create a warm air pocket around them to survive those incidental cold nights.
Spring in New England is a season of transition. Warm days may signal planting time, but cool nights and shifting conditions remind us to move forward carefully. By thinning crowded seedlings, giving roots room to grow, and easing plants gradually into outdoor conditions, gardeners can help reduce stress and build resilience. A little patience and flexibility now can pay off with healthier transplants, stronger growth, and a more successful garden as the season continues to unfold.
The UConn Home Garden Education Office supports UConn Extension’s mission by providing answers you can trust with research-based information and resources. For gardening questions, contact us toll-free at (877) 486-6271, visit our website at homegarden.cahnr.uconn.edu, or reach out to your local UConn Extension Center at extension.uconn.edu/locations.
There are many styles of raised beds to choose from, depending on your needs. Raised beds exist on a spectrum, ranging from framed boxes above ground to unframed, elevated planting mounds. When planning new raised beds, both types have specific considerations to keep in mind.
Mounded raised beds are created by mounding existing soil or adding additional material so the planting area sits above ground level. This method works well on compacted sites, in poorly drained areas, or on top of heavy clay soils.
Most mounded raised beds do not have a barrier between the ground and the mound. However, if you are wish to start a raised bed over lawn, cardboard can be placed underneath the mounded soil to smother the grass. If you use cardboard, it is best to allow it to decompose for a few months before planting. This will allow plant roots to grow freely into the soil below rather than being blocked by the cardboard layer.
The bed can be built using soil already on site, by mounding soil from the paths or edges into the bed. Alternatively, you can bring in topsoil and compost to create the beds. Any imported soil or compost should be free of pathogens, contaminants, and invasive weeds. Mounded raised beds are not tilled, and walking on the mound will compact the soil, so foot traffic should be avoided. These beds may need to be reshaped or re-mounded annually. Soil tests can be taken every two to three years, then apply amendments added as needed.
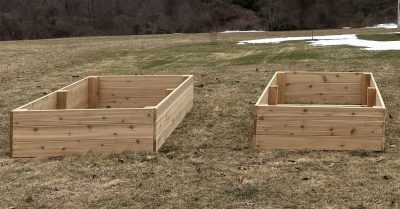
Framed raised beds offer many of the same benefits as mounded beds, along with additional structure and accessibility. A framed raised bed is more contained than an in-ground bed and can be made of wood, metal, or pavers. These beds are well suited for compacted or poorly drained sites, locations with contaminated soil, or in gardens designed to improve accessibility for people with limited mobility.
Raised bed depth can vary depending on the intended use. Some beds are only a few inches deep, while others may be up to 2 feet. Gardeners who use wheelchairs or who have difficulty bending may want to consider an elevated or deeper bed. Most annual vegetables require 12 to 18 inches of soil depth, root vegetables will require greater depth. Length and width can also vary based on site conditions, but a width of about an arm’s length is generally recommended for easy planting, harvesting, and weeding.
Prefabricated wood or metal beds can be purchased, or you can build your own using lumber. Cedar is often preferred over pine because it lasts longer, although it is more expensive. Use caution when considering repurposed or pressure-treated wood. Before 2004, pressure-treated lumber was treated with copper, chromium, and arsenic, which could leach into the soil. If pressure-treated wood is used, make sure it is labeled for ground contact. Whenever possible, choose untreated or naturally rot-resistant materials.
A good soil mix for framed raised beds is about one-half to two-thirds topsoil and one-third to one-half aged compost. This can require a large amount of material and may be costly depending on the size of the bed. Buying bulk topsoil by the cubic yard is usually less expensive than purchasing bags of raised bed mix. For smaller beds, bagged raised bed mix may be more practical. Avoid using free fill or topsoil from unfamiliar sources, as these may contain contaminants, invasive weeds, or invasive jumping worms.
To save money on filling a raised bed, some gardeners use hügelkultur, a method that fills the lower portion of the bed with logs, sticks, leaves, grass clippings, or kitchen scraps before adding topsoil and compost on top. Larger materials are placed in the bottom then followed by smaller organic materials overtop. Over time, the bulky material breaks down and enriches the soil. Because the material settles as it decomposes, additional topsoil and compost may need to be added annually.
Annual plants are generally better suited to raised beds than perennials or shrubs. Extreme temperature fluctuations in raised beds are not ideal for overwintering perennials, and the need to periodically add more soil makes raised beds better suited to annual crops.
Both mounded and framed raised beds dry out faster than in-ground gardens, so supplemental irrigation is usually needed throughout the growing season. Weed pressure may be minimal, but regular weeding will still be necessary. Raised beds should be mulched to help retain moisture and reduce weeds.
The paths between raised beds can be planted in turf, covered with wood chips, topped with crushed gravel, or left as bare ground. Keep in mind that paths between mounded beds may need to be mowed or weeded regularly. They will also likely become compacted over time due to foot traffic.
The UConn Home Garden Education Office supports UConn Extension’s mission by providing answers you can trust with research-based information and resources. For gardening questions, contact us toll-free at (877) 486-6271, visit our website at homegarden.cahnr.uconn.edu, or reach out to your local UConn Extension Center at extension.uconn.edu/locations.
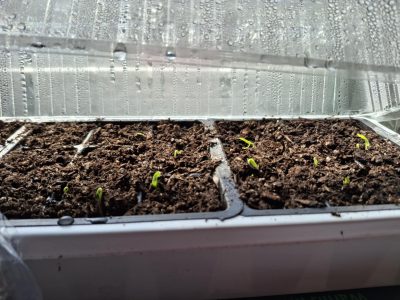
As you start to plan your next vegetable garden, you may reflect on the previous seasons to help you develop your seed selection, layout, and more. Gardening can already be a sustainable practice, but many want to be more intentional with reducing waste, improving efficiency, and promoting sustainability in their home. Your stages of garden planning should include considerations to ensure you are meeting these goals during the growing season.
The first way to improve your practices is to have an honest assessment of your strengths and weaknesses as a vegetable gardener. For example, through years of trial and error, I have finally admitted out loud that I am not skilled at keeping pepper seedlings warm enough to yield bountiful plants in the growing season. As a solution, I now buy my pepper plants from the garden center in the spring, while still using my setup to start other vegetables and flowers from seed. Using the garden center to help fill in gaps allows you to use that time, energy, and money for seed that has a track record of success. You might even have space to try something new!
Plan to save seed before your plants even start growing. Select seed varieties listed as “open pollinated” so that the offspring will come back true to seed in the following season. Plants that do not have this designation may not come back true to type and may lead to unfamiliar plants in the future!
Consider space as a commodity while you’re planning your garden. Think about the space that some plants require, and determine if that product is worth that space, time, and energy. If your row will yield half a dozen heads of cabbage from weeks of watering, weeding, and care, does that meet your gardening goal? Or do you have other goals in mind? Decisions like this early in the planning stages can help you make your garden more efficient, productive, and tailored to you.
Prevent waste by growing what you and your family will eat. Sometimes gardeners get caught up in the novelty. Purple cauliflower is exciting and worth the space if your family will eat the cauliflower. Avoid overplanting to keep your garden efficient and reduce waste. Does your family get sick of certain produce mid-season? That could be a clue that you're overplanting. When planning for the year ahead, ask yourself if your family has the capacity to eat or safely store whatever is harvested when it is ready. Plant yields are easily researched to help you determine how many plants you may need in your garden to meet your goals.
It can be difficult to consider cutting certain vegetables out of your garden for space or efficiency. However, this is where local agriculture can assist. Just like buying pepper starts from the garden center saves time and energy in the seedling space, buying local produce can help fill any gaps you may feel in your garden’s productivity. From a sustainability standpoint, buying local usually means less energy used in transportation, refrigeration and storage when compared to produce from outside our region.
Cost Share Agriculture (CSA) programs are an effective way to supplement your garden produce. These programs often work on a shareholder system, where purchasing a membership up front will guarantee a share of the farm’s harvest throughout the season usually on a weekly or bi-weekly basis. Connecticut has CSAs for produce, cut flowers, and even meat products. Many of them start signups well before the growing season begins, so keep an eye out! Visiting local farmers markets is another way to help supplement your garden produce, with less of a regular commitment. Some even provide forms of family entertainment, like music, during the summer.
As you plan your next garden, remember that sustainability starts with intentional choices and there is no “one size fits all” strategy. Carefully considering your strengths, weaknesses, and goals will help you promote a sustainable and efficient garden in the season to come.
The UConn Home Garden Education Office supports UConn Extension’s mission by providing answers you can trust with research-based information and resources. For gardening questions, contact us toll-free at (877) 486-6271, visit our website at homegarden.cahnr.uconn.edu, or reach out to your local UConn Extension Center at extension.uconn.edu/locations.
This year, Connecticut’s notably dry summer conditions have continued into fall. According to the U.S. Drought Monitor, all counties are abnormally dry for this time of year, and some are even considered to be in a moderate drought. Thus, many trees, shrubs, and perennials are heading into winter low on moisture. These conditions combined with the dry air, low precipitation, and fluctuating temperatures characteristic of Connecticut winters can lead to plant damage if no supplemental water is provided. Many of your plants will benefit from a deep final soak before the ground freezes.
Fall drought stress often doesn’t show up until spring, or even the following summer.Affected plants may appear perfectly normal and resume growth in the spring, using stored food energy. Plants may be weakened or die in late spring or summer when temperatures rise. Browning evergreens, delayed leaf-out, and sudden dieback are common signs of plants that went into winter too dry.
Moist soil is so important in the fall and winter months because it provides insulation to the roots. It may seem counter-intuitive, but properly hydrated soil does a much better job at protecting roots from freezing temperatures than dry soil. Root damage occurs for this reason when plants do not receive enough late-season moisture.
Woody plants with shallow root systems require the most supplemental water during extended dry periods in the fall and winter. Trees in this category include maples, birches, willows, and dogwoods. This category also includes perennials, and shrubs like hydrangeas, boxwoods, and azaleas. These plants benefit from mulch to further conserve soil moisture and buffer the roots from temperature swings. Apply mulch about 2 to 4 inches away from the trunk all the way to the outermost reach of its branches in a doughnut shape.

Evergreens also benefit from fall and winter watering because they do not go dormant in the winter. Evergreens of any age are still actively respiring during the coldest months of the year and will continuously lose water through their needles. If they go into the winter with dry soil, they are more likely to have a difficult spring recovery. This is especially true for those in open or windy areas.
Only water when daytime temperatures are above 40°F, ideally in the late morning or early afternoon so the water can soak in before possible freezing at night. Feel the soil at a depth of 4 to 6 inches to ensure that supplemental water is necessary. Soil should be consistently moist, but not oversaturated or muddy. Stop supplemental watering after the ground freezes because plants cannot absorb water through frozen soil. To water, use a soaker hose to provide a slow stream of water that can penetrate deeper into the soil with limited runoff. If your hose is already stored away for the winter, and your tree or shrub is small, consider drilling a 1/8-inch hole at the bottom of a 5-gallon bucket and filling that with water for a slow, steady stream. If dry weather continues into the winter and there’s little snow cover, additional watering once or twice a month may be needed until the soil hardens.
A final round of watering now can prevent root injury that won’t be visible until much later. Evergreens, deciduous trees, and other landscape plantings will head into winter stronger with a little extra attention this month. Giving the soil one last watering before it freezes is one of the simplest ways to protect your landscape from winter stress.
The UConn Home & Garden Education Center supports UConn Extension’s mission by providing answers you can trust with research-based information and resources. For gardening questions, contact us toll-free at (877) 486-6271, visit our website at homegarden.cahnr.uconn.edu, or reach out to your local UConn Extension center at extension.uconn.edu/locations.