The Spruce – Heather Zidack discusses why container mixes dry out so fast and how to maintain healthy container gardens.
Something Rotten in Tomato Land?
With the lazy, hazy days of summer in full swing, your vegetable garden is likely in full production mode. Tomatoes should be producing lots of blossoms by now with the earlier varieties offering ripening fruit. While it is true that tomatoes can be challenging to grow in New England, being susceptible to several diseases as well as some abiotic disorders, there are few summer pleasures greater than taking that bite of the first, ripe, sun-kissed tomato. That’s most likely the reason that 86% of food gardeners, according to the National Gardening Association, chose to grow them.
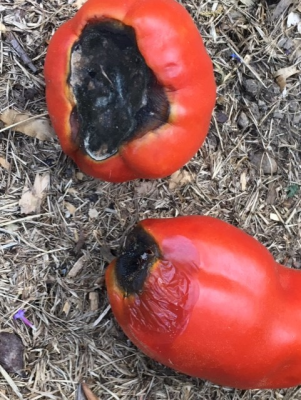 Between summer heat, sporadic rainfall, vacations and inconsistent watering, some of us are noticing black sunken patches on the blossom end (bottoms) of our ripening fruit. This is an abiotic or physiological disorder known as blossom end rot. It starts out with a small water-soaked area that enlarges and darkens as the tomato tries to ripen. The affected tissue has a dark, leathery appearance and may be colonized by a bacteria giving it a black color.
The cause of this disorder is lack of calcium. Most of us know that people require calcium for strong bones and healthy teeth. Plants also have calcium requirements that must be met for good growth and establishment. It is needed for the proper growth and functioning of shoot and root tips and is an integral part of cell walls. As your tomatoes grow in size, more cells with more cell walls are needed.
Plants take up the calcium they need through their roots. Nutrients like calcium, potassium and others are dissolved in the water that is in the soil. When a plant loses moisture on a hot day through the process of transpiration, the roots take up water to replace that loss and keep the plant turgid. The soil water contains nutrients the plants need. Anything that restricts the plant roots’ ability to take up water also reduces the amount of nutrients a plant receives.
Blossom end rot is usually caused by one of two factors. Either there is not enough calcium in the soil or there is not enough water in the soil for the calcium to be able to move into the plant. Sometimes, because of the high humidity, factor number three comes into play. Plants are not transpiring that much because of the high humidity. Since little water is being lost through the leaves, little water (containing calcium and other nutrients as well) is being absorbed by the roots. So even if your soil is loaded with calcium, and your garden is irrigated, plants may not able to transport enough calcium from the soil water into their internal structures.
If blossom end rot is noticed, first take a soil sample and send it to a soil testing laboratory (s.uconn.edu/soil-lab) to determine the soil pH and calcium levels. Often if calcium levels in the soil are too low, plants would also be exhibiting signs of deficiency including stunted growth, curling of leaves and perhaps spotting or scorching on leaves. Follow any recommendations for limestone additions if the pH or calcium levels are too low.
Next, evaluate your watering techniques. Often this disorder occurs when succulent, vigorously growing plants are subjected to drought conditions. It is best to water deeply and less often than to water lightly on a daily basis. After watering, dig a small hole to check if the top 6 inches or so of soil are moistened. Adjust your watering schedule accordingly and if at all possible, just apply water to the base of the plant and avoid getting the foliage wet to discourage diseases. There isn’t much one can do to lower the humidity and increase plant transpiration rates except hope for a bout of dry weather.
To thwart blossom end rot, some gardeners are purchasing blossom set sprays containing calcium to apply to their plants’ foliage. Others are fertilizing and spraying the plant’s foliage with calcium chloride, as directed on the package or making up a calcium solution by mixing gypsum or limestone with water and letting it sit overnight. After 24 hours or so, it can be used to drench the plants and soil. Gypsum can also be applied around the plants at a rate of about 5 pounds per 100 square feet and carefully scratched into the soil. Take care not to injure your tomato plant’s roots and water afterwards. Another option is to search out water soluble fertilizers that contain calcium and can also be used as a foliar spray and apply them to the plant’s leaves.
The UConn Home Garden Education Office supports UConn Extension’s mission by providing answers you can trust with research-based information and resources. For gardening questions, contact us toll-free at (877) 486-6271, visit our website at homegarden.cahnr.uconn.edu, or reach out to your local UConn Extension office at extension.uconn.edu/locations.
Water your CT Garden with Confidence
Watering is an essential skill for gardeners that is often overlooked. “How often should I water and how much?” is a frequent question with new gardens or when establishing new plants.
There’s no magic formula for watering your plants. The soil texture, local climate, and even the metabolism of your plants can affect how often water needs to be replenished. So how do we know what to do? Over time, experienced gardeners form a sense of their soil and their plant’s needs, and perfect their watering practices.
 What plants really need
Most established garden plants require about 1 inch of water per week from rainfall and irrigation combined. When mother nature doesn’t provide this through rainfall, we can supplement by adding about 0.62 gallons of water per square foot in a garden bed. However, actual needs vary with soil type, weather conditions, plant species, and stage of growth.
Knowing your soil texture can help you anticipate what your watering schedule might look like. Sandy soils are known for rapid drainage, which often means they require more frequent watering. Clay soils, on the other hand, hold water for longer periods and generally need less frequent irrigation. Plants also have preferences for different soil types, many of which are related to water availability and drainage. Choosing the right plant for the right site can help ensure it receives adequate moisture.
A plant's water demand may vary depending on its stage of growth. For example, we tend to encourage additional support for plants that are fruiting/flowering, or plants that have just recently been transplanted. Keep a close eye on these plants and their water needs during stressful periods. Newly planted trees, shrubs and perennials need this additional monitoring and support through their first year of establishment in the landscape. You may find that you’re watering them more frequently during this time. This can be totally normal.
Sometimes, soil can appear dark even when it hasn’t been watered, so don’t rely on appearances alone. Your hands are one of the most reliable tools for checking soil moisture. Dig a few inches below the surface and feel the soil. If it feels cool and slightly moist, watering can likely wait. If it feels dry and crumbly, it's time to water. If the soil feels saturated or releases water when squeezed, allow it to dry somewhat before watering again.
Water Deeply
Giving your plants a good soak does more than just help them in the short term. Deep watering provides a slow, thorough soak that reaches the plant’s root zone rather than just the soil surface. This encourages deeper root growth and can improve drought tolerance, often allowing for less frequent watering. For most vegetables and perennials, water should reach at least 6–12 inches into the soil. Trees and shrubs may benefit from moisture penetrating even deeper into the root zone.
Apply water slowly at the dripline so it soaks in without pooling or running off. Use a soaker hose, or a regular hose on a slow trickle over the root zone of your plants. Avoid high-flow sprinklers, since they may cause runoff. Keep in mind that water movement depends on soil type.
Check the soil every so often to ensure that water is penetrating deep enough and set a timer for yourself. After a few watering cycles, you will become familiar with the timing and flow rate for your specific soil and plants.
Stay Consistent
Don’t automatically change your watering habits just because the temperature changes. Hot weather can increase water demand, but it is essential to always check the soil first. During periods of heat and drought stress, plants can close their stomata and reduce water use as a survival mechanism. While this may slow water uptake, plants still need adequate soil moisture. Overwatering, however, may not be helpful. Instead, roots can sit in saturated soil and develop diseases like root rot. Always check the top few inches of soil to ensure water is needed.
When weather starts to cool off in the fall, continue your watering practices. By watering until the ground freezes, you help your plants, survive the winter. The effects of winter burn can be reduced when evergreens enter the winter properly hydrated.
Watering is an essential task in the garden year-round. It is important to know your plants, your soil, and the climate you are growing in to ensure you are giving your plants enough hydration. By watering only when needed, watering deeply, and continuing these practices well into the fall, you will be sure to have healthy plants year round!
The UConn Home Garden Education Office supports UConn Extension’s mission by providing answers you can trust with research-based information and resources. For gardening questions, contact us toll-free at (877) 486-6271, visit our website at homegarden.cahnr.uconn.edu, or reach out to your local UConn Extension center at extension.uconn.edu/locations.
What’s Going Down with Your CT Basil This Summer?
Vegetable Stress, Watering, and Other July News
Scout for Summer Tomato Issues
 Tomato growth is in full swing this July! Below are some common diseases and issues tomatoes often experience this time of year.
These resources act as a great starting guide if you're scouting your home gardens!
We always recommend a confirmed diagnosis to ensure a targeted management strategy. Doing so can save you time, money and energy by knowing you've applied the correct product on the first time. If you see any of these issues in your garden, don't hesitate to reach out to the Home Garden Education Office or the Plant Diagnostic Lab for assistance with confirmation and developing a management plan!
Interesting Insects: Prionus Borers
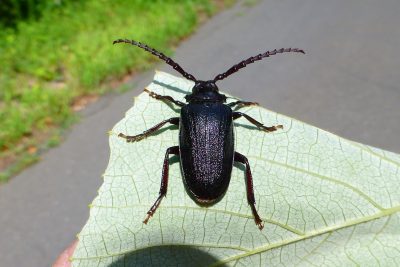
Prionus laticollis, broad- necked root borers are large black beetles up to an inch and a half long can be seen crawling across lawns, sidewalks and driveways in early summer.
Larvae are very large and feed on roots of woody ornamentals and tree roots in the soil for three years. Adults emerge from July to September. The larvae are pests, and adults could be killed when found to reduce larval populations in the future. Adults otherwise are not injurious to plants.


Managing Invasive Plants
Episode 166: Managing Invasive Plants
UConn 360– Lauren Kurtz discusses invasive plant management and the new Invasive Species Certificate Program.
Farming is Taking Flight: Drone Technology in CT

Agricultural drones are becoming more common in Connecticut and can support a wide range of farming activities. They can be used for tasks such as crop scouting and monitoring, field mapping, broadcasting seed, applying fertilizers, and precision pesticide application, where permitted and when conducted by properly licensed operators. One promising capability is the use of drones to seed cover crops.
Cover crops are plants grown to protect the soil and improve soil conditions, typically during periods where the soil would otherwise be bare, such as between cash crop growing seasons. They provide many environmental and agricultural benefits, including reducing soil erosion, capturing excess nutrients, suppressing weed growth, storing carbon in the soil, providing an additional source of livestock forage, and improving overall soil health. Planting cover crops early in the fall allows them more time to establish and grow, leading to greater ground cover and biomass production. These improvements help to maximize their benefits to the soil. In contrast, a late planting date, especially after the first fall frost, can reduce cover crop establishment, winter survival, and biomass production. Cover crops in silage corn systems are typically seeded after corn harvest using seed drills or other land-based equipment. However, in New England, silage corn harvest can extend to late October due to labor constraints, unfavorable soil conditions, and weather variability, which can substantially narrow the window for early cover crop establishment using these conventional drill-seeding methods.
Drones offer a potential alternative cover crop seeding method by enabling interseeding of cover crops, the practice of planting one crop into another crop before harvest. For example, a farmer could use a drone to broadcast cover crop seed in early fall over standing corn while it is still growing, allowing for several additional weeks of fall growth. This approach may extend the cover crop growing season without disrupting cash crop harvest. Drones can also access fields when wet soil conditions prevent ground equipment from operating after cash crop harvest, reducing compaction, and helping farmers take advantage of narrow planting windows.
Successful cover crop establishment using drones also depends on several other factors, including seed size, soil moisture conditions, and available sunlight beneath the corn canopy. Careful consideration of cover crop species selection and drone seeding timing will improve drone seeding success. Further research is needed to better understand how to optimize drone-based cover crop seeding across a range of field conditions and management practices.
While other broadcast seeding methods exist, they are often difficult to use or inaccessible in Connecticut field conditions, such as high-clearance tractor-mounted spreaders, fixed-wing aircrafts, and helicopters. Farmers indicate that it is difficult to seed cover crops into standing corn utilizing these other broadcast methods since Connecticut farmers often do not have high-clearance seeding equipment or the minimum required acreage for seeding by fixed-wing and rotary aircrafts. Farmers in Connecticut can avoid these difficulties with drone technologies, which are better suited for small field sizes.
As this technology continues to advance and adoption grows, it may play an important role in supporting sustainable farming and soil health across the state.
The UConn Home Garden Education Office supports UConn Extension’s mission by providing answers you can trust with research-based information and resources. For gardening questions, contact us toll-free at (877) 486-6271, visit our website at homegarden.cahnr.uconn.edu, or reach out to your local UConn Extension center at extension.uconn.edu/locations.
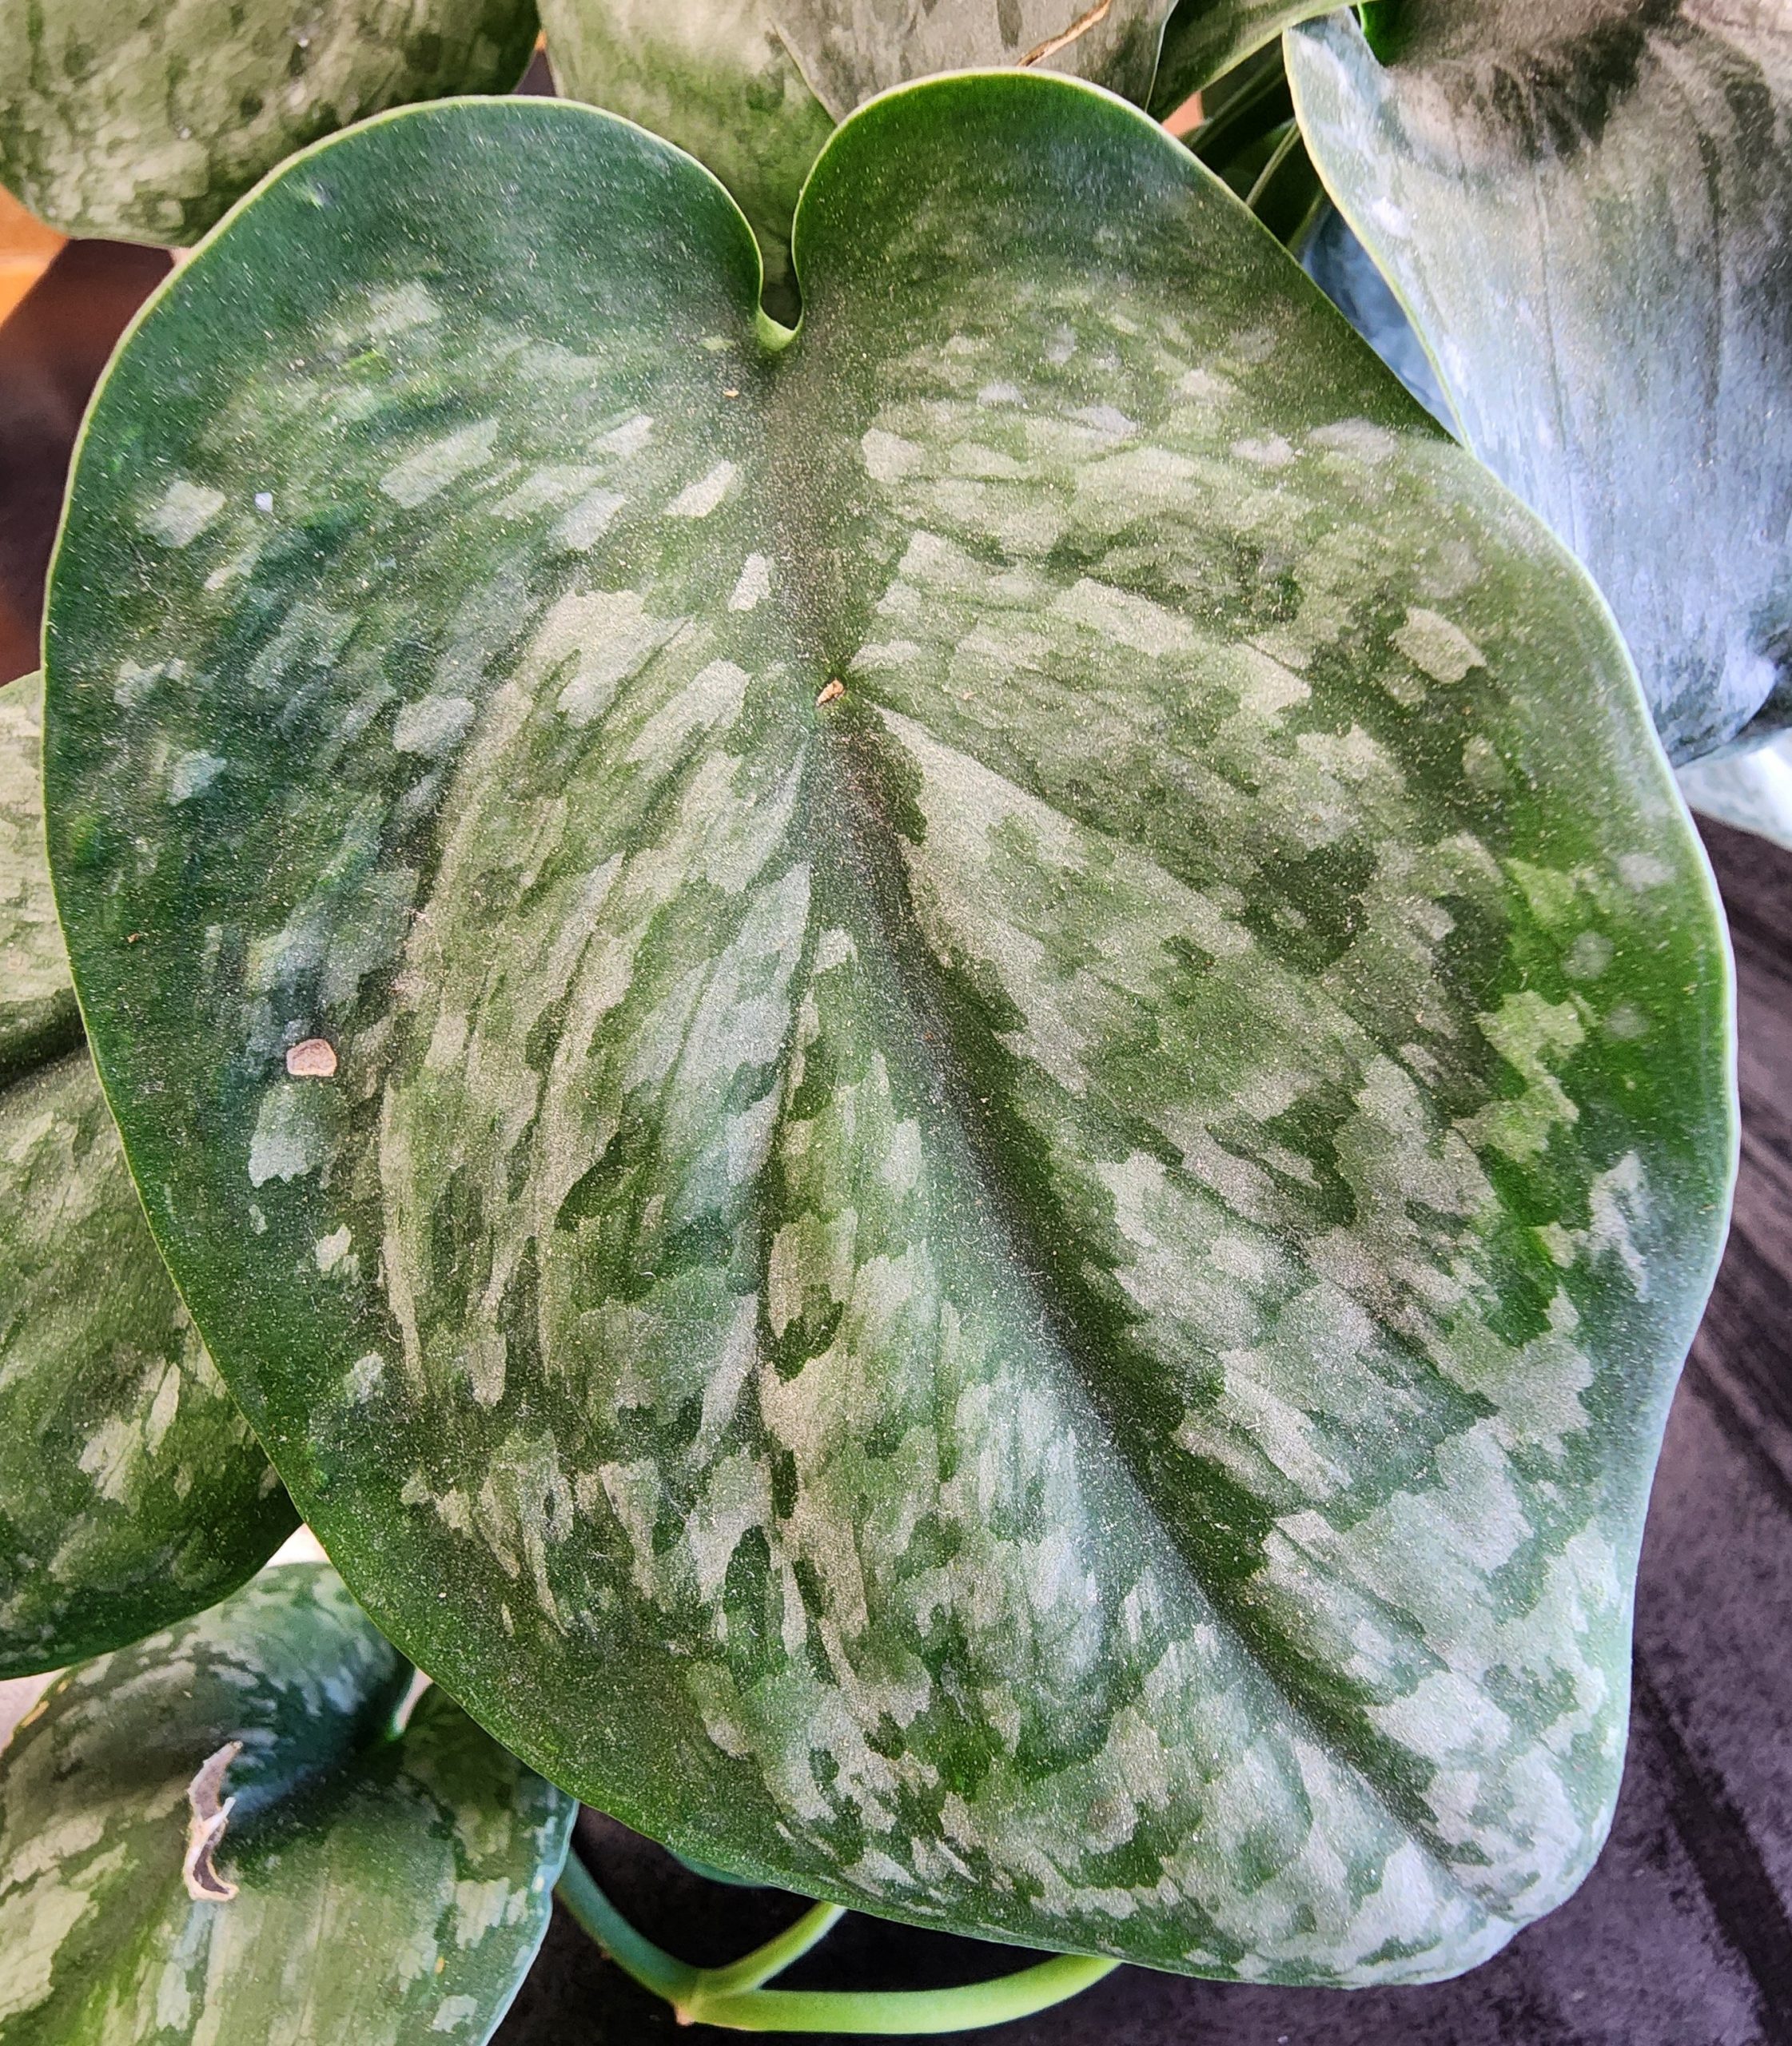
If Scindapsus is Wrong, I Don’t Want to Be Right
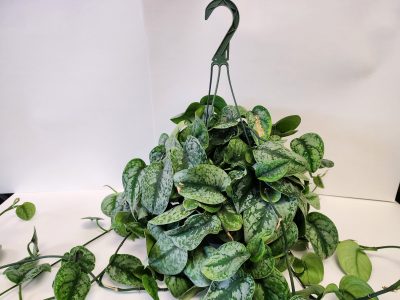
It really is not sinful to like Scindapsus. In fact, it can be very enjoyable to add some to your plant collection. These are a lesser-known houseplant, but are rapidly becoming very popular. They are very similar to the vining Philodendrons, and are most often confused with Pothos (Epipremnum). All of these aforementioned plants belong to the Araceae family. The Scindapsus come from Southeast Asia, Philodendrons from Central/South America, and Pothos from the Tropical Pacific. Although they come from different parts of the world, they all live in rainforest habitats, and therefore will do well when grown together. The thing that most stands out about the Scindapsus species are the unique colors. They are generally a gray or green color. Now that base color has, to more or less degree, some silver colors overlaid, except for some that don’t have any additional color at all.
The nicest part of Scindapsus is that they have very similar care to their look-a-like cousins. They generally like to have the top inch or two of soil dry out between waterings. The soil should be that used for aroids. If using a commercial houseplant soil, add some extra perlite and/or orchid bark to lighten it up a bit. The growth habit could be up a moss pole, or in a hanging basket. I prefer the hanging basket on these as I really like the look of the long vines hanging over the edge of the pot.
They are fairly easy to propagate. Take a cutting between the nodes – the place where the leaves grow out from. Trim this and put it in soil. Keep this in a moist and humid environment. Before long, there will be new growth tips emerging from the node. At that point, start adding some fertilizer to really kick things into gear. These plants adapt well to growing in our typical home environment, but they do not like it super dry. They tend to grow larger leaves in more humid environments, so think about putting one in the bathroom near the shower.
There are some fabulous new varieties of these plants, but because they are not as common yet therefore somewhat tricky to find. It seems there are new varieties coming to market more frequently now. Many of them are variations on the amount of silver in the leaves, or the pattern the silver coloration makes. There are two main species regularly offered so far in the trade. Scindapsus pictus, which has more of a round leaf, and Scindapsus treubii, which has more of an elongated, narrow leaf. There are more species, and I am sure we will see the “house friendly” ones coming to market in the future.
Weed Them and Reap!
By now the vegetables and flower beds should be pretty well planted and plants starting to establish themselves. Despite many of our best efforts, a new crop of weeds is also attempting to get established. These garden pests compete for light, water and nutrients. They also may harbor or attract insects that prey on our plants. If left to their own devices, they can crowd out our desirable specimens reducing the air flow and leading to conditions more conducive to disease.
Weeds are generally sorted into 4 categories: perennial, biennial, winter annuals and summer annuals. There’s a good chance that you removed any winter annuals as you prepared your planting areas. These plants typically germinate in the fall, overwinter, bloom in early spring and set seed. They include weeds such as annual bluegrass, chickweed and shepherd’s purse.
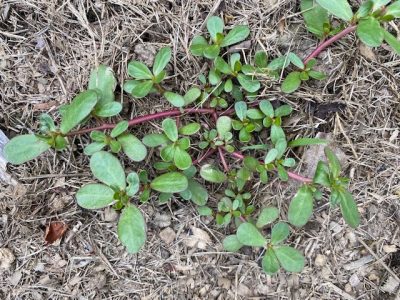
Perennial weeds include dandelions, burdock, thistle and plantains while Queen Anne’s lace and garlic mustard are some biennial ones. Usually, the summer annual weeds are most prevalent in recently planted vegetable and flower beds. Some examples are lambsquarters, galinsoga, purslane, crabgrass and ragweed.
You have probably heard the expression ‘A year’s worth of seeding is worth 7 years weeding’ or something along that line. Weed seeds can last a long time in the soil with purslane and dandelion seeds remaining viable up to 20 years and pigweed up to 40 years. So even letting a few weed plants go to seed will have you pulling up their progeny for quite some time.
What’s a gardener to do? The key to weed control is to stay ahead of them. Take them out when they are small and shallow rooted. For areas that are pretty much bare soil, like around vegetable plants, a small handheld hoe or cobra head weeder works great on patches of newly germinated weeds that are too tiny to pull by hand. For larger gardens, maybe a taller blade or stirrup hoe would be a good tool to have on hand.
I will admit to spending a lot of time on my hands and knees weeding. While this may be not practical for everyone, it gives you a chance to get up close and personal with both the weeds as well as your garden plants so you can see, for example, if any squash vine borers are attacking your squash or pumpkins or if your radishes are ready to be harvested or if that row of bean seeds has yet to germinate.
Mulch can be a gardener’s best friend. The key is to match the mulch to the garden. For vegetable gardens, straw mulches, shredded leaves or untreated grass clippings work well as they degrade over the season adding organic matter to the soil and feeding the bacterial microbes that are most active and essential in agricultural type soils. While many people use plastic, weed fabric or cardboard to keep weeds down, these have been shown to have negative effects on soil health. The benefits may outweigh the costs for commercial growers but for the home gardener, healthy soils mean healthy plants. Plus carboard, especially corrugated pieces often contains contaminants.
For perennial flower beds, I like the look of cocoa shell (if you don’t have dogs that would eat them) or buckwheat hull mulches. They set off your perennial foliage and flowering plants at a better scale than larger bark mulches, nugget mulches or woodchips do. The problem with these being they are not always easy to find or cheap. For trees and shrubs, coarser wood or bark mulches would be appropriate. The bottom line for mulches, is that regardless of which one you chose, it will help to keep weeds down.
In certain situations, the use of an organically certified (OMRI) herbicide might be helpful. There are a number of products on the market that contain essential oils, like clove or citrus, sodium or ammonium derivatives or even acetic acid (vinegar). I find them handy for high populations of just germinating weed seeds before planting or in pathways between rows. The tiny weeds are killed quickly especially on a sunny day.
Two things to consider when purchasing these products are that they typically do not kill the roots of larger established weeds. The top will generally die back but the roots are still alive and will resprout. The other thing is these organic weedkillers are non-selective meaning they can kill any plant they are sprayed on.
However, you choose to remove them, persistence and regular scouting will keep weeds to a minimum. Because the seeds can be in the soil, be transported when purchasing compost or plants, can blow in from the neighbor’s garden or even be moved by animals and people, weeds will always find a way into your gardens and it’s your job to keep them out.
Have a question about plants? The UConn Home Garden Education Office supports UConn Extension’s mission by providing answers you can trust with research-based information and resources. For gardening questions, contact us toll-free at (877) 486-6271, visit our website at homegarden.cahnr.uconn.edu, or reach out to your local UConn Extension Center at extension.uconn.edu/locations.
Start Scouting Now for this Common CT Garden Pest
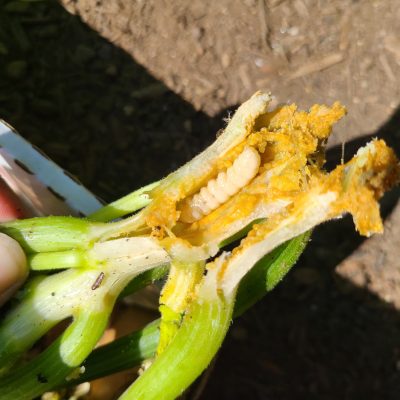
The Squash Vine Borer (SVB) is a red-orange and black winged insect. They emerge in early to mid-summer and lay their eggs at the base of squash stems. When those eggs hatch, larvae emerge and bore their way into the plant stem, continuing to eat your squash plants from the inside out until they are ready to pupate. Gardeners may not even notice their presence until they see squash plants wilting in the summer heat. Upon even closer inspection, a yellow, sawdust like appearance and entry hole at the base of the stem is often found. Once this is observed, it is often too late. While early June may feel too early to start scouting for these guys, it’s the perfect time to start planning defensive strategies to help protect your garden.
The first thing you can do, especially if you have a history with these insects, is select resistant cultivars. Knowing which types of squash are common targets can help you determine whether you will want to keep a closer eye on them this season, or maybe plant something different, altogether.
Cucurbita pepo is highly susceptible to Squash Vine Borer. This species includes Zucchini and summer squash. They have thin, hollow stems, which make it easy for these critters to get into. Pumpkins are also in this category. However, pumpkins are more likely to vine out and lay roots along the stems touching the soil surface. This helps the plant to withstand damage a bit better than its other counterparts.
Cucurbita maxima, which includes winter squash like giant pumpkins, Kabocha and Blue Hubbard varieties, is also susceptible to the SVB. While it is less preferred than C. pepo, it can still be targeted.
Cucurbita moschata is the most resistant plant species. C. moschata includes the butternut, honeynut and crookneck squashes. Their stems are thicker and more succulent, making them least favorable for the SVB to lay eggs on. Therefore, while not impossible, they stand a good chance against this garden pest. These insects are also rarely found in cucumbers and melons.
It is important to rotate your planting sites each year. These insects overwinter as pupae in the soil and emerge as adults in June-July. Planting in the same place each season is like placing a gift on their front doorstep. Moving your planting site and adding a protective row cover as soon as you plant can improve your odds at keeping the SVB away from your plants altogether. Leave the row cover until both male and female flowers begin to emerge. After that it is important to remove the row covers so pollinators can access the flowers.
For gardeners unable to rotate their gardens, preventative measures can still be taken. Do not use row covers as they can trap the pest in with your plants. Some recommend placing aluminum foil around the first couple inches of stem at the soil line to prevent insects from laying eggs and boring through stem tissue. Treating the base of the plants with a preventative pesticide may also be effective.
Chemical management is often tricky with these pests, and home gardeners may not feel it is worth the effort. Importantly, chemical management is no longer effective once the larvae have entered the stems, since they are then protected by the plants. In addition, these products can impact the pollinators visiting your cucurbits, so it’s important to carefully consider the full impact of chemical management. Always read the label in full and follow all instructions as prescribed.
Start scouting for the adults early. In mid to late June, check the base of stems for eggs and early boring damage. You may even see the adult insects flying around. Symptoms, like wilting, often begin in late June and become more common in July.
If you have a strong stomach and sense of adventure, you can carefully slice into the stem to try to find the larvae and extract it. Vining squash species may recover if the pest is removed and portions of vine are then buried in the soil, allowing new roots to take over and support the vine.
Alternatively, removing affected plants entirely and disposing of them in the trash may help to break the life cycle and remove pests from your garden for future seasons.
Since these insects typically only have one generation per year, your hard work does have a finish line. Paying extra attention and working to manage the SVB in early summer will allow your squash to grow healthy for the rest of the season. A second crop of summer squash can be planted in July, once adults are no longer out and laying eggs. This second crop should be unaffected by the SVB and produce healthy squash for your family to enjoy!
The UConn Home Garden Education Office supports UConn Extension’s mission by providing answers you can trust with research-based information and resources. For gardening questions, contact us toll-free at (877) 486-6271, visit our website at homegarden.cahnr.uconn.edu, or reach out to your local UConn Extension Center at extension.uconn.edu/locations.