Wait, Why the Heck Are People Putting Pennies in Their Houseplants’ Soil?
The Spruce – Heather Zidack educates readers on whether putting a penny in potting soil really keeps away pests and disease.
Wait, Why the Heck Are People Putting Pennies in Their Houseplants’ Soil?
The Spruce – Heather Zidack educates readers on whether putting a penny in potting soil really keeps away pests and disease.
American beeches have been suffering from beech leaf disease that is widespread in both Connecticut landscapes and forests. The prognosis for this disease is currently uncertain, but research is investigating treatments and other methods for possible control. This disease is evident from dark bands appearing on the leaves, so homeowners can to some extent seek help from licensed arborists once this symptom is evident.
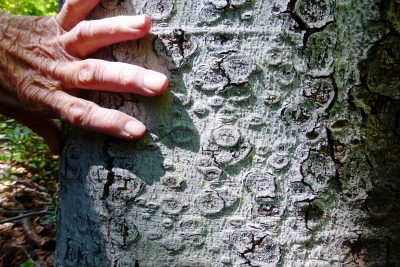
Meanwhile, beech bark disease is also becoming a major threat to American beech (Fagus grandifolia) in eastern North America. This disease is a result of an interaction between a scale insect and one of two Nectria fungal pathogens. When these scales are present, beech bark disease has an increased chance of infecting the tree. The scale responsible was introduced from Europe and first appeared in Nova Scotia around 1890, according to researchers. Within forty years, the fungal pathogen combined with heavy infestations of the beech scale were killing trees, although only in Eastern Canada and Maine.
The scale insect, Cryptococcus fagisuga, will attack American beech, European beech (Fagus sylvatica) as well as Chinese and Oriental beeches, F. enleriana and F. orientalis, respectively. The scale insects pierce through the thin bark of the beeches with a stylet and inject enzymes to help digest the plant material. These small wounds in the tree can now be the entry point of fungal pathogens, including the two native Nectria spp. that can cause beech bark disease.
Adults mate and females lay eggs in mid- summer. Eggs hatch from late summer until early winter and form a waxy white covering. These scale insects often go unnoticed until they develop a “woolly” appearance which is evident in the winter. The immature scales overwinter on the tree, and the next year will become adults. If you notice white woolly scale insects on beeches, especially on trunks, these are likely the beech bark scale. In two to three years, scale populations can reach high levels where the trunks may appear white. Scales do not have wings, but they can be blown by the wind to new trees or transported by birds or even humans.
Disease symptoms take several years to develop after scales appear. Anyone hiking through the forests of Connecticut has probably noticed disfigured bark caused by the Nectria pathogens responsible for beech bark disease. In severely infected trees, living tissue just beneath the outer bark is killed. Cankers appear looking like rough, raised, circular disks. Fungal fruiting bodies appear in the center of these raised circles. Sometimes there are so many red fruiting bodies of the fungus that large areas of the trunk appear red. Over time, bark may crack and split off. Trunks of weakened trees can snap in high wind events. Nectria kills areas of woody tissue, sometimes creating cankers on the tree stem and large branches which in turn weaken the tree. Infected trees can thus be susceptible to other diseases and insects.
So, this is not a happy tale, but homeowners do have some good news. Controlling the scale on any ornamental or native beeches on a property resulting in the absence of these scale insects will prevent beech bark disease. Because beech can form thick stands, thin some smaller trees out so the remaining trees will retain vigor. Make sure trees that have no scale present, and no disfigured bark are left with good space between them.
In case you may need an arborist, the Connecticut Tree Protective Association has licensed arborists that can help you assess the situation with your trees. A licensed arborist will be the best choice in any case. They will be educated in tree insect and disease problems and their solutions, if any are available. Contact the Connecticut Agricultural Experiment Station Forestry and Horticulture department for the latest news and control options for disease and insect problems. Hopefully, your beech trees will never have problems.
The UConn Home Garden Education Office supports UConn Extension’s mission by providing answers you can trust with research-based information and resources. For gardening questions, contact us toll-free at (877) 486-6271, visit our website at homegarden.cahnr.uconn.edu, or reach out to your local UConn Extension Center at extension.uconn.edu/locations.
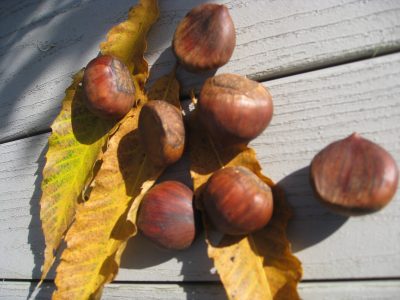
With Thanksgiving approaching, many of us will be sitting down to hearty feasts with family and friends. Time-tested recipes on worn index cards or heavily thumbed cookbooks are combed through/uncovered. Many of us gardeners pick a few new plants for our gardens each year, so why not try a new plant on the dinner table? Chestnuts were reputedly served at the first Thanksgiving and thanks to dedicated breeding programs may be available locally today.
It’s hard to imagine that a little over 125 years ago there were probably 4 billion American chestnuts (Castanea dentata) spread out from southern Maine to northern Georgia. They were an important food source for both indigenous people as well as wildlife. Early European settlers found their rot resistant wood useful for many building purposes.
Unfortunately, a disease (Cryphonectria parasitica), known as chestnut blight, was unintentionally introduced in 1876 on imported Japanese chestnuts (C. crenata). These were sold via mail order throughout the eastern U.S., and our native American chestnuts soon became infected. This fungus spreads by windblown spores. Signs of infection include a reddish-orange ‘rash’ on the affected bark and as it reproduces, an orangey substance oozes from pores in the bark. Cankers form and eventually the plant can no longer internally transport water and nutrients. Chestnut blight kills the parent tree but not the roots so even to this day, you are able to find sprouts growing from chestnut roots. As the sprouts develop, they too will be killed back by the blight so while the tree is kept alive, American chestnuts are considered functionally extinct, but all is not lost.
Fortunately, both researchers and chestnut lovers have been working pretty much for the past 100 years on developing varieties resistant to chestnut blight. Breeding work has been done in many locations but the Connecticut Agricultural Experiment Station began their program in the early 1900s and it is the only program that has continued uninterrupted to this day. Presently this CAES program is led by Forest Pathologist and Ecologist, Dr. Susanna Kerio.
Various chestnut species including American, Chinese Japanese and European have been crossed, backcrossed, planted, evaluated, culled and selected by researchers and enthusiasts all over the eastern U.S. As one can imagine, it takes more time to evaluate a tree’s characteristics than say, an annual plant like a tomato.
Organizations like The American Chestnut Foundation started in 1982 have been championing the search. According to Deni Ranguelova, the New England Regional Science Coordinator, the goal is to develop blight resistant chestnuts and restore this magnificent tree to its native range. Members of this organization have the opportunity to obtain straight species or hybrid seed to try their hand at growing chestnuts and add observations to the chestnut knowledge base.
Why all this work on chestnuts? Well for one, they are deliciously mild and sweet. They are low in calories and high in fiber. Chestnuts are a good source of potassium and other nutrients. Eat them freshly roasted (just like in the song!), in holiday stuffings, soups, in main dishes and glazed. To cook them, they do need to be scored whether oven roasted, boiled, steamed or microwaved to keep them from bursting. Lots of instructions, recipes and videos can be found online.
Second, plants are productive. In fact, it was estimated that before their demise that a mature American chestnut may be able to produce 6000 nuts! They can serve as a food source to both people and wildlife as researchers and enthusiasts create blight resistant strains to plant in our natural areas or in commercial orchards.
Aside from being a member of The American Chestnut Foundation and obtaining seed, one can order chestnut seedlings from several online nurseries. Keep in mind that chestnuts do best in a sunny area with well-drained soil. Root rots can occur in poorly drained areas. Plants are being bred to be straight and tall for timber, or shorter and wider for nut production. Make sure you have enough space for a mature chestnut tree, or most likely 2 trees as chestnuts need another plant for cross pollination.
Even if a chestnut tree is not in your future, do try some chestnut dishes at your Thanksgiving table. They may start a new tradition.
The UConn Home & Garden Education Center supports UConn Extension’s mission by providing answers you can trust with research-based information and resources. For gardening questions, contact us toll-free at (877) 486-6271, visit our website at homegarden.cahnr.uconn.edu, or reach out to your local UConn Extension center at extension.uconn.edu/locations.
This year, Connecticut’s notably dry summer conditions have continued into fall. According to the U.S. Drought Monitor, all counties are abnormally dry for this time of year, and some are even considered to be in a moderate drought. Thus, many trees, shrubs, and perennials are heading into winter low on moisture. These conditions combined with the dry air, low precipitation, and fluctuating temperatures characteristic of Connecticut winters can lead to plant damage if no supplemental water is provided. Many of your plants will benefit from a deep final soak before the ground freezes.
Fall drought stress often doesn’t show up until spring, or even the following summer.Affected plants may appear perfectly normal and resume growth in the spring, using stored food energy. Plants may be weakened or die in late spring or summer when temperatures rise. Browning evergreens, delayed leaf-out, and sudden dieback are common signs of plants that went into winter too dry.
Moist soil is so important in the fall and winter months because it provides insulation to the roots. It may seem counter-intuitive, but properly hydrated soil does a much better job at protecting roots from freezing temperatures than dry soil. Root damage occurs for this reason when plants do not receive enough late-season moisture.
Woody plants with shallow root systems require the most supplemental water during extended dry periods in the fall and winter. Trees in this category include maples, birches, willows, and dogwoods. This category also includes perennials, and shrubs like hydrangeas, boxwoods, and azaleas. These plants benefit from mulch to further conserve soil moisture and buffer the roots from temperature swings. Apply mulch about 2 to 4 inches away from the trunk all the way to the outermost reach of its branches in a doughnut shape.

Evergreens also benefit from fall and winter watering because they do not go dormant in the winter. Evergreens of any age are still actively respiring during the coldest months of the year and will continuously lose water through their needles. If they go into the winter with dry soil, they are more likely to have a difficult spring recovery. This is especially true for those in open or windy areas.
Only water when daytime temperatures are above 40°F, ideally in the late morning or early afternoon so the water can soak in before possible freezing at night. Feel the soil at a depth of 4 to 6 inches to ensure that supplemental water is necessary. Soil should be consistently moist, but not oversaturated or muddy. Stop supplemental watering after the ground freezes because plants cannot absorb water through frozen soil. To water, use a soaker hose to provide a slow stream of water that can penetrate deeper into the soil with limited runoff. If your hose is already stored away for the winter, and your tree or shrub is small, consider drilling a 1/8-inch hole at the bottom of a 5-gallon bucket and filling that with water for a slow, steady stream. If dry weather continues into the winter and there’s little snow cover, additional watering once or twice a month may be needed until the soil hardens.
A final round of watering now can prevent root injury that won’t be visible until much later. Evergreens, deciduous trees, and other landscape plantings will head into winter stronger with a little extra attention this month. Giving the soil one last watering before it freezes is one of the simplest ways to protect your landscape from winter stress.
The UConn Home & Garden Education Center supports UConn Extension’s mission by providing answers you can trust with research-based information and resources. For gardening questions, contact us toll-free at (877) 486-6271, visit our website at homegarden.cahnr.uconn.edu, or reach out to your local UConn Extension center at extension.uconn.edu/locations.
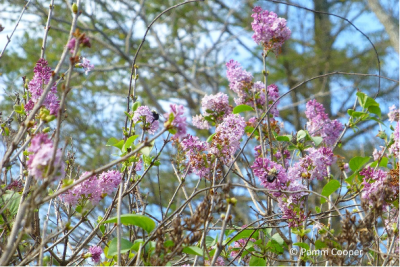
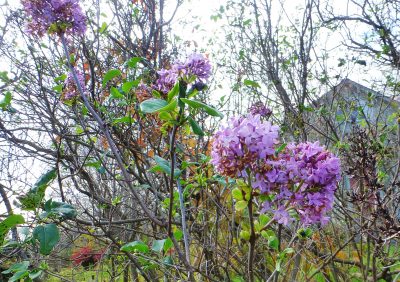
Spring-blooming woody plants like lilacs (especially the old, grafted varieties), ornamental cherries, forsythia, crabapples, azaleas and some magnolias set their flower buds for the following year in early summer shortly after flowering. Usually, flower buds are triggered to bloom by environmental conditions which normally occur after an extended fall and winter cold period, followed by longer days and warming temperatures in spring. It is not typical for these plants to have a second bloom in the fall, but environmental conditions sometimes trigger premature flowering in the fall. Some plants may have only a few flowers rebloom, while other plants may have more flowers open in the fall.
Some of the reasons for this out of season bloom are extended summer heat and drought conditions where supplemental water is lacking. Severe early defoliation, especially from certain fungal pathogens, can also contribute to reblooming. The past two springs have been very wet and diseases such as anthracnose and Pseudocercospora spp. leaf spot may have caused leaves to brown, shrivel and drop early. This stresses the shrub and contributes to out of sync rebloom if other conditions are right. Good sanitation practices such as cleaning up infected leaves will be helpful in reducing fungal infections the following year.
If a plant is healthy and relatively unstressed, the normal seasonal move to cooler weather triggers dormancy. Plants that are deciduous will drop leaves as daylight length and temperature both decrease. Next year’s leaf and flower buds will also remain in a dormant state. Flowering and leafing out will be triggered by increasing daylight and air temperatures the next spring.
If certain woody plants have been stressed during the growing season, however, the change to cooler weather followed by some warmer weather can trigger some of the flower buds to open prematurely. This false dormancy especially affects flower buds near the tops of old-style lilacs where it is sunnier and warmer. Ornamental cherries may show sporadic flowering all over the tree where there is a southern exposure.
While fall reblooming of ornamental trees and shrubs can lead to a disappointing floral display the following spring, it is not harmful to the plant. After a less showy spring bloom period, flower buds will be produced normally. If stressful conditions caused by environmental conditions, insect pests or fungal pathogens are minimal, then a second bloom in autumn is unlikely to occur. Gardeners and landscapers can only do so much, and while the weather is out of our control, making sure plants are maintained properly to avoid stress during the summer will go a long way in helping them remain as healthy as possible.
The UConn Home & Garden Education Center supports UConn Extension’s mission by providing answers you can trust with research-based information and resources. For gardening questions, contact us toll-free at (877) 486-6271, visit our website at homegarden.cahnr.uconn.edu, or reach out to your local UConn Extension center at extension.uconn.edu/locations.
We Asked Gardening Pros If You Should Rake Leaves From Garden Beds—And They All Agreed
The Spruce – Heather Zidack and other professionals give their insight on raking leaves from your garden beds.

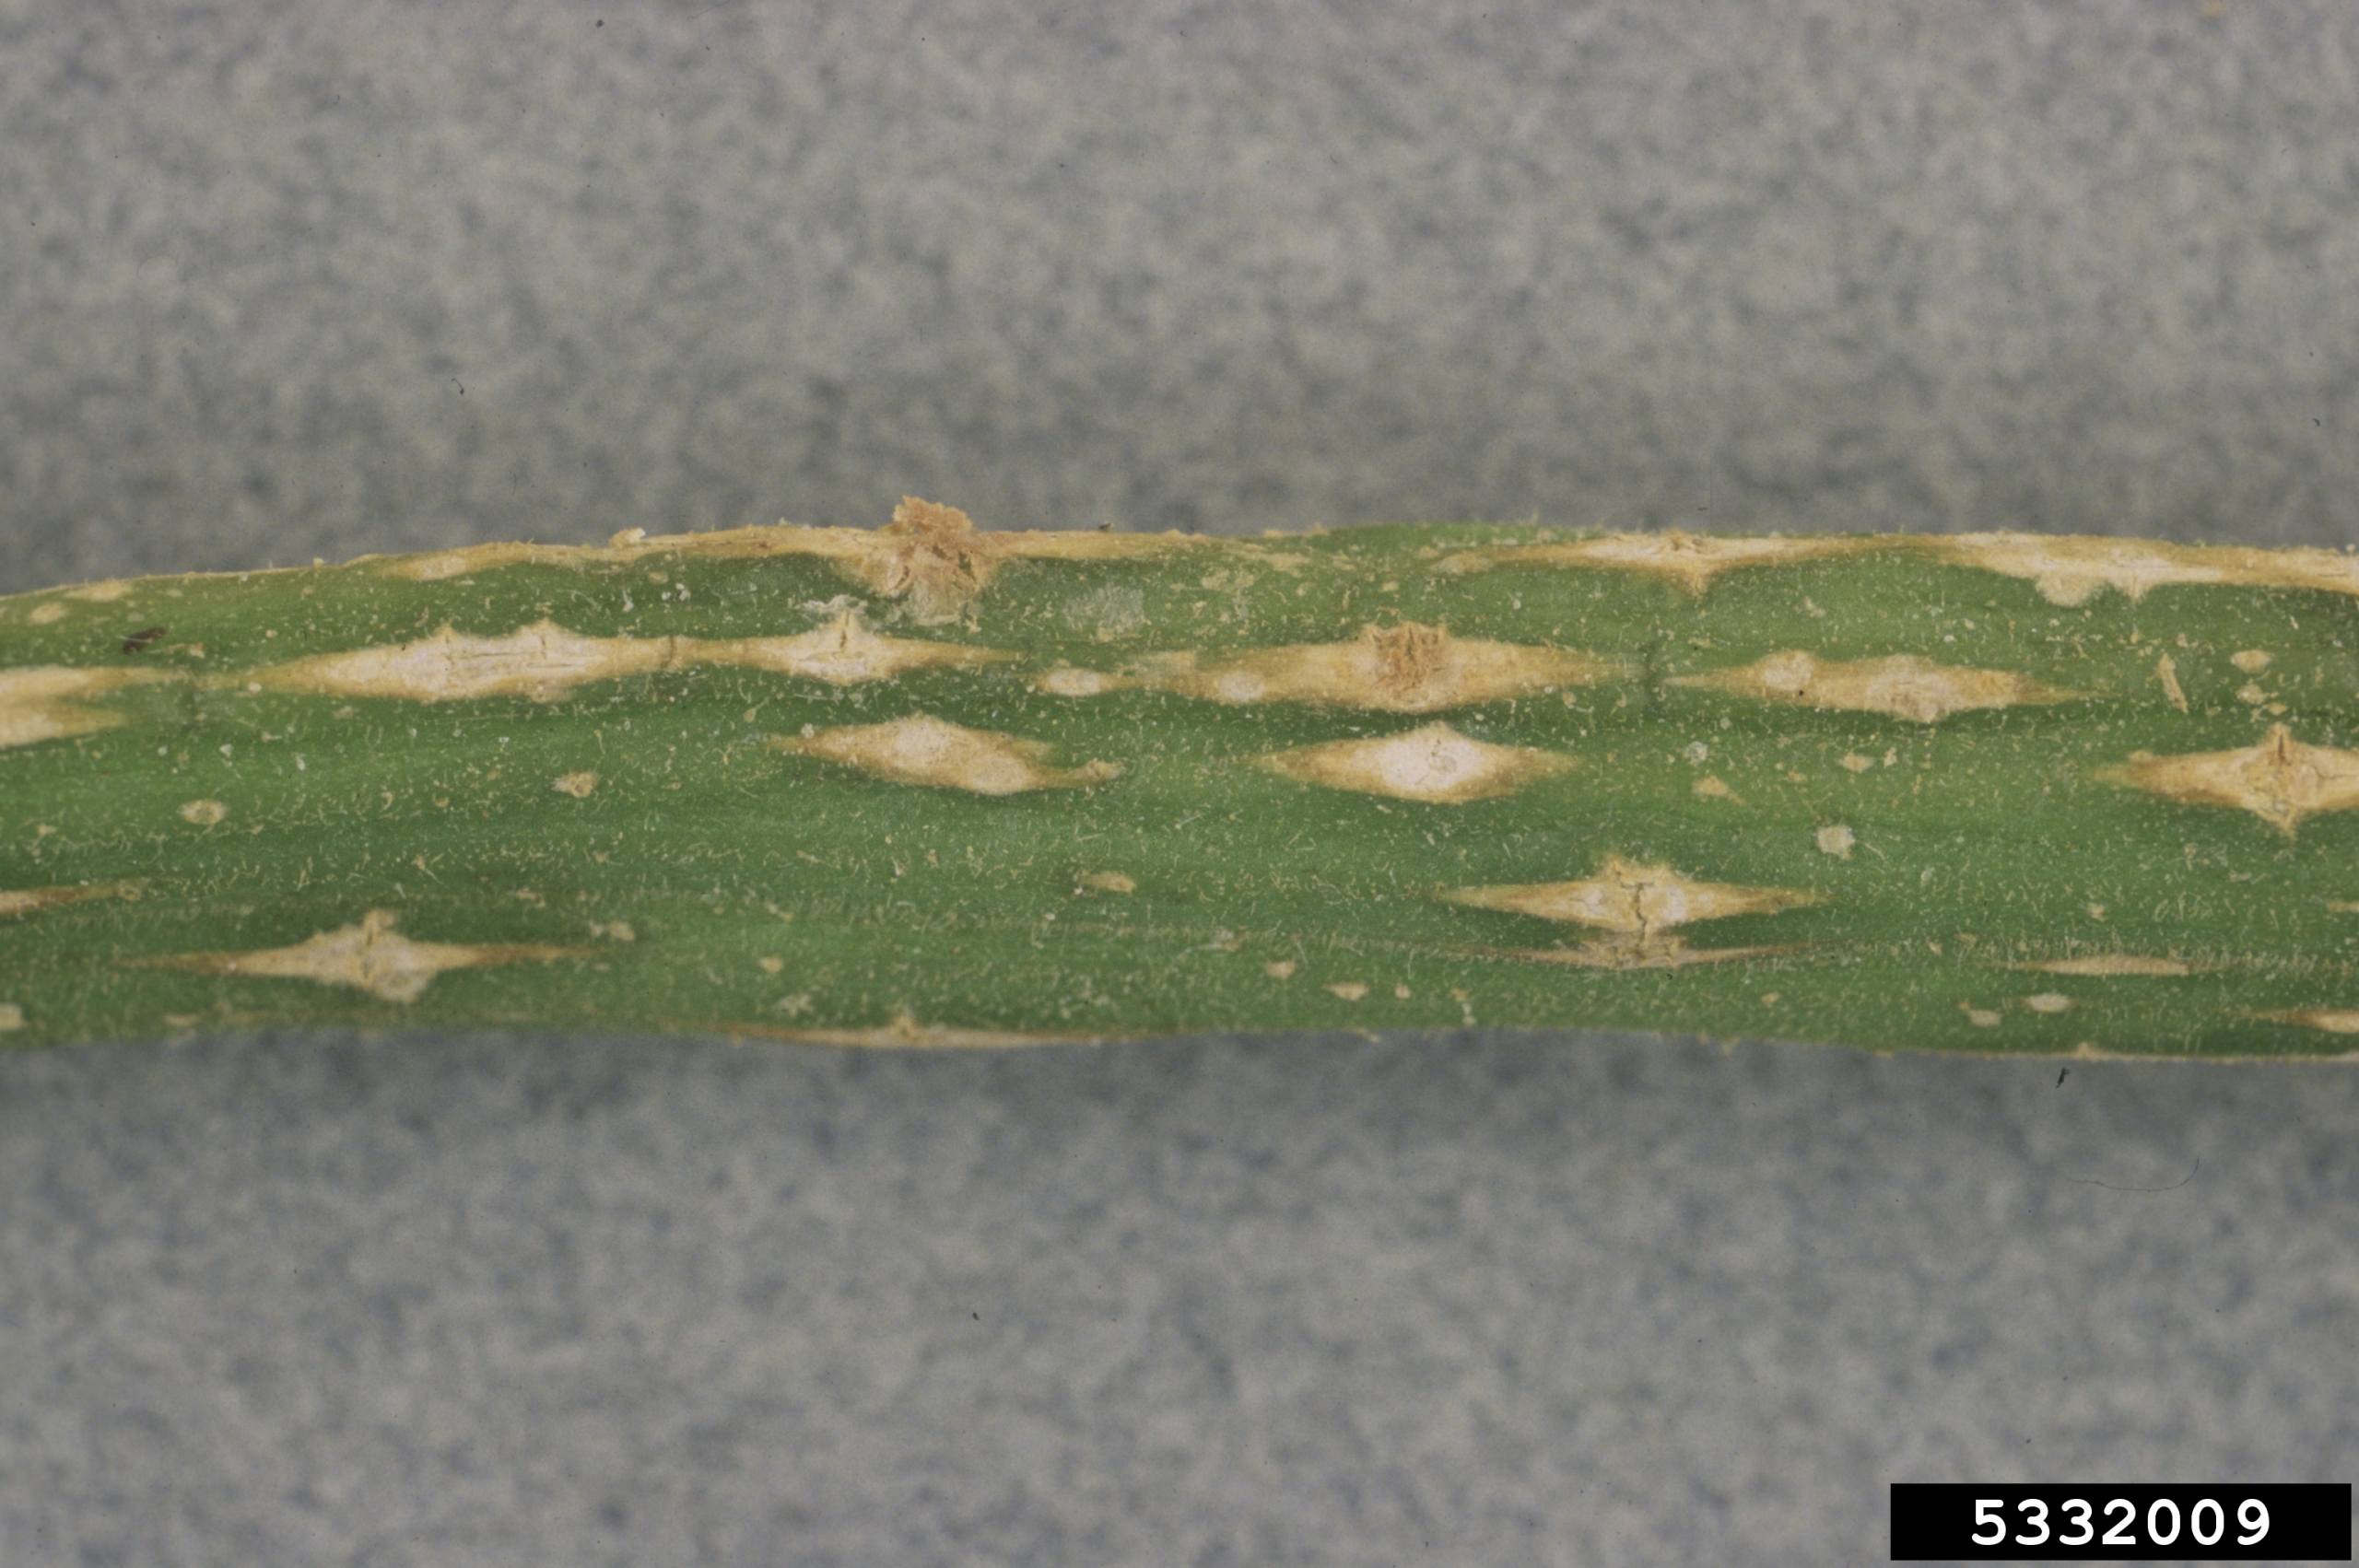
A chill in the air, football playing on the TV, and a certain kind of latte in your hand – there is only one season which encapsulates all three. Autumn is at our doorstep, bringing with it vibrant colors to paint the trees and an abundant harvest to use in all the season’s culinary endeavors. Many of the crops most representative of fall are cucurbits – the most relevant of which being various varieties of squash and pumpkins. Although the season is associated with comfort, danger lurks for these plants in the form of a fungal disease – Plectosporium blight.
As the disease name suggests, the fungal pathogen Plectosporium tabacinum is responsible for its occurrence. Following a typical cycle of disease in infected hosts, fungal reproductive structures overwinter on crop residue. The pathogen even has the ability to dwell in soil for up to three years, much overstaying its welcome. As the growing season progresses, fungal spores will enter hosts through natural openings like cuticles and stomata. Plectosporium tabacinum prefers a cool and rainy environment, as windy and wet weather can assist in the spread of fungal spores and therefore the disease itself.
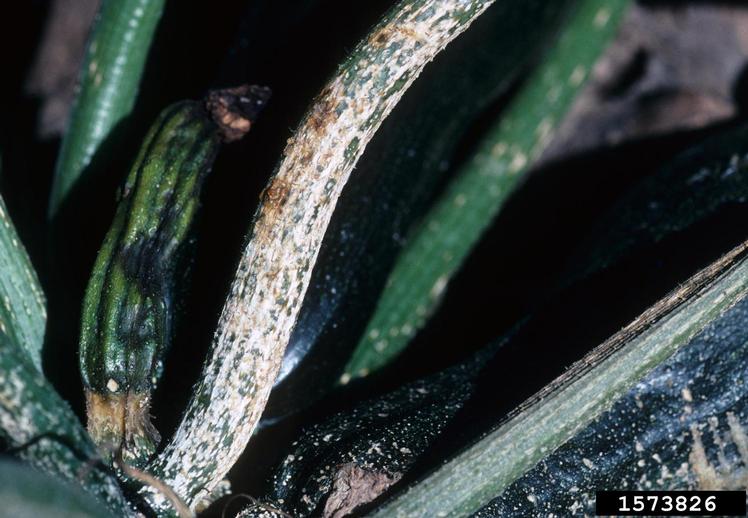
Plectosporium blight has a few key symptoms which are easy to spot. White or cream-colored patches of various sizes will be present on stem tissue and can also spread to leaf petioles – the stalk which connects the leaf to its stem or branch. In severe cases of infection with Plectosporium tabacinum, hosts can become entirely defoliated as these lesions deplete petioles of their strength. Raised circular lesions in colors including white, tan, and gray, will appear on the body of the fruit and possibly leaves. As the disease progresses, infected tissue will become increasingly brittle and dry, forming tan abrasions that detract from the plant’s vigor.
Fear not – all hope is not lost for the unofficial mascots of autumn. There are management strategies readily available to deter Plectosporium tabacinum. Due to the pathogen’s ability to dwell in plant residue and soil for long periods of time, crop rotations are beneficial to position potential hosts away from areas where the disease was observed in the past. In addition, assuring that plants have ample space between each other and therefore promoting air circulation. This leaves fungal pathogens without a suitable place to dwell, reducing infection of plants in the area. Control can also be achieved by fungicides, including Chlorothalonil and strobilurin based compounds. Always read the label in full before using any chemical product on your plants.
The number of management strategies available for Plectosporium blight is a comforting indicator that this disease is easily controlled. As you are outside admiring the fall foliage and enjoying a reprieve from the harsh heat of summer, peruse your fall cucurbit harvest for the aforementioned symptoms. Stay curious and enjoy the dynamics of the season – it'll slip away in the blink of an eye!
The UConn Home & Garden Education Center supports UConn Extension’s mission by providing answers you can trust with research-based information and resources. For gardening questions, contact us toll-free at (877) 486-6271, visit our website at homegarden.cahnr.uconn.edu, or reach out to your local UConn Extension center at cahnr.uconn.edu/extension/locations.

By Nora Doonan, UConn Soil Science Graduate Student, Department of Plant Science & Landscape Architecture
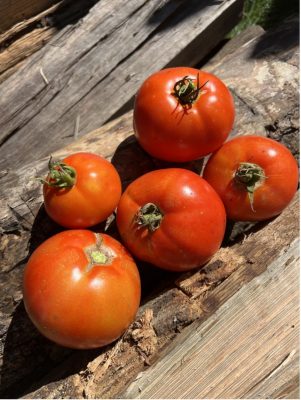
It can be frustrating to put time and energy into growing tomatoes, only to find that your tomatoes have developed blossom-end rot. Blossom-end rot is a physiological disorder that commonly affects tomato plants, characterized by a black, sunken spot on the fruit. This disorder is caused by insufficient calcium as a result of nutrient and water management challenges. Blossom-end rot can also affect peppers, eggplants, squash, and watermelons. In tomatoes, it is commonly seen on larger and elongated varieties, which can have a greater demand for calcium. Calcium is an essential plant nutrient that is required for proper growth, especially for the development of cell walls in the tomato fruit. When a fruiting tomato plant experiences calcium deficiency, the cell wall can collapse and show the appearance of blossom-end rot. Soil tests can reveal if your soil has sufficient levels of calcium and can determine if your soil pH is optimal for nutrient availability.
Oftentimes, the soil is sufficient in calcium levels, but blossom-end rot still occurs. Blossom-end rot can be closely associated with soil moisture that is too wet or too dry. The soil should never dry out completely. It is important to water regularly to ensure that plants receive 1 to 2 inches of water a week. A cycle of dryness followed by overwatering is only promoting calcium deficiency in the plant. If soil is too saturated, there may be insufficient oxygen levels in the soil that can affect the roots’ ability to take up water and nutrients.
One method of maintaining optimal soil moisture is to mulch tomato plants with an organic mulch, such as wood chips or straw, after the soil has warmed up. This will help to prevent excessive evaporation and drying of the soil. Another method is to plant tomatoes in a mound of soil that is high in organic matter or compost. Organic matter can retain soil moisture and provide adequate drainage.
There are other factors that can affect calcium uptake by the plant, such as high concentrations of ammonium, potassium, and magnesium in the soil. This can be caused by over fertilization. Specifically, over fertilizing with nitrogen can promote excessive production of leaves in the tomato plant, which can preferentially distribute calcium to the leaves rather than the fruit.
Calcium movement in the plant is dependent on transpiration, which is the loss of water to the atmosphere from plant leaves, stems, and flowers. Calcium is taken up through the roots and relies on water flow through the xylem for transport through the plant. This movement of water through the xylem is driven by the process of transpiration. Calcium is not redistributed from the leaves to the fruit. In addition, the overfertilization of ammonium, potassium, and magnesium can allow for competition in root uptake of calcium because they are all positive cations. Damages to roots, caused by fertilizer burns or cultivation, can also be a factor in impairing nutrient and water uptake. To prevent blossom-end rot through fertilization practices, apply fertilizer as recommended by a soil test and apply nitrogen fertilizers in the form of nitrate, rather than ammonium.
Any affected fruits can be removed from the plant, as they will continue to drain moisture and calcium for development from other fruits. A foliar application of calcium can be made to the leaves when the fruit is young, but it is not the most effective method, since calcium in the leaves is relatively immobile. The goal is to prevent the need for foliar application through water and nutrient management across the tomato plant growth stages. Hopefully these methods will allow you to prevent blossom-end rot starting at beginning stages of growth, so that you can enjoy a bounty of beautiful, red tomatoes.
The UConn Home & Garden Education Center supports UConn Extension’s mission by providing answers you can trust with research-based information and resources. For gardening questions, contact us toll-free at (877) 486-6271, visit our website at homegarden.cahnr.uconn.edu, or reach out to your local UConn Extension center at cahnr.uconn.edu/extension/locations.