Episode 166: Managing Invasive Plants
UConn 360– Lauren Kurtz discusses invasive plant management and the new Invasive Species Certificate Program.
Web cookies (also called HTTP cookies, browser cookies, or simply cookies) are small pieces of data that websites store on your device (computer, phone, etc.) through your web browser. They are used to remember information about you and your interactions with the site.
Session Management:
Keeping you logged in
Remembering items in a shopping cart
Saving language or theme preferences
Personalization:
Tailoring content or ads based on your previous activity
Tracking & Analytics:
Monitoring browsing behavior for analytics or marketing purposes
Session Cookies:
Temporary; deleted when you close your browser
Used for things like keeping you logged in during a single session
Persistent Cookies:
Stored on your device until they expire or are manually deleted
Used for remembering login credentials, settings, etc.
First-Party Cookies:
Set by the website you're visiting directly
Third-Party Cookies:
Set by other domains (usually advertisers) embedded in the website
Commonly used for tracking across multiple sites
Authentication cookies are a special type of web cookie used to identify and verify a user after they log in to a website or web application.
Once you log in to a site, the server creates an authentication cookie and sends it to your browser. This cookie:
Proves to the website that you're logged in
Prevents you from having to log in again on every page you visit
Can persist across sessions if you select "Remember me"
Typically, it contains:
A unique session ID (not your actual password)
Optional metadata (e.g., expiration time, security flags)
Analytics cookies are cookies used to collect data about how visitors interact with a website. Their primary purpose is to help website owners understand and improve user experience by analyzing things like:
How users navigate the site
Which pages are most/least visited
How long users stay on each page
What device, browser, or location the user is from
Some examples of data analytics cookies may collect:
Page views and time spent on pages
Click paths (how users move from page to page)
Bounce rate (users who leave without interacting)
User demographics (location, language, device)
Referring websites (how users arrived at the site)
Here’s how you can disable cookies in common browsers:
Open Chrome and click the three vertical dots in the top-right corner.
Go to Settings > Privacy and security > Cookies and other site data.
Choose your preferred option:
Block all cookies (not recommended, can break most websites).
Block third-party cookies (can block ads and tracking cookies).
Open Firefox and click the three horizontal lines in the top-right corner.
Go to Settings > Privacy & Security.
Under the Enhanced Tracking Protection section, choose Strict to block most cookies or Custom to manually choose which cookies to block.
Open Safari and click Safari in the top-left corner of the screen.
Go to Preferences > Privacy.
Check Block all cookies to stop all cookies, or select options to block third-party cookies.
Open Edge and click the three horizontal dots in the top-right corner.
Go to Settings > Privacy, search, and services > Cookies and site permissions.
Select your cookie settings from there, including blocking all cookies or blocking third-party cookies.
For Safari on iOS: Go to Settings > Safari > Privacy & Security > Block All Cookies.
For Chrome on Android: Open the app, tap the three dots, go to Settings > Privacy and security > Cookies.
Disabling cookies can make your online experience more difficult. Some websites may not load properly, or you may be logged out frequently. Also, certain features may not work as expected.
Episode 166: Managing Invasive Plants
UConn 360– Lauren Kurtz discusses invasive plant management and the new Invasive Species Certificate Program.
By Emily Leahy and Dr. Nick Goltz, UConn Home Garden Education Office

We all know that old saying, “April showers bring May fungi!” (No? Just me?). All joking aside, you may have noticed that the recent wet spring weather lead many fungi to break dormancy, release spores, and wind up in new places. While growers and gardeners often find themselves preparing for the season by promoting airflow between plants, increasing soil drainage, and applying preventive fungicides when really needed, it’s hard to deny the spectacle of spring fungi and the beauty they bring to our spring gardens; and few are as spectacular as cedar rusts (Again, only me?)!
Cedar rusts are flashy diseases caused by multiple species of the fungi in the genus Gymnosporangium. In the case of cedar apple rust, a disease we see all the time here in Connecticut, the causal agent is the fungus Gymnosporangium juniper-virginianae. Gymnosporangium is a group of heteroecious fungi, meaning that they require two hosts to complete their life cycles. Species within the Juniperus genus are primary hosts of cedar rusts with plants such as apple, crabapple, hawthorn, or quince usually serving as a secondary host, though close relatives such as pear or chokeberry may occasionally be seen with cedar rust.
Spores – small reproductive structures produced by fungi – are released from fungal structures to infect other hosts. Cedar rusts, attention seekers that they are, utilize multiple types of spores to get to their host plants of choice. Beginning with the secondary hosts in late summer, spores called aeciospores are produced and distributed by wind and rain, traveling to inoculate nearby juniper trees. Wet, mild weather in early fall creates the perfect conditions for these aeciospores to germinate, eventually resulting in the formation of large galls on the primary host.
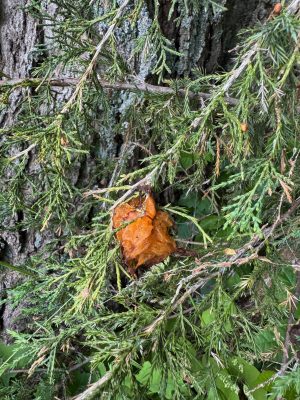
Juniper galls are irregularly shaped structures on the plant and range in color from gray to dark red. Circular indentations are present on the gall’s surface, through which bizarre looking telial horns protrude in the spring the year after the host is first inoculated with the disease. These structures are first colored dark brown and have a dry appearance but later become gelatinous and bright orange as they mature and expand for a brief time during moist spring conditions. The surfaces of telial horns are coated in teliospores which later germinate to form the next important player in the cedar apple rust disease cycle, basidiospores. After releasing spores, the telial horns will dry up and fall off. The basidiospores are then distributed by wind and rain to inoculate secondary hosts such as apples or crabapples. Immature leaves with wet surfaces are the most susceptible targets for infection.
The next stage of the disease cycle kicks off with yellow-orange lesions that appear on the upper surfaces of leaves. A halo of red tissue may surround the edges of these spots, giving a dramatic bullseye appearance. Tiny, raised, fungal structures known as pycnia develop within the leaf lesions and on fruit surfaces. Pycnia produce pycniospores (notice a theme here?), which leads to the development of aecia during mid-summer. Yellow or brown lesions appear on the underside of leaves, from which the tubular aecia and of course, their aeciospore-covered surface, protrudes. During late summer under dry environmental conditions, aeciospores are released and travel to nearby juniper hosts where the disease cycle begins again.
You might be thinking, “enough with the spore-talk! What should I do about cedar rusts if I see signs of them?” Rest easy - although cedar rust fungi are complex and dramatic, they typically don’t cause lasting harm, and there are plenty of management strategies available to mitigate their damage. Pruning can be used to promote airflow and eliminate galls from junipers before telial horns have an opportunity to develop, and appropriate fungicides may be applied to secondary hosts as a preventative measure. And for those thinking of purchasing a new tree, know that many apple and crabapple cultivars are available at the nursery with various levels of resistance to cedar rust.
Have a question about plants? The UConn Home Garden Education Office supports UConn Extension’s mission by providing answers you can trust with research-based information and resources. For gardening questions, contact us toll-free at (877) 486-6271, visit our website at homegarden.cahnr.uconn.edu, or reach out to your local UConn Extension Center at extension.uconn.edu/locations.
This article was published in the Hartford Courant May 30, 2026
Do Eggshells Actually Help Your Roses Grow? Here’s What a Gardener Says
The Spruce – Heather Zidack discusses how Egg Shells are best used in the garden, and things to consider before adding them!
By. Dr. Lauren Kurtz, UConn Home Garden Education Office

Chaos gardening is a growing social media trend that encourages gardeners to relinquish control, scatter assorted seeds, step back, and see what happens. Instead of carefully spacing plants and planning layouts, chaos gardeners toss seeds and let nature decide what grows where. The results can vary widely, ranging from a surprising assortment of plants to a patch of disappointment.
Unlike traditional gardening, this approach emphasizes spontaneity over structure. For many, the appeal lies in its simplicity. Chaos gardening is easy to start, requires minimal knowledge, and often relies on leftover or inexpensive seed packets. The low-stakes, experimental nature makes it especially attractive to busy people or those new to gardening.
Still, the trend raises valid questions. Without site preparation or ongoing care, how well can seeds establish? And does “letting go” invite weeds into the garden under the guise of wildscaping?
In practice, chaos gardening often produces mixed results. While the concept is appealingly simple, success rates can be low, and plantings may struggle to persist long term. Still, gardeners interested in the trend can improve their chances of success by following a few simple suggestions.
Avoid using this approach in large or prominent spaces. Start small, either in a container or a less visible area of the yard. To maintain a sense of experimentation, while increasing success, consider focusing on a single species at a time or scattering spring bulbs through an existing lawn. Tossing out a packet of “wildflower” seeds may sound charming, but it will not produce an instant, picture-perfect meadow. More often, it results in a steadfast patch of mugwort.
Even with a relaxed approach, a bit of planning goes a long way. Key factors such as sunlight and soil conditions still matter. The principle of “right plant, right place” applies regardless of gardening style. Identifying site conditions, selecting appropriate species, and preparing the planting bed can significantly improve outcomes.
Gardeners should also approach seed mixes labeled “wildflower,” “pollinator-friendly,” or “native” with some caution. While not inherently problematic, these mixes can contain species that are poorly suited to local conditions. A quick review of the species on the list can help inform decisions about whether the plants are suited to the region or growing conditions.
Learning how to recognize seedlings, including common weeds and invasive plants, is another important step. Early identification allows gardeners to remove undesirable species before they establish. Observing which plants succeed can also guide future efforts, gradually transforming a disorderly patch into a more reliable and productive space.
Patience is essential. Many perennials grown from seed take more than one season to flower. Including a mix of annuals and perennials can help maintain visual interest while longer-lived plants establish. As with any gardening method, some trial and error is expected.
Chaos gardening may never replace traditional approaches, but it offers an accessible entry point for beginners and a creative outlet for experienced growers. With a balance of spontaneity and informed decision-making, even an unstructured planting can become a living experiment.
The UConn Home Garden Education Office supports UConn Extension’s mission by providing answers you can trust with research-based information and resources. For gardening questions, contact us toll-free at (877) 486-6271, visit our website at homegarden.cahnr.uconn.edu, or reach out to your local UConn Extension Center at extension.uconn.edu/locations.
This article was published in the Hartford Courant May 24, 2026
These are damaging plants to avoid in CT gardens. They can kill native plant species and take over.
The Hartford Courant – Dr. Lauren Kurtz discusses how native plants attract birds and pollinators, while invasive species harm ecosystems and what residents can do in their own gardens.
By Dr. Lauren Kurtz, UConn Home Garden Education Office

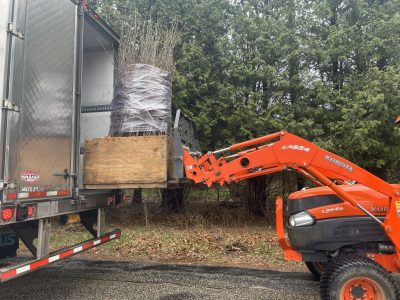
Bare root trees and shrubs, as the name suggests, are not sold in a pot or balled and burlapped. At the nursery bare root plants are grown in the ground, harvested as young plants, and sold without soil surrounding the roots. They are sold while the plant is dormant, usually in late winter or early spring and are best planted while they are still dormant or just before bud break. Historically, they have been used for agriculture or conservation plantings but they are also suitable for the home landscape. Bare root trees and shrubs are a great choice if you need a lot of plant material or are on a tight budget.
Consider using bare root trees and shrubs to provide structure in your garden, to create wildlife habitat, for erosion control, or to start your home orchard or tree farm. Additionally, bare root plants are perfect for planting a hedge because they are similar in size, establish quickly, and don’t require too much digging. They will take longer to fill in the hedge than containerized plants, but they will cost a lot less money. Many popular landscape trees and shrubs are available as bare root plants.
Choose a reputable nursery or grower, preferably one that is growing regionally adapted plants. In New England, choose a grower in the Northeastern United States. When choosing species to purchase, have planting goals in mind. These goals can be those previously mentioned or other goals like revegetating an area with native plants after removing invasive plants. As with any planting project, consider the right plant for the right place. Choose species that are suited to the growing conditions of the planting area. Consider sun exposure, soil characteristics, hardiness zone, plant size at maturity, and location of underground utilities.
Before purchasing bare root plants, have a plan with all the above considerations addressed. Unlike containerized plants, bare root plants have a very specific and narrow timeline for purchasing and planting. They are typically shipped in the early spring, around the time they should be planted.
To keep plants dormant before planting, they can be placed in the fridge or in an unheated garage or basement. They can be stored dormant in the original shipping package for no more than two weeks before planting. Mist the roots every few days so they do not dry out during cold storage.
Planting bare root plants is done in the early spring before buds open or late fall after the plant goes dormant but before the ground freezes. As with all trees and shrubs, they should not be planted too deep. The root flare, or transitional part of the plant between the roots and stem, should be level with the soil. Add a layer of mulch or compost but avoid piling mulch too high up the trunk. Water weekly, or more often under dry conditions, during the first year after planting. Protection from deer and rodents is important when planting young tender trees and shrubs. Use a tree tube or fencing to discourage browsing.
The UConn Home Garden Education Office supports UConn Extension’s mission by providing answers you can trust with research-based information and resources. For gardening questions, contact us toll-free at (877) 486-6271, visit our website at homegarden.cahnr.uconn.edu, or reach out to your local UConn Extension Center at extension.uconn.edu/locations.
This article was published in the Hartford Courant February 21, 2026
By Dr. Avishesh Neupane, UConn Soil Nutrient Analysis Lab

If you spread compost on your garden this year, there is a good chance you added a little plastic, too. Researchers around the world are now finding microplastics – tiny plastic fragments and fibers smaller than a grain of rice – in garden soils and compost products that look perfectly normal to the naked eye. In one recent study of commercial composts, every single one of the 11 products tested contained microplastics, with cleaner, eco-labeled brands still showing lower but measurable levels.
That raises a fair question for Connecticut homeowners: Should you worry about microplastics in your yard? The short answer is don’t panic, but don’t ignore it either. Microplastics are not a crisis that should send you ripping out your raised beds, but they are a good reason to be mindful about how plastic moves through our gardens and to be choosy about what we bring in.
Microplastics in garden soil mostly come from everyday sources. Composts and organic fertilizers made from mixed municipal waste or sewage sludge can carry plastic fragments and fibers, and biosolid-based fertilizers have been identified as a major pathway for microplastics into farm and lawn soils. Plastic-coated, slow-release fertilizers can contribute microplastics as their coatings weather and break down. In yards and gardens, plant tags, synthetic twine, netting, and landscape fabric can also fragment into tiny pieces when mixed into soil or added to the compost pile. On top of that, particles from tire wear, litter, and degraded plastics elsewhere can settle out of the air or arrive with runoff.
Scientists are still figuring out the full story, but some patterns are emerging. Lab and greenhouse studies show that plastic particles can affect earthworms and microbes and, in some cases, reduce seed germination, root growth, and nutrient uptake. What this means for a typical Connecticut backyard is still being studied, and while the highest documented levels of microplastics are in intensively treated farm soils, we don’t yet have enough data to say exactly how home gardens compare. Based on what we know so far, microplastics don’t appear to be an immediate emergency in your yard, but they are a good reason to take soil seriously and to reduce plastic input wherever you can. You can’t control every particle that drifts in on the wind, but you can control much of what you deliberately put on your soil and avoid adding unnecessary plastic to a system you want to keep healthy for decades.
One of the biggest questions for homeowners is whether these particles enter food crops in significant amounts. While lab studies show that tiny plastic particles can interact with roots and potentially enter plant tissues, scientists are still working to understand how often this happens in a typical backyard and what it actually means for human health. For now, most scientists emphasize source control, i.e., reducing inputs, as the most practical step. That is something gardeners are already good at: choosing better materials, building healthy soil, and asking hard questions about what they buy.
Simple shifts in what you apply to your yards can greatly reduce microplastic inputs. Be choosy about compost and soil amendments. Ask what went into bagged or bulk compost, and favor products made from yard waste, leaves, or clean food scraps over those blended with municipal solid waste or sewage sludge. Avoid fertilizers and composts listing “biosolids,” “sewage sludge,” or “municipal residuals,” which are known sources of microplastics. Rethink plastic-coated fertilizers, as their coatings break down into microplastics. Keep plastic out of your compost stream by removing plant tags, synthetic twine, and landscape fabric scraps whenever you can. Skip thin plastic mulches and cheap fabrics and use shredded leaves, wood chips, cardboard, or durable, reusable barriers. And don’t underestimate your own leaves and grass clippings; they are low in plastic, build organic matter and structure, and improve soil without adding new plastic sources. We may not be able to garden without any plastic in the 21st century, but we can make sure that the soil under our feet isn’t quietly becoming a plastic landfill in slow motion.
Connecticut has not yet written microplastic standards for garden products, but the state has moved aggressively on a closely related issue. As of October 1, 2024, Connecticut banned the use or sale of any soil amendment made from biosolids or wastewater sludge that contains PFAS (per- and polyfluoroalkyl substances, a group of persistent “forever chemicals”), and on July 1, 2025, extended the ban to PFAS-containing biosolid fertilizers. Those laws are aimed at chemicals, not microplastics, but they target many of the same products. To read more about this law, read our article here.
The UConn Home Garden Education Office supports UConn Extension’s mission by providing answers you can trust with research-based information and resources. For gardening questions, contact us toll-free at (877) 486-6271, visit our website at homegarden.cahnr.uconn.edu, or reach out to your local UConn Extension Center at extension.uconn.edu/locations.
This article was published in the Hartford Courant February 7, 2026
By Dr. Avishesh Neupane, UConn Soil Nutrient Analysis Lab
Every spring, I see the same scene in garden centers. Carts piled high with lime, fertilizer, gypsum, compost-in-a-bag, and something in a shiny package that promises instant results. When I chat with home gardeners, I often ask: How did you decide you needed all of that? Most of the time, the answer is, “I don’t really know. It looked helpful.” As someone who works with soil tests every day, I see the other side of that story. I see the lawn with three times more phosphorus than it needs. The vegetable bed that gets lime every year, even though the pH is already high.
A lot of this comes down to a few myths that are passed down by neighbors, family, and well-meaning advice on the internet. But they quietly drain gardeners’ wallets and sometimes weaken the very plants people are trying to help. Here are five of the most common myths, and what to do instead.
Plants will try their best in less-than-ideal conditions. By the time plants show clear distress, the problem is often advanced. pH has drifted far from the ideal range. One nutrient is so high that it is starting to interfere with others. In the lab, I see plenty of samples from landscapes that “seem fine,” where the numbers tell a very different story. I also see the opposite. People are convinced their soil is terrible, but the test says they are in good shape and only need minor tweaks.
This myth costs money because skipping the test means guessing. Guessing leads to buying products you do not need and missing the changes that would help the most. A better approach is to test your soil every few years, or sooner if you are starting something new. A good test provides clear recommendations matched to what you are growing.
People worry they are not fertilizing enough, so “a little extra” feels like good insurance. Extra nutrients do not automatically translate to extra health. Instead, excess fertilizer can burn roots and foliage, push lush but weak growth that attracts pests and disease, and wash into streams and lakes where it fuels algae blooms, harming the environment.
This myth costs money as you are paying for nutrients your plants cannot use. You may also pay later for disease control or to repair damaged turf and stressed garden beds. A better approach is to view soil test recommendations as a ceiling, not a suggestion to exceed.
Many people learned that you “always lime the lawn in the fall.” As many native New England soils are naturally acidic, lime can be important in the right amount and in the right places. But I also see plenty of tests where pH is already in the upper 6s or above 7, and the lawn is still getting lime out of habit.
When pH gets too high for the plants, iron and other micronutrients become less available. Acid-loving plants like blueberries and rhododendrons struggle. This myth costs money twice. First, you pay for lime, then you may pay to fix the problems caused by a high pH. A better approach is to test soil pH and apply only when it is recommended.
Clay dries slowly in spring, sticks to tools when wet, and can feel like a brick when dry. A bag of sand looks like an easy fix, but mixing a little sand into a lot of clay does not make loam. It often makes something closer to concrete. What truly helps clay is organic matter. Compost and well-rotted manure can loosen heavy soils, improve drainage, and support healthier soil structure and biology.
This myth costs money because you buy sand, haul it around, and see little improvement. For most home gardens, adding organic matter works much better.
Big bags and bulk deliveries of “topsoil,” “garden soil,” or “planting mix” can feel like a shortcut to perfect beds. Sometimes they are excellent, but at other times they are basically subsoil with a nicer name, which can cause problems like high salt levels, unbalanced nutrients, or a pH far from the target.
This myth costs money because poor-quality material means paying twice. Once to bring it in, and again to correct it. A better approach is to ask suppliers what is in the mix and how it is produced. And whenever possible, improve the soil you already have.
The common thread in all five myths above is that we reach for products before we understand the soil. If you start with a test, you can skip lime when your pH is already in range, cut back on fertilizer where nutrients are high, and put your time and money into the changes that will actually move the needle. That is better for your plants, your budget, and the rivers and lakes downstream. Your garden does not need every product on the shelf. It just needs the right help at the right time.
The UConn Home & Garden Education office supports UConn Extension’s mission by providing answers you can trust with research-based information and resources. For gardening questions, contact us toll-free at (877) 486-6271, visit our website at homegarden.cahnr.uconn.edu, or reach out to your local UConn Extension Center at extension.uconn.edu/locations.
This article was published in the Hartford Courant January 4, 2026
By Dr. Avishesh Neupane, UConn Soil Nutrient Analysis Lab
When I was a graduate student from Nepal living in New Haven from 2012 to 2014, I kept noticing the same winter aftereffect across town. Along busy streets, the first foot of lawn by the pavement turned yellow and matted, and the road-facing sides of yews and hollies burned while the yard sides looked fine. Coming from a place that does not spread salt each winter, it felt backward. We made the road safer, but the plants and soil paid the price. At UConn’s Soil Nutrient Analysis Lab, we hear versions of this every spring. People send soil from a strip along the road or from a bed near the driveway and say that spot never greens up like the rest.
You have also likely noticed the symptoms. Fine particles form a crust on the soil surface where water evaporates. Turf browns right at the pavement edge. Buds on the roadside of a shrub fail to break. Evergreens brown on the street side when traffic spray carries salty water, while the interior needles stay green. Vegetable beds that sit too close to plow piles can exhibit poor emergence, tip burn, or slow growth, even when the rest of the garden appears fine.
Sodium chloride (rock salt) is the most widely used deicer. Once it dissolves, it separates into sodium (Na⁺) and chloride (Cl⁻). Chloride is highly mobile. It moves with meltwater, so in a wet spring, it can leach through the soil and, where conditions allow, reach groundwater, affecting well water quality.
Sodium changes how soil behaves. In healthy soil, calcium and magnesium sit on exchange sites; repeated sodium inputs displace them, sealing the surface, reducing infiltration, and making the soil feel tighter right where plants already struggle. Sodium also competes with potassium uptake, so salt-burned spots can look nutrient-deficient even when tests show adequate levels.
Alternatives to sodium chloride are often less harsh but cost more. Magnesium chloride and calcium chloride melt at lower temperatures but still add chloride and can injure plants and corrode concrete and metal. Calcium magnesium acetate (CMA) is chloride-free and generally gentler, yet it’s pricier and harder to find.
If you inform the lab that the sample is from a salt-affected area (such as a roadside, plow pile, or splash zone), they will interpret the numbers with that history in mind and, if necessary, use the appropriate salinity method for your sample.

Start with prevention. Before winter, top-dress the first 1–2 feet along the road with a thin layer of compost to improve structure and exchange capacity. Keep that strip covered, overseed thin turf, or use a salt-tolerant edge, and ask the plow operator to place piles where meltwater drains to the street or to vegetation that isn’t over your well line. Where meltwater goes matters as much as how much salt you use.
After winter, fix what the season left behind. If the roadside sample shows elevated EC, lightly loosen any compacted or crusted soil so that water can infiltrate. Then, leach the area with two or three deep soakings a few days apart to push salts below the main root zone. If a hedge or shrub burns on the roadside year after year, consider moving it back or replacing the front row with more salt-tolerant plants.
For chronic hotspots, shift from one-time flushing to long-term protection: use less deicer, keep piles away from beds and wells, maintain dense groundcover in the first foot along pavement, and in harsh exposures, consider stone mulch plus seasonal compost topdressing to help the soil rebound.
If your well water tastes salty, check the state’s road-salt guidance and contact your town. When the damage is limited to curb strips or driveway beds, soil testing and better winter practices usually solve it.
The UConn Home & Garden Education Center supports UConn Extension’s mission by providing answers you can trust with research-based information and resources. For gardening questions, contact us toll-free at (877) 486-6271, visit our website at homegarden.cahnr.uconn.edu, or reach out to your local UConn Extension center at extension.uconn.edu/locations.
This article was published in the Hartford Courant November 23, 2025
By Heather Zidack, UConn Home & Garden Education Center

It’s already November! It doesn’t seem like that long ago when we were giving advice about seeding lawns and watering in new fall plantings. Now that the time has changed, the days feel shorter, and the nights are getting colder, it’s important to remember to take the time to properly store your garden equipment and accessories before locking up the shed for the season.
Freezing temperatures are on the way fast. Drain and roll up any hoses to remove tripping hazards from the landscape. Store them inside a garage or shed to keep them out of the elements and lengthen their lifespan of use in the garden. Make sure that your outdoor water systems are properly winterized. Whether that means flushing your irrigation system, or simply shutting off your outside water, don’t forget this important step to protect your pipes! Once lines are turned off, open external valves to relieve any remaining pressure.
Water can not only wreak havoc on pipes but many garden accessories, too. A glass rain gauge left outside can and will freeze and shatter outdoors. Ceramics like pottery and bird baths are susceptible to cracking, so store them either in the shed or upside down in a sheltered area. Stash your garden gnomes, garden flags and solar pathway lights to protect them from fading and damage. Brittle cold, freezing water, and a careless throw of the snow shovel could spell disaster for garden décor left out in the open.
Inside the shed, take a quick inventory. Leftover seed or bagged mulch could be rodent attractants. Seeds should be stored in areas safe from extreme temperatures to preserve germination rates. Bird seed should be stored in animal proof containers. Chemical products like pesticides and fertilizers may be adversely affected by temperature fluctuations and freezing. They could also make a real mess if a water-based or pressurized solution were to burst. Products leftover from the growing season should be evaluated and moved into a space safe from freezing temperatures. Product labels or manufacturers will have storage and disposal information to help you make the best decision about what to do with your garden chemicals at the end of the season.

Winter will be a great time to thoroughly clean, repair, and sharpen tools. Store them somewhere that is easy to get to later so you can make sure your tools are fresh for the new season! If you have to do the seasonal shed shuffle, this is also a great time to rotate the lawn mower and snow thrower to prepare for the first storms of the season.
Speaking of your gas-powered equipment, check your owner’s manuals for winterizing recommendations and instructions to help maintain the life and quality of your equipment. You may need specific maintenance before long term storage. Contact a professional for any maintenance tasks that you do not feel confident performing on your own.
If you’re running out of space in the shed and garage, consider covering lawn furniture with UV and mildew resistant covers. Take down awning covers and temporary structures. I, myself, have fallen victim to the false sense of security of a mild winter, only to be devastated by the collapse of my garden tent in the first, albeit belated, heavy snow.
While all of this seems like common sense, the mad dash from here to the holidays will have many of us pulled in different directions. Our equipment, tools, and garden infrastructure are some of the biggest investments we put into our gardens. Hopefully this short checklist will help you knock out those last few chores that come with maintaining a four season New England garden.
The UConn Home & Garden Education Center supports UConn Extension’s mission by providing answers you can trust with research-based information and resources. For gardening questions, contact us toll-free at (877) 486-6271, visit our website at homegarden.cahnr.uconn.edu, or reach out to your local UConn Extension center at extension.uconn.edu/locations.
This article was published in the Hartford Courant November 8, 2025